RacecapturePro MK3 hardware install: Difference between revisions
(WIP) |
No edit summary |
||
| Line 4: | Line 4: | ||
=Connections= | =Connections= | ||
==Main Connector | [[file:RaceCapturePro_MK3_Rear_Diagram.png]] | ||
==Main Connector== | |||
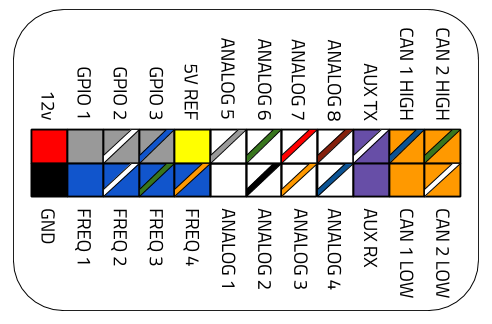
The main connector provides access to all power, sensor and communications connections for the RaceCapture/Pro system. | |||
[[file:RaceCapturePro_MK3_Molex_pinout.png]] | [[file:RaceCapturePro_MK3_Molex_pinout.png]] | ||
{| class="wikitable" style="text-align:center; width:700px; height:200px;" | |||
|+ RaceCapture/Pro MK3 connector pinout | |||
|- | |||
! colspan="2" | Power | |||
|- | |||
! Connection | |||
! Color | |||
|- | |||
| 12v | |||
| Red | |||
|- | |||
| Ground | |||
| Black | |||
|- | |||
! colspan="2" | Frequency / RPM sensor inputs | |||
|- | |||
| Blue | |||
| Frequency / RPM input 1 | |||
|- | |||
| Blue / White stripe | |||
| Frequency / RPM input 2 | |||
|- | |||
| Blue / Green Stripe | |||
| Frequency / RPM input 3 | |||
|- | |||
| Blue / Orange Stripe | |||
| Frequency / RPM input 4 | |||
|- | |||
! colspan="2" | Voltage Reference | |||
|- | |||
| Yellow | |||
| +5v voltage reference | |||
|- | |||
! colspan="2" | Analog Sensor Inputs | |||
|- | |||
| White | |||
| Analog Input 1 | |||
|- | |||
| White / Black Stripe | |||
| Analog Input 2 | |||
|- | |||
| White / Orange Stripe | |||
| Analog Input 3 | |||
|- | |||
| White / Blue Stripe | |||
| Analog Input 4 | |||
|- | |||
| White / Gray Stripe | |||
| Analog Input 5 | |||
|- | |||
| White / Green Stripe | |||
| Analog Input 6 | |||
|- | |||
| White / Red Stripe | |||
| Analog Input 7 | |||
|- | |||
| White / Brown Stripe | |||
| Analog Input 8 | |||
|- | |||
! colspan="2" | General Purpose Input / Output (GPIO) | |||
|- | |||
| Gray | |||
| GPIO 1 | |||
|- | |||
| Gray / White Stripe | |||
| GPIO 2 | |||
|- | |||
| Gray / Blue Stripe | |||
| GPIO 3 | |||
|- | |||
! colspan="2" | Auxiliary Serial Input | |||
|- | |||
| Purple / White Stripe | |||
| Auxiliary RS232 Serial TX | |||
|- | |||
| Purple | |||
| Auxiliary RS232 Serial RX | |||
|- | |||
! colspan="2" | CAN Bus | |||
|- | |||
| Orange / Blue Stripe | |||
| CAN 1 High | |||
|- | |||
| Orange | |||
| CAN 1 Low | |||
|- | |||
| Orange / Green Stripe | |||
| CAN 2 High | |||
|- | |||
| Orange / White Stripe | |||
| CAN 1 Low | |||
|} | |||
===Plug Connector Type=== | |||
The connector is a standard 24 pin Molex Mini Fit Jr. | |||
* '''Plug Housing:''' Molex Mini Fit Jr 39012240 | |||
* '''Compatible Pins:''' Molex 46018-1541 or 46018-1541 | |||
* '''ProTip''': a 24 pin Molex harness from a computer power supply can also work as a secondary wiring harness | |||
==GPS== | ==GPS== | ||
Connect the included GPS antenna to this port. | Connect the included GPS antenna to this port. | ||
* '''Note''' Tighten this connection to '''5-6 inch/lbs''' (just beyond finger tight). '''Do not over torque''' | * '''Note:''' Tighten this connection to '''5-6 inch/lbs''' (just beyond finger tight). '''Do not over torque''' | ||
==Cellular Telemetry== | ==Cellular Telemetry== | ||
If optioned with the 3.5G real-time cellular telemetry module, connect the cellular antenna to this port. | If optioned with the 3.5G real-time cellular telemetry module, connect the cellular antenna to this port. | ||
* '''Note''' Tighten this connection to '''5-6 inch/lbs''' (just beyond finger tight). '''Do not over torque''' | * '''Note:''' Tighten this connection to '''5-6 inch/lbs''' (just beyond finger tight). '''Do not over torque''' | ||
==Antenna Placement Guide== | |||
===GPS=== | |||
For optimal GPS reception, install GPS antenna with a clear 360 degree view of the sky, such as on the roof of the vehicle. | |||
===Cellular antenna=== | |||
For optimal cellular performance, install the cellular antenna on the roof of the vehicle, using the roof as a ground plane. | |||
===Antenna separation=== | |||
It's recommended you separate the GPS and cellular antennas as reasonably far apart as possible, such as mounting at opposite ends of the roof. | |||
[[file:RaceCapture_Pro_MK3_antenna_install.png]] | |||
* '''Note:''' - about 3 foot / 1 meter separation is ideal. | |||
==RJ45 CAN + Power connection== | ==RJ45 CAN + Power connection== | ||
Revision as of 04:08, 25 March 2017
Installation
Orientation
Connections
Main Connector
The main connector provides access to all power, sensor and communications connections for the RaceCapture/Pro system.

| Power | |
|---|---|
| Connection | Color |
| 12v | Red |
| Ground | Black |
| Frequency / RPM sensor inputs | |
| Blue | Frequency / RPM input 1 |
| Blue / White stripe | Frequency / RPM input 2 |
| Blue / Green Stripe | Frequency / RPM input 3 |
| Blue / Orange Stripe | Frequency / RPM input 4 |
| Voltage Reference | |
| Yellow | +5v voltage reference |
| Analog Sensor Inputs | |
| White | Analog Input 1 |
| White / Black Stripe | Analog Input 2 |
| White / Orange Stripe | Analog Input 3 |
| White / Blue Stripe | Analog Input 4 |
| White / Gray Stripe | Analog Input 5 |
| White / Green Stripe | Analog Input 6 |
| White / Red Stripe | Analog Input 7 |
| White / Brown Stripe | Analog Input 8 |
| General Purpose Input / Output (GPIO) | |
| Gray | GPIO 1 |
| Gray / White Stripe | GPIO 2 |
| Gray / Blue Stripe | GPIO 3 |
| Auxiliary Serial Input | |
| Purple / White Stripe | Auxiliary RS232 Serial TX |
| Purple | Auxiliary RS232 Serial RX |
| CAN Bus | |
| Orange / Blue Stripe | CAN 1 High |
| Orange | CAN 1 Low |
| Orange / Green Stripe | CAN 2 High |
| Orange / White Stripe | CAN 1 Low |
Plug Connector Type
The connector is a standard 24 pin Molex Mini Fit Jr.
- Plug Housing: Molex Mini Fit Jr 39012240
- Compatible Pins: Molex 46018-1541 or 46018-1541
- ProTip: a 24 pin Molex harness from a computer power supply can also work as a secondary wiring harness
GPS
Connect the included GPS antenna to this port.
- Note: Tighten this connection to 5-6 inch/lbs (just beyond finger tight). Do not over torque
Cellular Telemetry
If optioned with the 3.5G real-time cellular telemetry module, connect the cellular antenna to this port.
- Note: Tighten this connection to 5-6 inch/lbs (just beyond finger tight). Do not over torque
Antenna Placement Guide
GPS
For optimal GPS reception, install GPS antenna with a clear 360 degree view of the sky, such as on the roof of the vehicle.
Cellular antenna
For optimal cellular performance, install the cellular antenna on the roof of the vehicle, using the roof as a ground plane.
Antenna separation
It's recommended you separate the GPS and cellular antennas as reasonably far apart as possible, such as mounting at opposite ends of the roof.

- Note: - about 3 foot / 1 meter separation is ideal.
RJ45 CAN + Power connection
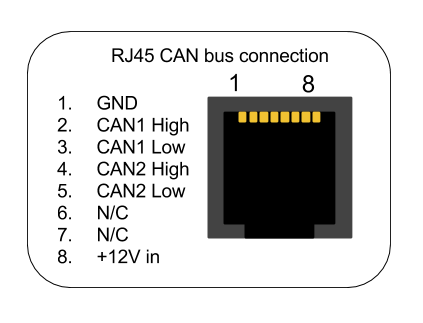
The RJ45 port provides connections for power and both CAN channels.
OBDII CAN cable
The RJ45 port is normally provided for the OBDII CAN cable accessory for a convenient plug and play OBDII connection
Custom Cable
You can also use a common RJ45 ethernet cable to provide power, ground and CAN bus data for a custom application.
| Connection | CAT5 EIA-T568B RJ45 cable |
|---|---|
| +12v | Brown |
| Ground | Orange/White |
| CAN 1 High | Orange |
| CAN 1 Low | Green/White |
| CAN 2 High | Blue |
| CAN 2 Low | Blue/White |
Note: These color codes assume EIA-T568B RJ45 cable (check printing on the cable to confirm)


