Megasquirt CAN: Difference between revisions
| (5 intermediate revisions by the same user not shown) | |||
| Line 1: | Line 1: | ||
=Megasquirt | =Megasquirt Integration= | ||
Channels enabled: | Channels enabled: | ||
| Line 9: | Line 7: | ||
* Manifold Absolute Pressure (MAP) | * Manifold Absolute Pressure (MAP) | ||
* Air/Fuel Ratio (AFR) | * Air/Fuel Ratio (AFR) | ||
* And more | |||
==Megasquirt Wiring== | ==Megasquirt Wiring== | ||
===RaceCapture/Apex=== | ===RaceCapture/Apex=== | ||
Use the CAN High and Low connections from either CAN1 or CAN2. Typically CAN1 is used, so you would use '''CAN 1 High''' and '''CAN | Use the CAN High and Low connections from either CAN1 or CAN2. Typically CAN1 is used, so you would use '''CAN 1 High''' and '''CAN 1 Low''. | ||
[[Image:RaceCaptureApex_can_bus_pinout.png|500px]] | [[Image:RaceCaptureApex_can_bus_pinout.png|500px]] | ||
===RaceCapture/Pro MK3=== | ===RaceCapture/Pro MK3=== | ||
Use the CAN High and Low connections from either CAN1 or CAN2 on the 24 pin Molex harness. Typically CAN1 is used, so you would use '''CAN 1 High''' and '''CAN | Use the CAN High and Low connections from either CAN1 or CAN2 on the 24 pin Molex harness. Typically CAN1 is used, so you would use '''CAN 1 High''' and '''CAN 1 Low''. | ||
[[Image:RaceCapture_Pro_MK3_Molex_CAN_pinout.png|500px]] | [[Image:RaceCapture_Pro_MK3_Molex_CAN_pinout.png|500px]] | ||
===RaceCapture/Pro MK2 | ===RaceCapture/Pro MK2 MK3 RJ45 and RaceCapture/Track (MK1 / MK2)=== | ||
You can use a standard CAT-5 ethernet cable with RJ45 connectors to integrate with RaceCapture/Pro MK2 and | You can use a standard CAT-5 ethernet cable with RJ45 connectors to integrate with RaceCapture/Pro MK2/MK3 and RaceCapture/Track MK2 | ||
* Note, RaceCapture/Track MK1 can be used, but you must wire it to CAN1 | |||
{| class="wikitable" style="text-align:center; width:700px; height:200px;" | {| class="wikitable" style="text-align:center; width:700px; height:200px;" | ||
| Line 76: | Line 73: | ||
[[Image:megasquirt_CAN_RCP.jpg|500px]] | [[Image:megasquirt_CAN_RCP.jpg|500px]] | ||
==Enable Megasquirt | ==Enable Megasquirt CAN broadcast== | ||
In TunerStudio, enable CAN | In TunerStudio, enable CAN mode and burn it to the controller. Once this is done, RaceCapture/Pro will be receiving CAN bus data from the Megasquirt. | ||
* '''Note''': Enable CAN broadcast at 1520 in Tuner Studio, and set CAN baud rate to 500K. | |||
==Megasquirt Preset== | ==Megasquirt Preset== | ||
| Line 84: | Line 83: | ||
[[image:RaceCapture_Megasquirt_CAN_mapping.png|600px]] | [[image:RaceCapture_Megasquirt_CAN_mapping.png|600px]] | ||
==Verifying== | |||
Once connected and with the preset loaded, navigate to the Dashboard screen in the RaceCapture app to verify data connectivity. | |||
==References== | ==References== | ||
* [http://www.msextra.com/doc/pdf/Megasquirt_CAN_Broadcast.pdf Full CAN bus mapping] | * [http://www.msextra.com/doc/pdf/Megasquirt_CAN_Broadcast.pdf Full CAN bus mapping] | ||
Revision as of 14:36, 31 March 2022
Megasquirt Integration
Channels enabled:
- Engine RPM (RPM)
- Throttle Position (TPS)
- Coolant Temperature (Coolant)
- Manifold Absolute Pressure (MAP)
- Air/Fuel Ratio (AFR)
- And more
Megasquirt Wiring
RaceCapture/Apex
Use the CAN High and Low connections from either CAN1 or CAN2. Typically CAN1 is used, so you would use CAN 1 High' and CAN 1 Low.
RaceCapture/Pro MK3
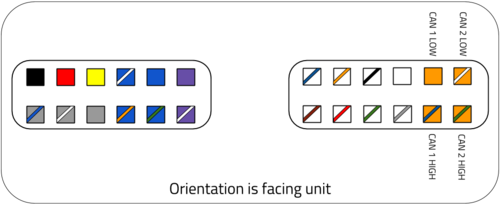
Use the CAN High and Low connections from either CAN1 or CAN2 on the 24 pin Molex harness. Typically CAN1 is used, so you would use CAN 1 High' and CAN 1 Low.
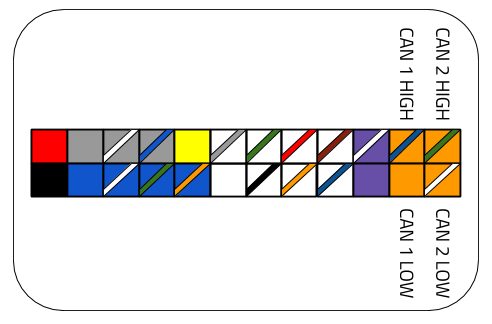
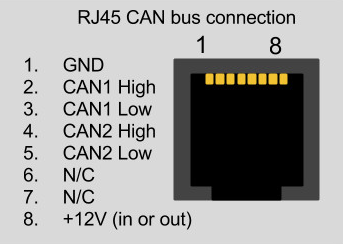
RaceCapture/Pro MK2 MK3 RJ45 and RaceCapture/Track (MK1 / MK2)
You can use a standard CAT-5 ethernet cable with RJ45 connectors to integrate with RaceCapture/Pro MK2/MK3 and RaceCapture/Track MK2
- Note, RaceCapture/Track MK1 can be used, but you must wire it to CAN1
| Connection | RaceCapture/Pro (RJ45 cable) |
|---|---|
| +12v | Brown |
| Ground | Orange/White |
| CAN 1 High | Orange |
| CAN 1 Low | Green/White |
These color codes assume EIA-T568B RJ45 cable (check printing on the cable to confirm)
- Note: If you have RaceCapture/Pro powered through the terminal block and grounded at the same location, all you need to wire are the two CAN ligh/CAN low connections. You do not need to separately connect ground and power via the RJ45 port.
Microsquirt
Connect RaceCapture CAN High / CAN Low to pins 2 and 3 of the Microsquirt wiring harness, according to the instructions in the Microsquirt Manual
Megasquirt 2 V3
Wire up the CANH / CANL internal jumpers according to the instructions in the Megasquirt Manual
If connected per the guide, you CAN connections will be on the following port on the DB37
- CAN High - DB37 Pin 3 (SPR1)
- CAN Low - DB37 Pin 4 (SPR2)
Connect CAN High and CAN Low to the corresponding CAN High and CAN Low channel connections on RaceCapture/Pro
Note Ensure the Megasquirt has the correct internal modifications to allow CAN bus operation; usually requiring the addition of jumpers. Please refer to the Megasquirt documentation for more information.
MS3 Pro
Refer to the MS3-Pro MS3-Pro wiring manual for wiring instructions.
CAN bus connections available on MS3-Pro white connector:
- CAN High: Pin 34
- CAN Low : Pin 33
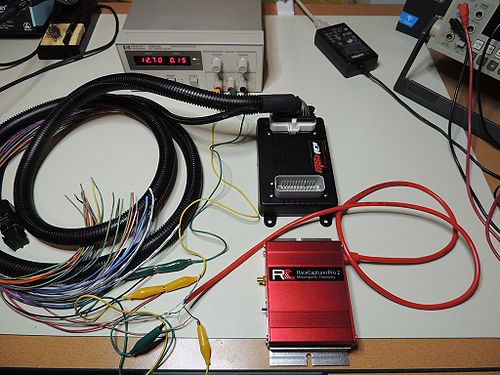
Photos
Enable Megasquirt CAN broadcast
In TunerStudio, enable CAN mode and burn it to the controller. Once this is done, RaceCapture/Pro will be receiving CAN bus data from the Megasquirt.
- Note: Enable CAN broadcast at 1520 in Tuner Studio, and set CAN baud rate to 500K.
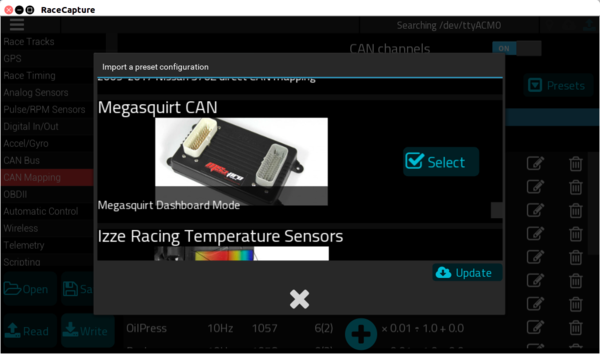
Megasquirt Preset
Once wiring and connections are complete, select the Megasquirt preset under Setup / CAN Channels, and then write the changes to your RaceCapture system.
Verifying
Once connected and with the preset loaded, navigate to the Dashboard screen in the RaceCapture app to verify data connectivity.

