RaceCapture RaceRender Guide: Difference between revisions
No edit summary |
|||
| (8 intermediate revisions by 2 users not shown) | |||
| Line 1: | Line 1: | ||
= Guide to getting your RaceCapture data into your video with RaceRender = | = '''Guide to getting your RaceCapture data into your video with RaceRender''' = | ||
Written by John Freund ([https://www.facebook.com/john.freund.209 https://www.facebook.com/john.freund.209] | |||
[https://www.facebook.com/johnfreundracing/ https://www.facebook.com/johnfreundracing/] | |||
| Line 26: | Line 29: | ||
'''1.''' Install RaceRender 3.5.8 or newer | '''1.''' Install RaceRender 3.5.8 or newer | ||
'''2.''' '''(Optional)''' | '''2.''' Download the template/profile files referenced in this guide here and extract the files from the archive: [[File:RaceCapture and RaceRender workflow files.zip]] | ||
'''3.''' '''(Optional)''' Move the extracted file ''"Project - _6RaceCapture - basic template.rrt"'' to where RaceRender3 Templates are stored. On Windows this is: | |||
C:\Users\USERNAME\Documents\RaceRender 3\Templates | C:\Users\USERNAME\Documents\RaceRender 3\Templates | ||
where "USERNAME" is the Windows user you are logged in as. | where "USERNAME" is the Windows user you are logged in as. | ||
''' | '''4.''' The other extracted file should be named with a filename like "RaceRender Data Profile - RaceCapture*.rrlc", including a date. Use the latest version present if there are multiple. This can be saved wherever you like but I suggest: | ||
C:\Users\USERNAME\Documents\RaceRender 3 | C:\Users\USERNAME\Documents\RaceRender 3 | ||
Remember this location for later. | Remember this location for later. | ||
| Line 71: | Line 76: | ||
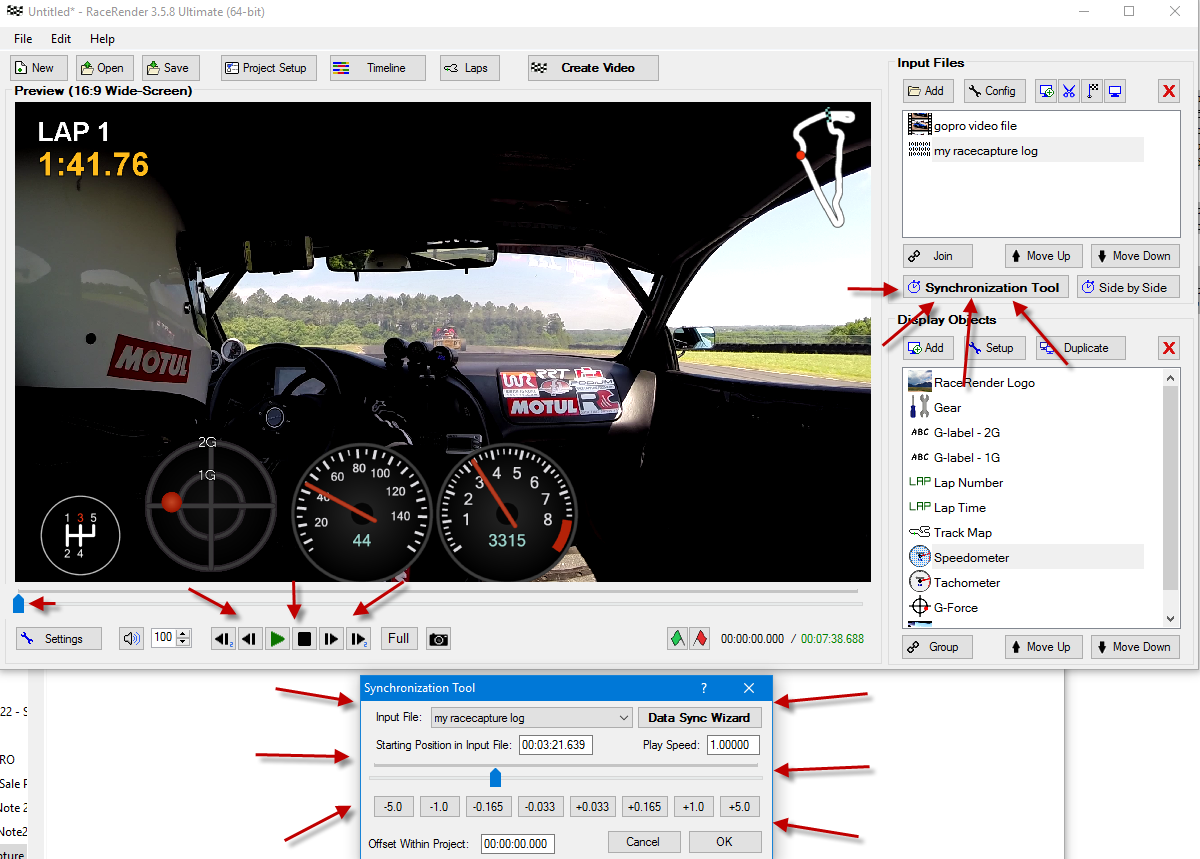
'''6.''' Now that we have the data fields mapped we need to synchronize the data to the video. The easiest way to do this is by using the Synchronization Tool. The button is just below the Input Files section of the main RaceRender video preview screen. Clicking it will open a popup for you to adjust starting position of either the video file or the data file, whichever has more data time-wise than the other at the start. This takes some finesse and can be quite tedious to get quite right but should be self-explanatory after playing around. You'll be playing with starting positions and offsets, and then in the main preview screen using the video playback controls at the bottom to see how things are looking by watching a bit of your previewed video. | '''6.''' Now that we have the data fields mapped we need to synchronize the data to the video. The easiest way to do this is by using the Synchronization Tool. The button is just below the Input Files section of the main RaceRender video preview screen. Clicking it will open a popup for you to adjust starting position of either the video file or the data file, whichever has more data time-wise than the other at the start. This takes some finesse and can be quite tedious to get quite right but should be self-explanatory after playing around. You'll be playing with starting positions and offsets, and then in the main preview screen using the video playback controls at the bottom to see how things are looking by watching a bit of your previewed video. | ||
[[File:RaceRender | [[File:RaceRender synchronization.png]] | ||
Here are some tips to make this easier: | Here are some tips to make this easier: | ||
| Line 82: | Line 87: | ||
'''8.''' Trim your video to just what you want rendered in your final output, like perhaps your fastest lap. On the preview screen use the video controls to figure out just where you want to start and end your video. To the right of those controls are two flags, one green and one red. Find the start position in your video preview, pause the preview playback, then click the green flag to select the start position. Do the same with the red flag to select the end position. | '''8.''' Trim your video to just what you want rendered in your final output, like perhaps your fastest lap. On the preview screen use the video controls to figure out just where you want to start and end your video. To the right of those controls are two flags, one green and one red. Find the start position in your video preview, pause the preview playback, then click the green flag to select the start position. Do the same with the red flag to select the end position. | ||
[[File:RaceRender trimming.png]] | |||
'''9.''' Render your video! In the File menu select Create Video File from Project. You may be prompted to save your project, I would do so in case you realize you need to fix some things and re-render your video. After that you'll be brought to the Create Video File screen. Here's what settings I personally use: | '''9.''' Render your video! In the File menu select Create Video File from Project. You may be prompted to save your project, I would do so in case you realize you need to fix some things and re-render your video. After that you'll be brought to the Create Video File screen. Here's what settings I personally use: | ||
| Line 97: | Line 104: | ||
'''10.''' Check the output! I usually have to re-render my video about five times because I miss things or want to tweak things. I may have not quite syncrhonized the video, or maybe gauges were misaligned, or something. Always double/triple check the rendered output. | '''10.''' Check the output! I usually have to re-render my video about five times because I miss things or want to tweak things. I may have not quite syncrhonized the video, or maybe gauges were misaligned, or something. Always double/triple check the rendered output. | ||
=== Known Issues === | |||
* If you find RaceRender performing terribly slow you may be affected by a timing issue in your RaceCapture log. Rarely, usually right in the beginning of a log if it happens, you can have timestamps that are.. out of order. Events that seem to go back in time. RaceRender expects all the timestamps to go in chronological order and when they don't it has a hard time processing the data. The fix is pretty easy. Open the logs and visually inspect the first page's worth of values in the "Utc" column. These values will be really large numbers as they are time in Unix epoch time, but they should normally go up in value (the value is the number of seconds since I believe a date in the 70s, I forget and I'm a Unix professional :D). If you see any going out of order, you can re-order them or simply delete the entire lines since a handful of data lines won't affect your video rendering results much. Alternatively you can use the GEMS conversion script I wrote found in the Autosport Labs Forums here: https://forum.autosportlabs.com/viewtopic.php?t=3731. Just use the initial perl script conversion and use that output file as your input for RaceRender. This works because that script makes sure to re-order any out of order timestamped log entries. This isn't the first suggestion because using the script takes a bit of technical know-how with setting up a Windows Unix environment and getting packages like Perl. | |||
*If you need to clean up the headings on your log file and remove any rows that do not have latitude or longitude, you can upload your log file [http://www.mytrackschedule.com/RCLogs/ here]. | |||
--[[User:Jpf11|Jpf11]] ([[User talk:Jpf11|talk]]) 00:12, 23 June 2017 (UTC) | |||
Latest revision as of 18:50, 13 June 2019
Guide to getting your RaceCapture data into your video with RaceRender
Written by John Freund (https://www.facebook.com/john.freund.209
https://www.facebook.com/johnfreundracing/
RaceRender is a popular video data overlay tool which is great for racing enthusiasts in creating amazing compositions using raw data with video. In this guide we'll explain a basic workflow for how you can get your RaceCapture data overlayed onto just about any video source, be it from your smartphone, GoPro, or other digital camera.
RaceRender software can be found at http://racerender.com
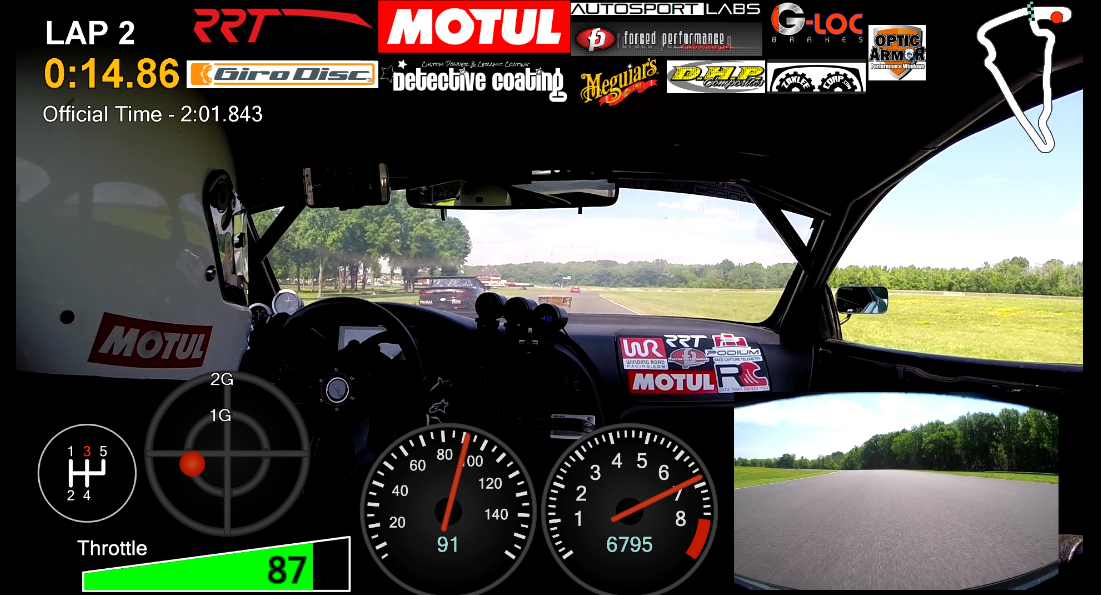
Screenshot showing what you can do with your RaceCapture data in RaceRender:
Source Video:
{{#evu:https://www.youtube.com/watch?v=GkKPAN-c_mE}}
These instructions have been verified with the following software versions:
RaceRender 3.5.8 on Windows 10
Setup
1. Install RaceRender 3.5.8 or newer
2. Download the template/profile files referenced in this guide here and extract the files from the archive: File:RaceCapture and RaceRender workflow files.zip
3. (Optional) Move the extracted file "Project - _6RaceCapture - basic template.rrt" to where RaceRender3 Templates are stored. On Windows this is:
C:\Users\USERNAME\Documents\RaceRender 3\Templates
where "USERNAME" is the Windows user you are logged in as.
4. The other extracted file should be named with a filename like "RaceRender Data Profile - RaceCapture*.rrlc", including a date. Use the latest version present if there are multiple. This can be saved wherever you like but I suggest:
C:\Users\USERNAME\Documents\RaceRender 3
Remember this location for later.
Basic workflow
1. Open RaceRender
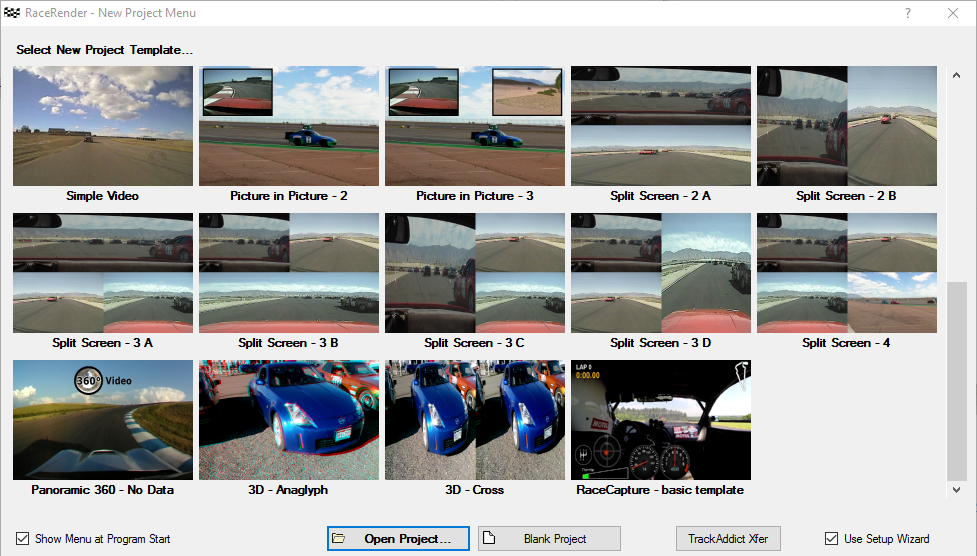
2. (Optional - skip this step if you're an experienced RaceRender user and already have a layout you'd like to use) If you downloaded the basic template in step 2 of setup you can choose it from the initial New Project Menu where you can select a New Project Template. It should be listed as "RaceCapture - basic template". You may need to scroll down to see it as it will likely be the last option.
This template sets up the following basic data displays:
- Track Map with location
- Current Lap Time
- Current Lap Number
- Speed
- RPM
- G-Force
- Gear
3. (Optional) If you did use the basic template here then you will be prompted to select input files for the Video and Data. Simply select your those with the Add Video File and Add Data File buttons as appropriate, and then click OK. Your Layout will appear along with a Project Setup Wizard. I would close the wizard personally as the rest of the instructions assume you did :)
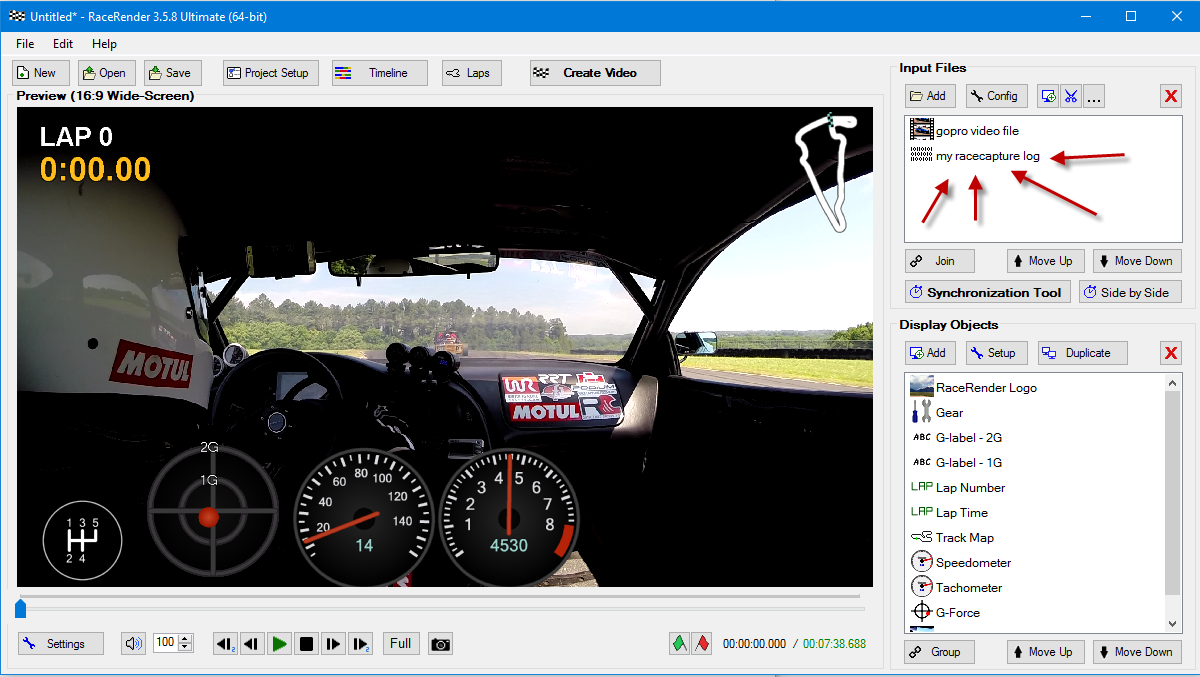
4. Now we need to set up the data. In the upper right of the RaceRender window is a section for Input Files which will have both your video file and your data file. Double Click on your data file.
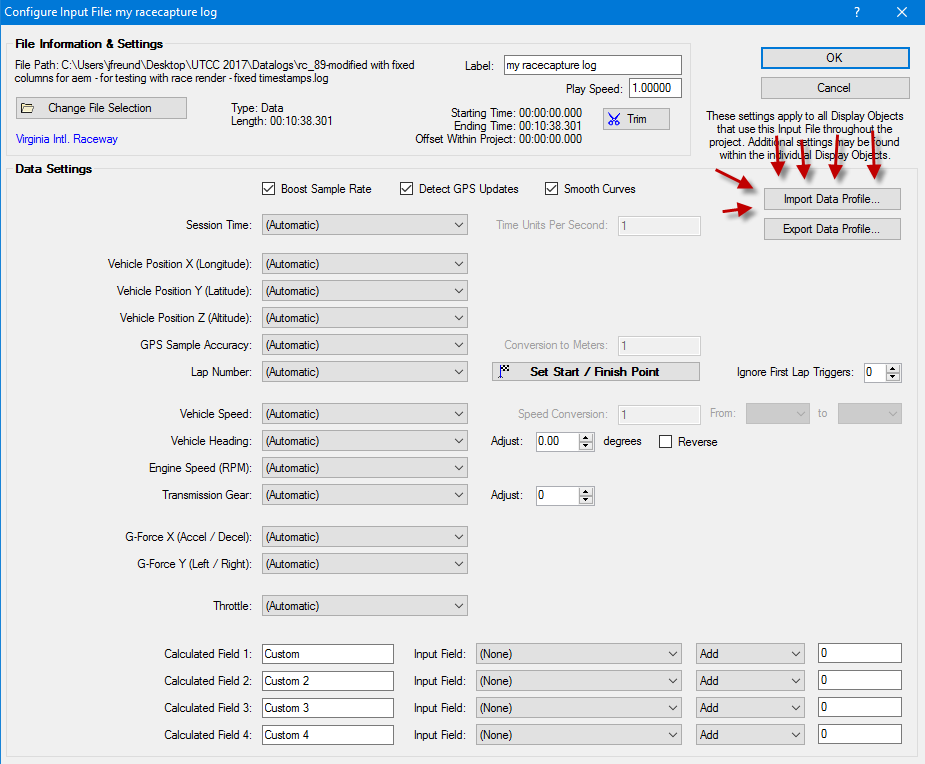
This brings open the Configure Input File screen.
5. On the Configure Input File screen in the upper right you will see a button for Import Data Profile.
Click it, and in the file selection screen that opens find and select the RaceRander Data Profile downloaded in Step 3 of the Setup instructions above. This data profile will do basic setup of RaceCapture data to key RaceRender's inputs, like g-force, rpm, gps coordinates, etc. It won't map Throttle position or any other custom data inputs you may have.
Note about the Transmission Gear input: The profile here sets this input to "Calculate". This means RaceRender will look at the data and try to figure out what gear you are in. If you actually have a gear position data input then change this input to that field. Otherwise read on. Calculate is for those that don't have data on gear position. It works better when there is lots of data in your log file that covers all the gears you use in the car. This can be glitchy, and sometimes doesn't work quite right. Example: If your log file only covers when you're driving in 2nd and up, RaceRender will think 2nd gear is 1st and display it as such. In these cases I will use the Calculated Fields at the bottom of the Configure Input File screen to fudge the gear value, like adding +1 to the Transmission Gear.
6. Now that we have the data fields mapped we need to synchronize the data to the video. The easiest way to do this is by using the Synchronization Tool. The button is just below the Input Files section of the main RaceRender video preview screen. Clicking it will open a popup for you to adjust starting position of either the video file or the data file, whichever has more data time-wise than the other at the start. This takes some finesse and can be quite tedious to get quite right but should be self-explanatory after playing around. You'll be playing with starting positions and offsets, and then in the main preview screen using the video playback controls at the bottom to see how things are looking by watching a bit of your previewed video.
Here are some tips to make this easier:
- Watch your video and gauge where you are on your course. Assuming you know the course you should be able to figure out where you are. Then try to line this up with the position shown in the track layout (which since we set up the data mappings should be showing your gps position).
- Use major events. Things like specific corners where you brake really hard, or places you know you shifted from one gear to another and can see the shift happen in your video. Look at the data showing on the screen like speed and rpm, and get them to match what you see is happening in the video. These help you not only get close, but can help you really fine tune the synchronization.
- If you're useing a GoPro try RaceCapture's feature for automatically starting GoPro recording when datalogging begins. This will get your data VERY close from the start!
7. (Optional) Add some more visual displays of your data! Add more gauges and map them to data fields captured via your RaceCapture. A great one is to add a Throttle gauge as most people have this input (shown in the examples at the top of this page). Experiment! You can do this with the Add button on in the Display Objects section (bottom right) of the preview window. Once you select a gauge face type, select the new object in the Display Objects list and double-click to open its properties. In the properties you'll need to change the Input to the appropriate field from your RaceCapture. Additional Configuration might be required.
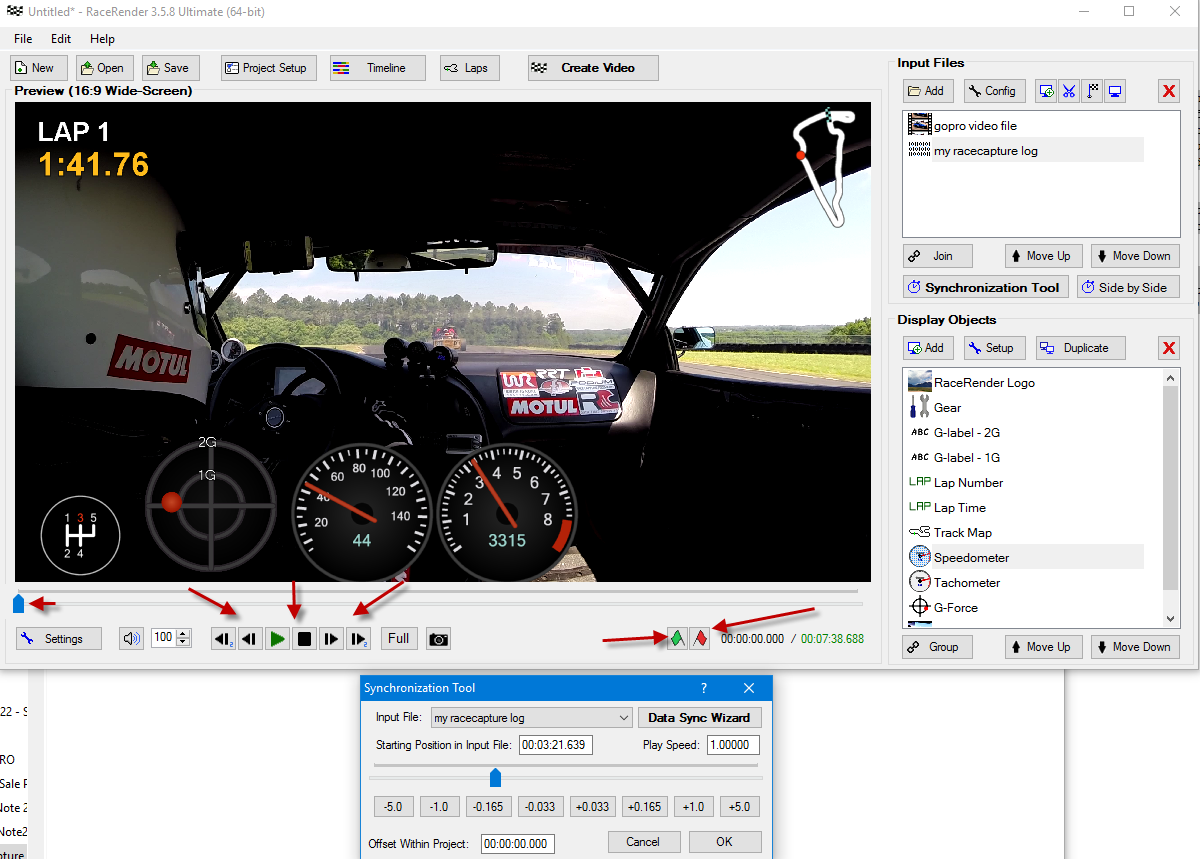
8. Trim your video to just what you want rendered in your final output, like perhaps your fastest lap. On the preview screen use the video controls to figure out just where you want to start and end your video. To the right of those controls are two flags, one green and one red. Find the start position in your video preview, pause the preview playback, then click the green flag to select the start position. Do the same with the red flag to select the end position.
9. Render your video! In the File menu select Create Video File from Project. You may be prompted to save your project, I would do so in case you realize you need to fix some things and re-render your video. After that you'll be brought to the Create Video File screen. Here's what settings I personally use:
- File Format: MPEG-4 H.264
- Aspect Ratio & Workspace: 16:9 Wide-Screen (because this matches my the video format I use with my GoPro, suggest changing this to match your camera)
- Picture Size (Height): 1080 (again, this matches my original video format and I don't like to lose resolution for no reason)
- Video Frame Rate: 60 FPS (also matches my original framerate. Always set this as high as your source framerate)
- Audio Channels: 16-bit Stereo
- Audio Sample Rate: 48000 Hz (this is what my GoPro records its videos at)
- Picture Scaling Quality: Maximum (I want the best quality output. RaceRender always loses some video quality in my opinion, arguably due to poor renderers, but using this setting minimizes that)
- Video Bitrate: 64000kbps (totally arbitrary but I kept going up and up until the video quality looked "good enough" to me. results in a big file on disk but these days I don't care about disk space much)
- Audio Bitrate: 128kbps (this is what my GoPro is recording audio at. Not great to be honest.)
10. Check the output! I usually have to re-render my video about five times because I miss things or want to tweak things. I may have not quite syncrhonized the video, or maybe gauges were misaligned, or something. Always double/triple check the rendered output.
Known Issues
- If you find RaceRender performing terribly slow you may be affected by a timing issue in your RaceCapture log. Rarely, usually right in the beginning of a log if it happens, you can have timestamps that are.. out of order. Events that seem to go back in time. RaceRender expects all the timestamps to go in chronological order and when they don't it has a hard time processing the data. The fix is pretty easy. Open the logs and visually inspect the first page's worth of values in the "Utc" column. These values will be really large numbers as they are time in Unix epoch time, but they should normally go up in value (the value is the number of seconds since I believe a date in the 70s, I forget and I'm a Unix professional :D). If you see any going out of order, you can re-order them or simply delete the entire lines since a handful of data lines won't affect your video rendering results much. Alternatively you can use the GEMS conversion script I wrote found in the Autosport Labs Forums here: https://forum.autosportlabs.com/viewtopic.php?t=3731. Just use the initial perl script conversion and use that output file as your input for RaceRender. This works because that script makes sure to re-order any out of order timestamped log entries. This isn't the first suggestion because using the script takes a bit of technical know-how with setting up a Windows Unix environment and getting packages like Perl.
- If you need to clean up the headings on your log file and remove any rows that do not have latitude or longitude, you can upload your log file here.

