RaceCapture DashWare Guide
Video with data overlay using Dashware
- Written by Scott Barton of ProFormance Coaching
Dashwareis a free software that allows you to take your data log files and videos and combine them to create video files with data overlay.
Record and save data on RCP
You will need to record and save your data on the micro SD card on your Race Capture Pro.
Export and Prepare the Data in Excel
- Find the session(s) you want to use on your SD card.
- Open the log file in Excel, go to Data > Convert Text to Columns > Use comma for the separator
- Ensure that the 2nd column is of format text, otherwise it’s too large as a number
- For the 2nd column (“Utc”|”ms”|0|0|1), make a new column and subtract the first value in the first entry from every item, divide this by 1000 to get back to seconds
- For all of the headings, take the format of “AccelX”|”G”|-333.0|333.0|25 and change to “AccelX” this is super important as it will lead to no amount of frustration if your column headings change in subsequent data logs
- Get rid of any rows that don’t have a valid latitude and longitude
- Export the resulting file as .CSV
You can automatically clean up the headings and remove any rows without latitude and longitude by uploading your log file here. You will still need to create a new column and get seconds as mentioned above in step 4.
If you need more info, please see Step 2 of Rowan Hicks excellent guide here. https://www.rowanhick.com/2016/01/07/racecapture-pro-dashware-win
Create Dashware Data Profile for RCP
The Autosports Labs Data Profile provided with Dashware does not work. You can download my Race Capture Pro Data Profile and some RCP gauges and a project template here (please see the ReadMe.txt). My RCP Data Profile maps 40 Race Capture Pro data elements to Dashware Inputs. The RaceCapturePro.xml file is the data profile. This maps the RaceCapturePro data log file that we created to the available Dashware inputs. These Dashware inputs is how the Dashware gauges get the appropriate data. This RaceCapturePro.xml mapping assumes you used the select box in Race Capture App when setting up your Race Capture Pro to select your input names using the out of box input names (ie, RPM, AFR, Brake, OilPress, OilTemp, TPS, EGT, etc). If you added or customized any of your RCP input names, you will either have to rename the column in Excel before importing into Dashware, or you will have to update the Calculators/Converters and Column Mappings in Dashware Data Profiles (best way). It also assumes you have cleaned up the column headers as mentioned in the previous step.
To add the RaceCapturePro.xml data profile to your system in Dashware go to Project --> Data File(s) --> Add --> Edit Profiles... --> Add New Data Profile... --> and click on Open Data Profiles Directory. This should open the C:\Users\YourUsernameHere\Documents\DashWare\DataProfiles directory. Copy the RaceCapturePro.xml file into that directory, then hit the Refresh button on the New Data Profile window, then hit cancel. You should now be able to select the RaceCapturePro data profile. If not, close Dashware and open it back up. It is a good idea to take a look at the mappings to see what data is mapped to which Dashware inputs. Note that PredTime is mapped to SCUBA->Dive Time Remaining (Mins). I have mapped Brake in RCP to Brake Position in Dashware. If you are using Brake for Brake Pressure, you will have to change that mapping in Dashware.
If you need more info or would like to create your own Dashware Data Profile, please see Step 3 of Rowan Hicks excellent guide here. https://www.rowanhick.com/2016/01/07/racecapture-pro-dashware-win
Create Dashware Project and Sync Video
Create a dashware project (click for video howto).
There is a RCP Project Template and RCP Gauges in the RCP-Dashware.zip file that you can add and modify if you don't want to create your own. Copy the RaceCapturePro folder to the C:\Users\YourUsernameHere\Documents\DashWare\Templates directory. The .dashware files are gauges. Just drag and drop them into your Gauge Toolbox (video HowTo). Here is a video on how to create and configure Dashware Gauges.
For syncing video, I like to cruise down pit lane at a fairly slow speed, then accelerate hard. When trying to sync the data and video, you will then be able to see the acceleration G's in the data as well as hear it in the video, making it easy to sync up.
Once you get the data profile mapping and project template setup the first time, subsequent Dashware video creations should be pretty quick and easy.
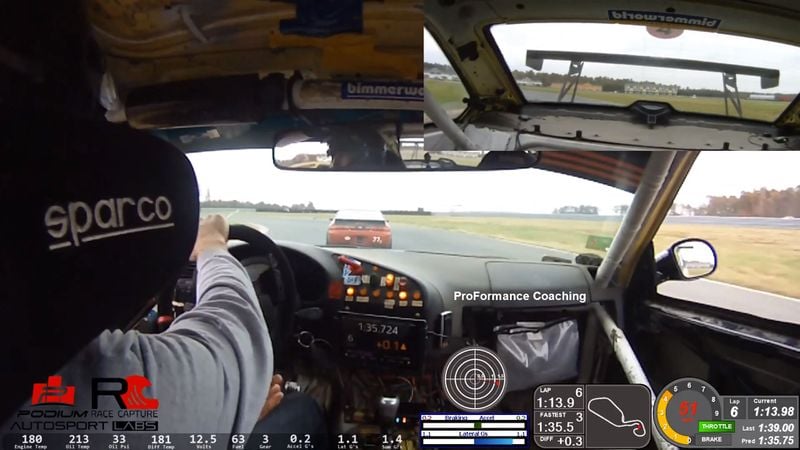
Video with data overlay using the included data profile and project template
Fix your video input file if needed
You may get an error when trying to create the video file in Dashware: Error Rendering in MediaFoundationMedia Foundation Error. The cause seems to be that Dashware is picky about the format of video it needs as a source video file. One solution is to use FFMPEG to re-create the video file (Dashware seems to be able to use files output by FFMPEG). Info about this error here.
Here is the video on how to fix this error. Note, he incorrectly states that it doesn't work because the video doesn't have audio. In reality it is because the video format from his camera is not compatible and when he uses FFMEG to create another file, it creates a file Dashware can use.
You can download FFMPEG here: https://www.ffmpeg.org/download.html
How to use FFMPEG. https://www.labnol.org/internet/useful-ffmpeg-commands/28490/ I used the resize command. ffmpeg -i input.mp4 -s 1920x1080 -c:a copy output.mp4