RC OBDII: Difference between revisions
| (One intermediate revision by the same user not shown) | |||
| Line 184: | Line 184: | ||
You will notice that OBDII performance may drop as you add more channels. OBDII was never meant to be a high performance data-logging interface, but rather intended for periodic use with a scan tool. | You will notice that OBDII performance may drop as you add more channels. OBDII was never meant to be a high performance data-logging interface, but rather intended for periodic use with a scan tool. | ||
===How does OBDII work, anyway=== | |||
What makes it slow? The request / reply protocol OBDII prescribes. The behavior is universal, and every OBDII-compliant ECU operates in this manner: | What makes it slow? The request / reply protocol OBDII prescribes. The behavior is universal, and every OBDII-compliant ECU operates in this manner: | ||
Latest revision as of 14:54, 17 May 2024
Getting started with OBDII
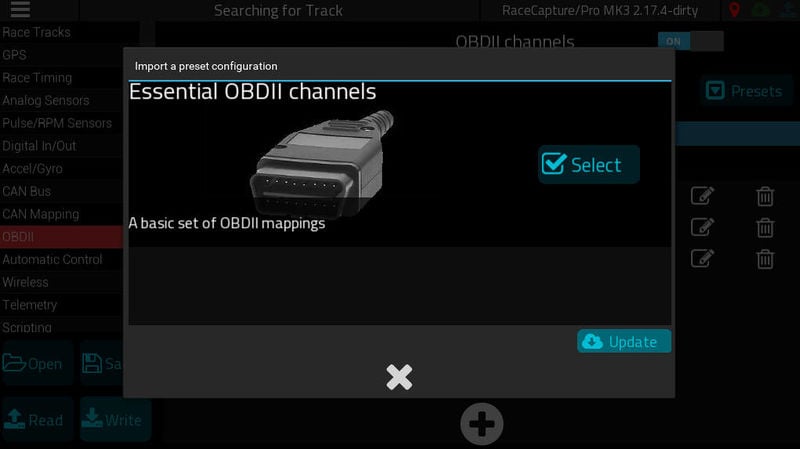
You can easily set up OBDII channels by navigating to Setup / OBDII and selecting the OBDII preset. Make sure you have OBDII turned 'ON', as well.
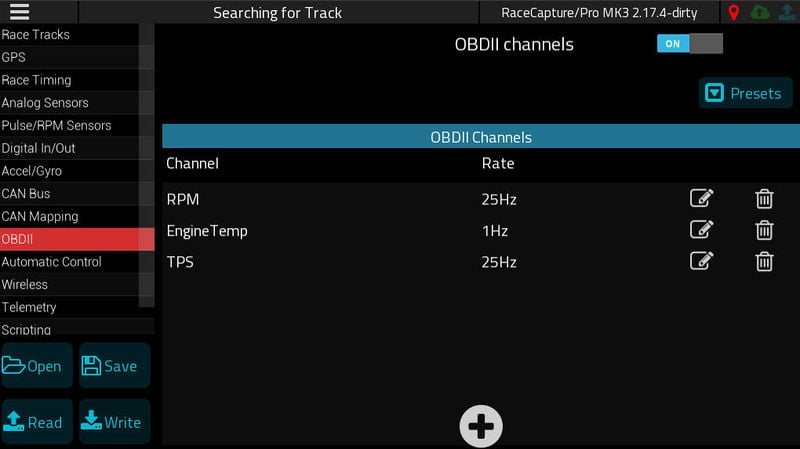
Once you've selected the Preset, you'll see a few essential channel listed. Press Write to write the settings to your RaceCapture system.
After writing the changes, you can navigate to the dashboard to view the real-time values while your engine is running.
Creating additional OBDII channels
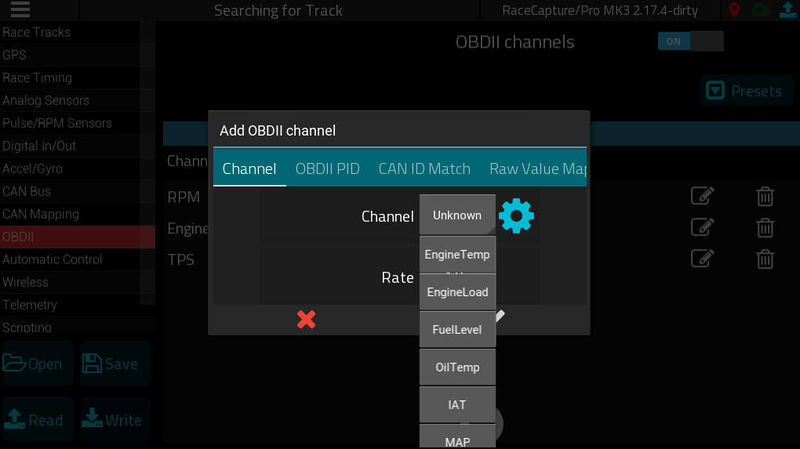
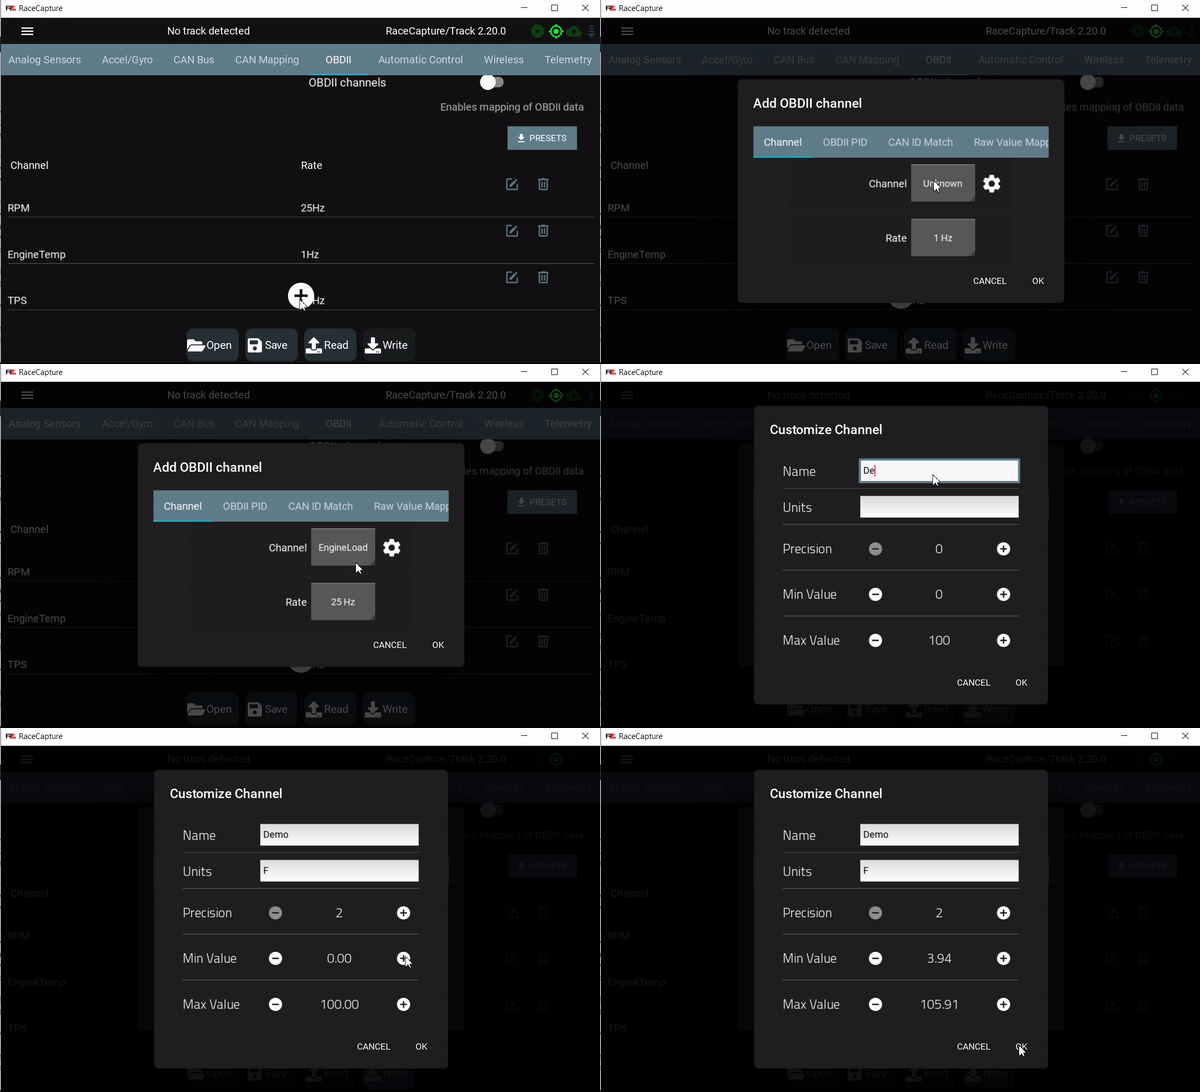
You can create additional channels by pressing the (+) button in the OBDII setup screen. An editor will pop up, and you will be able to select a standard channel from the list.
Once this channel is selected, you can press the check to add the new channel, then press 'Write' to write the updated settings to your RaceCapture system.
Converting between units
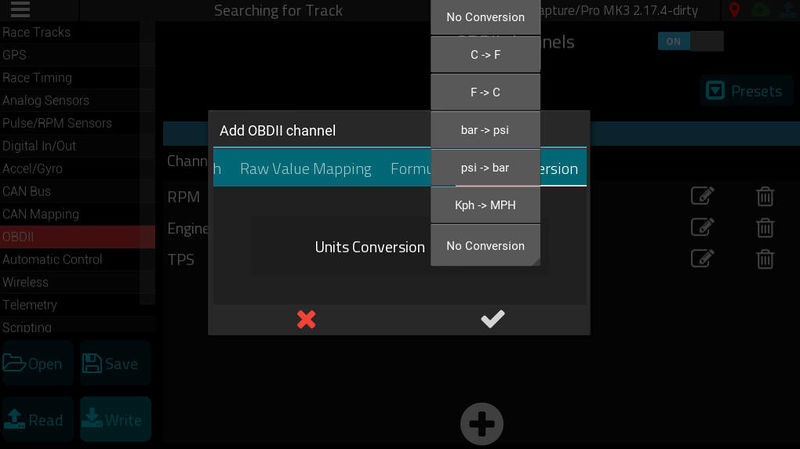
If you want to convert channel units, such as converting Celsius to Fahrenheit, you can enable that by swiping to the right most tab of the OBDII channel editor:
Note about Standard Channels
The list of default channels are part of the SAE standard channels provided by the OBDII specification. Learn more about the SAE standard channels
Not all cars support all channels
Cars will typically implement a subset of the SAE standard channels. If you see no data for a particular channel, the car's ECU does not support it.
Channels you can rely on
Channels that are virtually guaranteed to work are:
- TPS (Throttle Position)
- RPM (Engine speed)
- EngineTemp (Engine temperature)
- MAP (Manifold pressure; also indicates turbo boost pressure if value is greater than 100Kpa)
- IAT (Inlet Air temperature)
You can find out all of the channels available on your vehicle by using a cheap OBDII Bluetooth adapter and the free Torque app and go into Adapter Status and scroll down to Available sensors.
Extended OBDII channels
Many manufacturers implement custom extended OBDII channels, commonly known as "Mode 22" OBDII.
Creating an extended channel
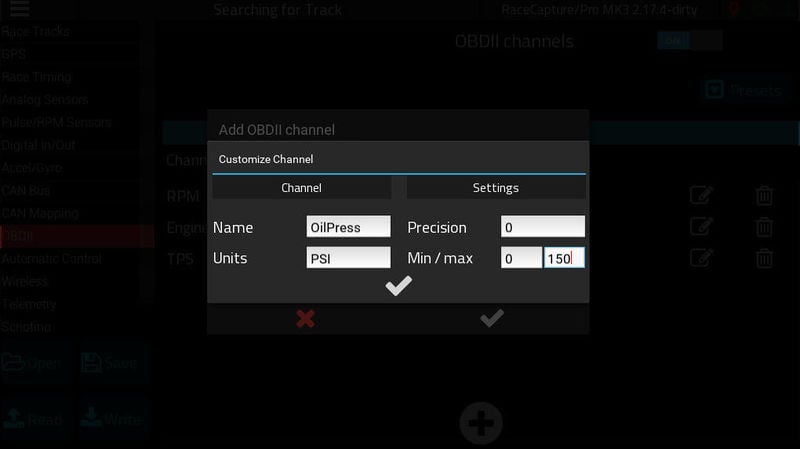
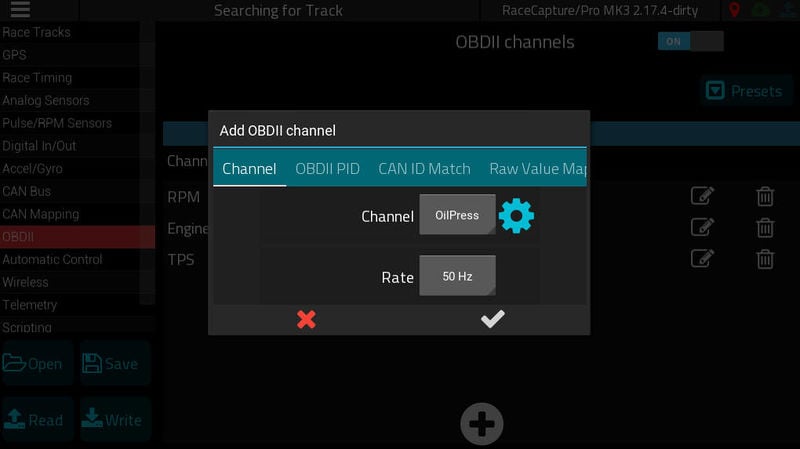
Start by pressing the (+) to create an OBDII channel. Then, press the gear button next to the channel to edit the settings.
In this case, we will set up an OilPressure channel.
Select a sample rate for this channel.
- Note: Select a low sample rate (1Hz) for sensors that change slowly, like EngineTemp and FuelLevel. Select a higher sample rate (10-50Hz) for sensors that change faster, like RPM and Speed.
Customizing OBDII PIDs in RaceCapture
The RaceCapture app allows users to map custom OBDII PIDs according to their needs. The custom OBDII PIDs (On-Board Diagnostics II Parameter IDs) are not part of the standard set of PIDs defined in the OBD-II specification and are used to extract detailed and specific data about certain parameter of the car. Extended PIDs provide a deeper level of access to vehicle data and are particularly useful for comprehensive diagnostics, performance tuning, or in-depth monitoring of vehicle systems.
For mapping these extended PIDs, we can utilize the Torque App, a separate and third-party application, known for its comprehensive library of OEM-specific extended OBDII PIDs. The extended PID mapping process involves several steps, identifying the PIDs using Torque App to configuring them within RaceCapture. Here's a simple guide to help you map your custom PIDs successfully.
Note: Precise conversion of Torque formulas to RaceCapture is crucial. Any errors here could lead to incorrect data being displayed, which might affect your diagnostics or performance measurements. Ensure each step is correctly followed for accurate data readings.
Installing Torque App
- Download and install the Torque App (3rd Party app) from the Google Play Store
- Navigate to “Manage Extra PIDs/Sensors” within the Torque App to locate your vehicle and available PIDs.
Adding OBDII MODE & PID in the RaceCapture app
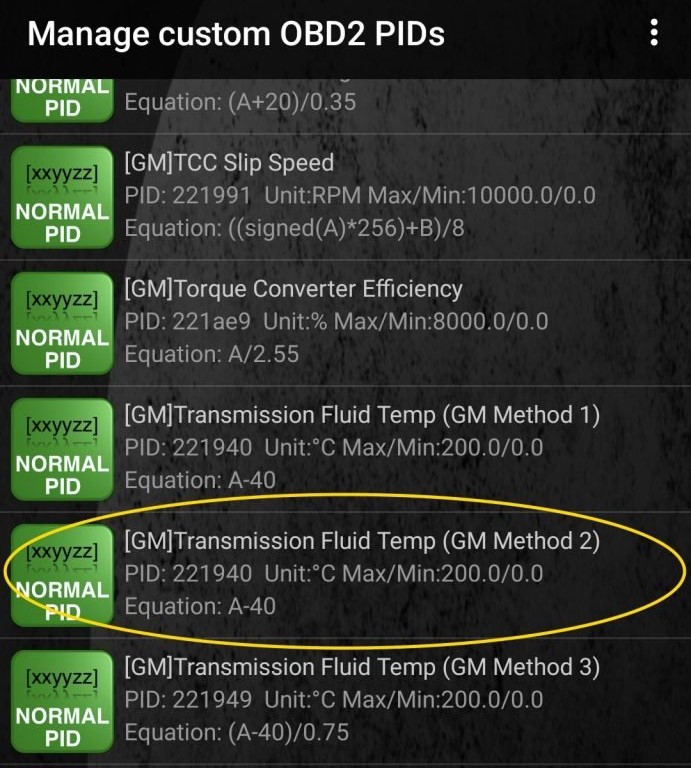
- Choose the desired PID from the Torque App that you want to use. For example it is 221940 for the Torque Corvette Transmission Temperature (GM Method 2)
- In the RaceCapture app, add a new channel by tapping the '(+)' icon and configure the settings (channel name, units, min/max) as needed.
- Extract the Mode and the PID from the Torque PID. In the below example, Torque PID: 221940, Mode: 22, Actual OBDII PID: 1940
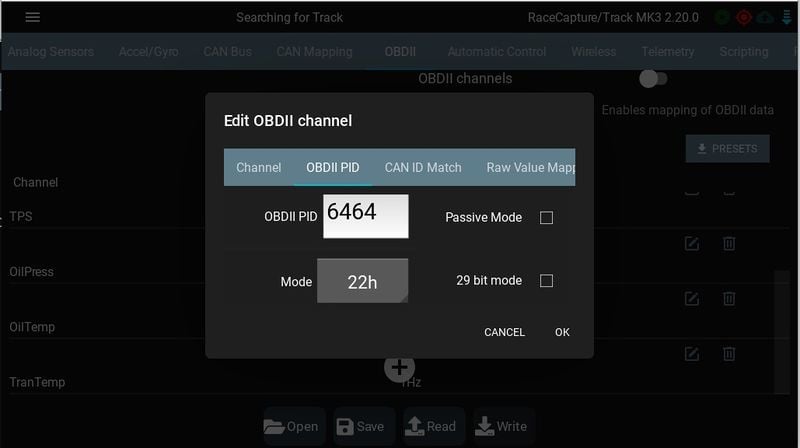
- On the OBDII PID tab, select mode 22h, and enter the decimal PID value. By default form the Torque app you will PID value with a series of hexadecimal numbers. You will need to convert the hexadecimal number to decimal for the PID field. How to convert. The decimal equivalent of 1940 is 6464.
Configuring the Raw Value mapping and Formula in the RaceCapture app
- For this channel, the Torque app indicates the Equation is “A – 40”.
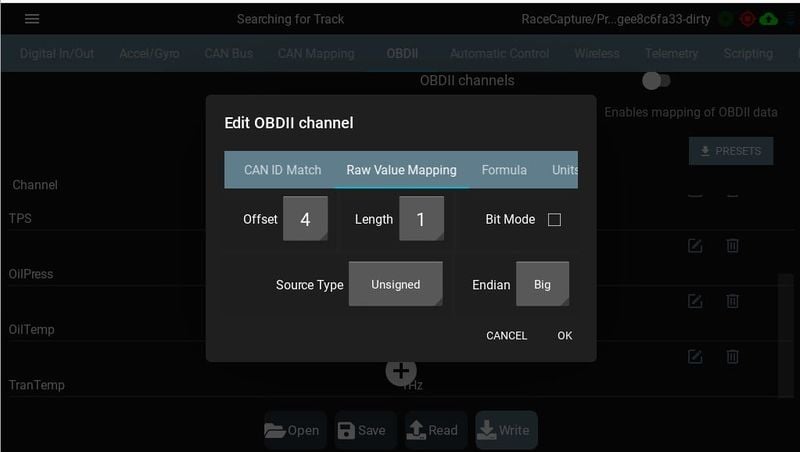
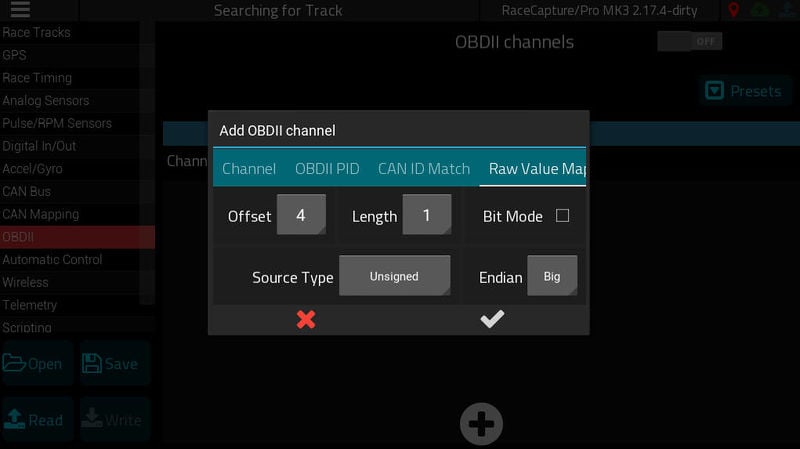
- The Raw value mapping lets you extract the value from the ECU’s reply. For this channel, choose the offset of 4, length of 1, Big Endian, and source type Unsigned.
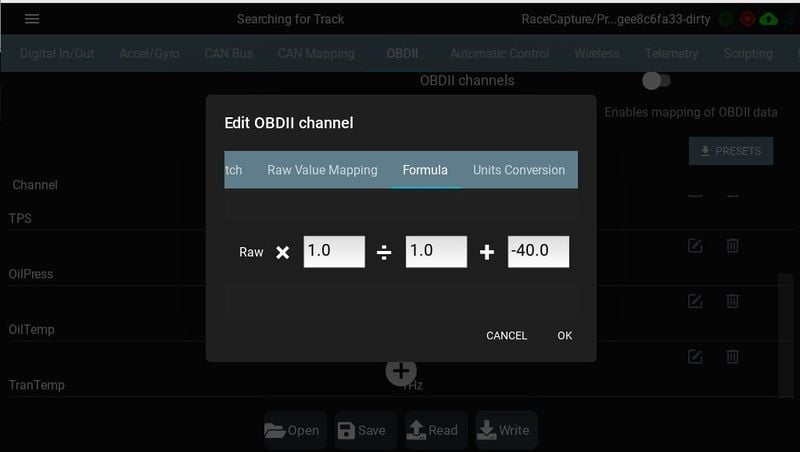
- For the Formula, the Torque app specifies A – 40, so edit the formula to be Raw × 1 ÷ 1 + -40.
Handling 29-bit Mode Operations
Some OEMs, like Honda, implement OBDII using an extended CAN address, known as 29 bit mode.
If you are not getting OBDII data from your Honda or other car, try enabling 29 bit mode for each channel.
Understanding Torque’s Formula Conversion
The RaceCapture app separates raw data extraction from the conversion formula, whereas the Torque App combines them using variable placeholders like A, B, or C. Users must take this into account when translating Torque formulas into RaceCapture settings.
- Single Byte Data: Torque formulas referencing single-byte lengths will typically only show A.
- Two-Byte Data: For Torque formulas that use two bytes, users will see a formula that includes both A and B, and almost always in the format of (A * 256 + B). This formula means “Put the A value into the high byte (multiply by 256) and then add the B value”. So, if users see similar formula. Know that in the equivalent RaceCapture scheme, we are extracting two bytes in the Raw Value Mapping:
- Offset = 4, Length = 2, Endian = Big
- Additional modifiers : What further conflates the Torque scheme is there may be additional modifiers on the formula, such as an adder offset (e.g. -40). Therefore, if user see a formula like this: (A * 256 + B) – 40. User would specify the following in the Raw Value Mapping:
- Offset = 4, Length = 2
- In the Formula tab, users would only specify -40 for the adder.
Note : Remember, converting these formulas correctly is key to getting accurate data readings in RaceCapture
Setting the CAN mapping
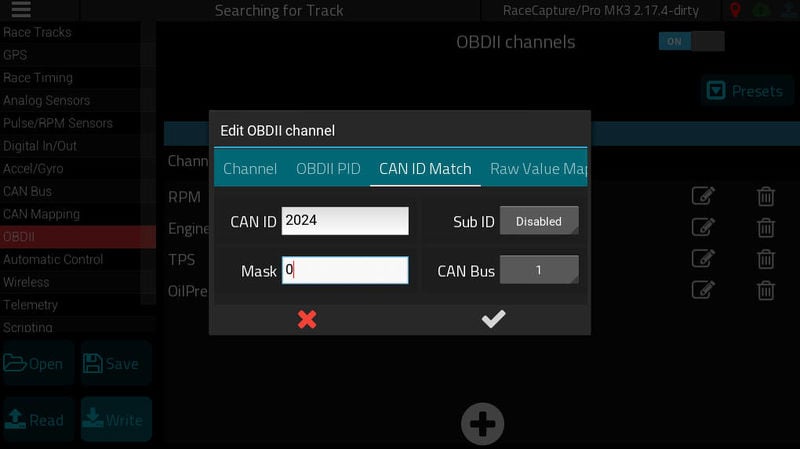
Under the CAN ID match tab, specify 2024 for the CAN ID to match on. This is the CAN ID for the OBDII response Leave the other settings as default.
Setting the Raw Value mapping
Under the Raw Value Mapping tab, specify the following values:
- Offset: 4
- Length: 1 - 4 (see guide below)
- Endian: Big
- Bit Mode: Unchecked
- Source Type: Unsigned
- Note: The length will vary based on the size of the value returned by the ECU. The clue is in the conversion equation supplied with the PID information (e.g. Torque app).
Use the following as a guide:
- If only A is specified in the equation, use 1 for length.
- If A and B are specified in the equation, use 2 for length
- If A, B and C are specified in the equation, use 3 for length
- If A, B, C and D are specified in the equation, use 4 for length
Example used: (A * 0.65) - 17.5 - length is 1
Setting the conversion formula
The ECU will respond with an encoded value, which may not represent the meaningful real-world value. Therefore, a conversion formula will need to be applied.
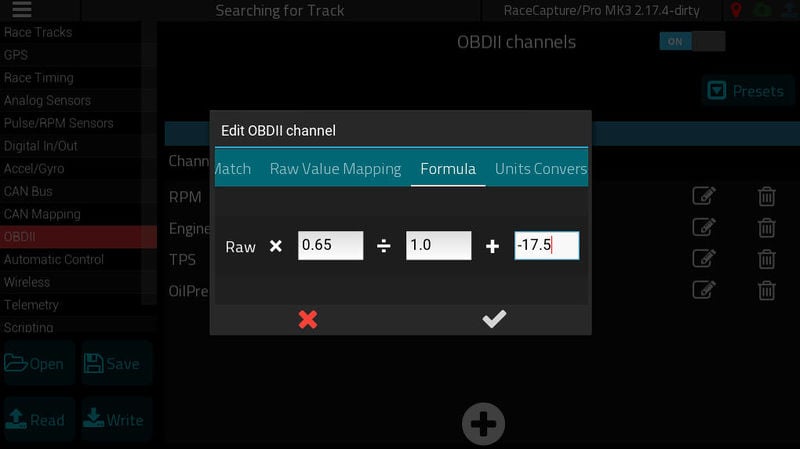
Under the Formula tab, specify the multiplier, adder, and divider that will be applied to convert the raw value to the real-world value.
The information that came with the PID will typically include a conversion equation. In this example for GM Oil Pressure, the equation is (A * 0.65) - 17.5
The A in the equation represents the raw value read from the ECU. Therefore, you would specify 0.65 for the multiplier, and -17.5 for the adder. Leave the divider as 1.
(Optional) Selecting a units conversion
You can optionally convert the value to your preferred units. Select the units conversion in the Units Conversion tab.
Finishing and Verifying
Press the Check button on the editor popup and then Write the settings back to your RaceCapture system.
Then, switch to the dashboard mode to verify you are receiving data for that channel.
OBDII Performance
You will notice that OBDII performance may drop as you add more channels. OBDII was never meant to be a high performance data-logging interface, but rather intended for periodic use with a scan tool.
How does OBDII work, anyway
What makes it slow? The request / reply protocol OBDII prescribes. The behavior is universal, and every OBDII-compliant ECU operates in this manner:
- Data system to ECU: “hey, send me RPM”
- ECU to data system: “ok, here’s the RPM value”
- Data system to ECU: “hey, send me throttle position”
- ECU to data system: “ok, here’s the throttle position value”
- Data system to ECU: “hey, send me engine temperature”
- ECU to data system: “ok, here’s the engine temperature value”
…and so on. So, while OBDII requests channels one at a time, direct CAN bus streaming can data (typically available on modern and aftermarket ECUs) acts like a one-way firehose of broadcasted data. RaceCapture supports this mode as well, see our CAN bus integration guide
Given those limitations, we have a few things that make our OBDII interface as fast as possible:
We use a powerful 32 bit ARM processor in RaceCapture that interacts with your car’s ECU directly, minimizing the lag between querying for an OBDII channel and processing the reply. Indeed – our code is running right down at the metal, and is much higher performance compared to your typical OBDII dongle.
RaceCapture also uses a priority scheduler that optimizes all of your OBDII channels. Here’s how it works:
Prioritizing OBDII queries
Let’s say there’s 3 channels you want from OBDII: RPM, TPS and EngineTemp. Since RPM and TPS are fast-changing channels, you set their rate to 25Hz. EngineTemp changes much more slowly, so you set that to 1Hz.
RaceCapture will now automatically schedule OBDII channels based on their configured rate – optimizing the OBDII schedule so the higher rate channels are queried more often than slower channels. In the above example:
- RPM and TPS are queried at the same rate (round-robin querying)
- EngineTemp is queried at 1/25 the rate as RPM and TPS.
This way we maximize the update rate we can get for RPM and TPS at 25Hz, minimizing the lag on the RaceCapture dashboard as well as in your data stream.

