RaceCapture-Track
Start it up
Plug it in
Unpackage the RaceCapture system and included cable.
- Plug one end of the cable into the RaceCapture unit
- Plug the other end of the cable into your car's OBDII port.
- Place the RaceCapture unit on your dashboard with clear view of the sky. Position the system so it's square to the car's axis.
Download the app
Download the RaceCapture app for your mobile device.
- Google Play
- Amazon App Store
- Apple iOS app store (coming soon)
Connect to your RaceCapture system
In your mobile device WiFI settings, connect to the RaceCapture WiFi network.
- By default, RaceCapture will setup a WiFi network starting with 'RaceCapture', with no password. You can immediately connect to this network.
Once you've connected to the RaceCapture WiFi network, launch the RaceCapture app.
Verifying Connectivity
The RaceCapture app will guide you through a brief automated setup and tour. During this process the connection to RaceCapture will be verified.
System Status
Dashboard Mode
To view your dashboard, touch the dashboard option on the main screen.
Customizing a gauge
Most gauges can be customized for the channel and setting visual alerts. Touch the gauge you wish to customize, select the channel you wish to monitor and optionally configure alerts.
You can navigate between dashboard screens by swiping left or right, or press the arrow buttons in the lower corners of the screen.
Race tracks and predictive lap timing
RaceCapture offers predictive lap timing, which relies on a robust track detection system leveraging hundreds of track maps worldwide.
How it works
- When GPS receives a lock, RaceCapture will search for a known nearby track.
- If a track is detected with one configuration, it is automatically selected.
- If a track is detected with multiple configurations, the RaceCapture app will prompt you for which configuration you're using.
- If no tracks are detected nearby, the RaceCapture app will offer the ability to create a track on the spot.
- If you're not able to immediately create the track, you can do so later under Setup.
Setup Mode
You can configure all of RaceCapture's options under the setup page.
- Note: Whenever you make a change on one of these pages, you will need to write your changes back to the RaceCapture device.
Race Tracks
On the RaceTracks page you can create a custom track, which will be included in the library of track maps for automatic detection. To create a custom track, turn off 'Automatic race track detection' and then press the add (+) button. You will be presented with an option to create a circuit or Autocross (point-point) style course. Follow the on-screen instructions to create your track.
GPS
The GPS page allows you to adjust the GPS sample rate and enable/disable various channels.
- Note: We highly recommend you keep the default channels enabled for proper operation of analysis and lap timing.
- 10Hz is the recommended sample rate for the best balance of performance / accuracy. Getting the best GPS performance
Race Timing
These enable the lap timer and predictive lap timer. Leave these 'on' to enable these features.
Analog Sensors
RaceCapture has one analog sensor that measures current battery voltage. The default 1Hz is the recommended sample rate. To disable, set the sample rate to 'Disabled'.
Accel / Gyro
The recommended mounting orientation for RaceCapture is square with the chassis.
- You can re-map channels by re-assigning the physical axis to the mapped channel.
- Once defined, you can calibrate the accelerometer + gyro by pressing the calibrate button, and then pressing the write button to write the calibration back to RaceCapture.
CAN bus
For OBDII operation, ensure the CAN bus is set to On.
- Common baud rates for OBDII is 500K and 250K. The default is 500K, which applies to nearly every CAN OBDII vehicle.
OBDII
You can select from a standard list of OBDII channels on the OBDII configuration screen.
Selecting sample rates
For channels that require a faster response rate, like RPM and TPS, we recommend 10, 25 or 50Hz. More slowly changing channels like EngineTemperature should be set to 1 or 5Hz.
- Note about unsupported channels: - If your ECU does not support a channel, the value will remain at 0. RaceCapture will time-out waiting for a response from the ECU, which will affect the performance of other channels. We recommend removing all unsupported channels to ensure optimal OBDII performance.
Wireless
You can configure RaceCapture simultaneously for both Access Point and Client mode.
Client Mode
To enable client mode, specify the SSID and password for the network you wish to connect to and turn the client mode switch to on
Access Point Mode
To enable the RaceCapture access point, specify the SSID and a password.
- Note: If specified, passwords must be minimum of 8 characters. Leave the field blank to create an open network.
Telemetry
To enable real-time telemetry, enter the device ID provided by your [Podium account]
- Note: You will also need to enable telemetry in the top level application preferences. When telemetry is broadcasting, you will see a green cloud icon in the application toolbar.
Logs
To view the log messages provided by the RaceCapture unit, you can enable the Poll log check box. You can copy the current log to the clipboard by pressing the Copy button.
- Note: These logs are useful for diagnosing issues with your RaceCapture unit.
Analysis Mode
Viewing Data
To view real-time data streaming from RaceCapture, tap the 'Race' option on the main menu, then swipe the screen until you see the raw channels view. There you will see all channels being received by the RaceCapture system, including OBDII engine sensors.
- By default, RPM and TPS are enabled for OBDII.
Applying Decals
Install the RaceCapture, Podium and Autosport Labs decals on your car in prominent locations
Hitting the Track
When at the track you can use RaceCapture to:
- Display predictive lap times
- Show real-time sensor data such as RPM, engine temperature and more
- Live-stream your racing to Podium so your pit crew, friends and fans can follow your racing, live.
When you're at a Race Track
When you arrive at the track the RaceCapture app will automatically detect the track you're at and automatically configure the start/finish line so lap times can be generated.
Setting a custom Race Track
If you're at a track that's not in our database, you can manually configure the track:
- Roll up to the start/finish line
- Go to Setup / Race Tracks and select the option for a custom track.
- Touch the button to set the start/finish line.
- Write the configuration back to RaceCapture
- The custom track will be used, and will show in the title bar.
- Protip: Help us grow our worldwide track map database by Submitting a track!
Auto-X
- Use the walk-a-track tool to configure the start and finish point for your Auto-X course.
- Select Race before you roll up to the start line.
- Your session will be automatically recorded
Customizing your dash
Selecting a channel
On the various dashboard screens, most gauges allow you to select what channels you want to display. Tap the gauge to select the channel you wish to display
Customizing warning ranges
You can customize two-level warning thresholds for your gauges by selecting the customize option.
Live-streaming
Analysis
Extra information
Configuring on the bench
Windows / OSX: The RaceCapture app also runs on your laptop to make it easy to configure on your bench over USB
Configure track
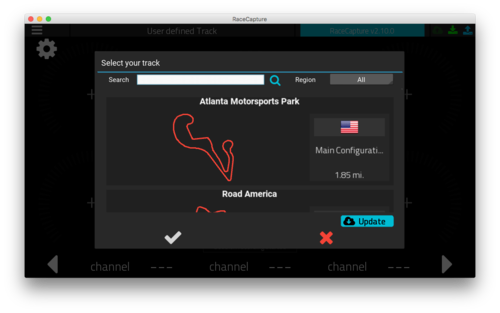
If RaceCapture does not have a track set, when you select the Dashboard view you will be prompted to set a track: 
Search for and select your track, then click/tap the checkbox to set the track.
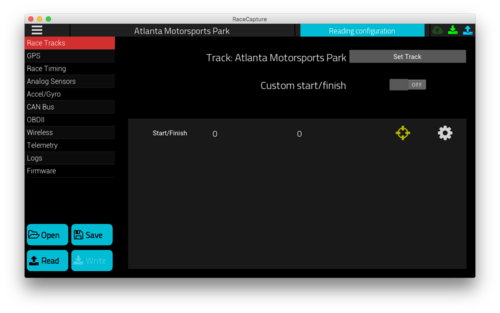
You can also change your track in the Tracks section in the Configuration screen:

Setup OBDII (optional)
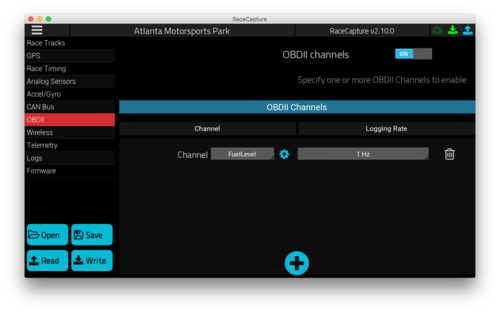
To setup OBDII channels, use the OBDII screen. Turn on OBDII channels and click the + button at the bottom to add a channel. Select the channel name and sample rate. Note: Due to the design of the OBD2 protocol, individual channels (PIDs) are requested sequentially, so individual channel rates decrease based on the number of channels enabled.
Save Config
Once configured, press the Save button on the bottom right to save your configuration. Now hit the track!

