RaceCapture App User's Guide: Difference between revisions
No edit summary |
|||
| (217 intermediate revisions by 3 users not shown) | |||
| Line 1: | Line 1: | ||
[[image:racecapture_app_home_page.jpg|800px]] | |||
== | =Overview= | ||
==About the guide== | |||
This is a comprehensive user guide that contains complete instructions about the services and functions of the RaceCapture app. The app is designed to be easy to use across multiple devices. The RaceCapture app allows you to integrate your devices with the RaceCapture modules and get instant access to the endless functionalities of RaceCapture modules. Using this app, customers can access all the features of the RaceCapture modules, monitor, store, and analyze the real-time data, and users can also provide customized commands to the RaceCapture modules using Lua scripts. Further details about the app are given in the respective sections.<br> | |||
'''Note:''' It is recommended that this guide be read thoroughly to familiarize with the RaceCapture app, and perform tasks efficiently and effectively. | |||
==Navigation== | |||
===Home View=== | |||
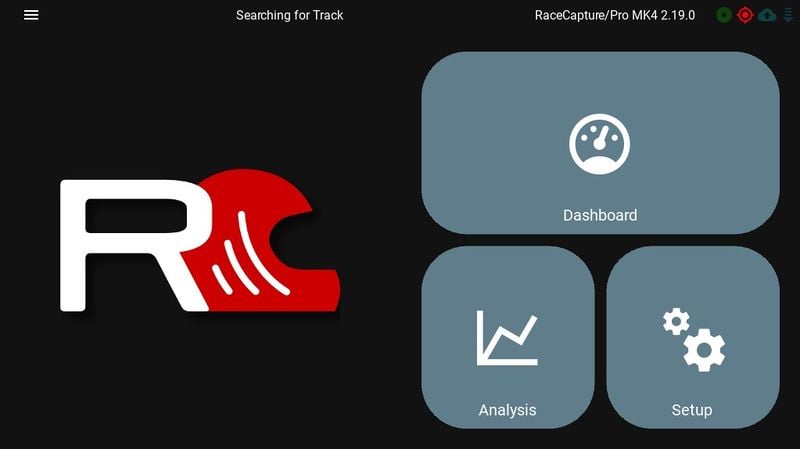
Upon launching the Racecapture app, the Home View serves as the starting point, presenting users with three primary icon options: | |||
* Analysis | |||
* Dashboard | |||
* Setup | |||
* System Status | |||
=== | ===Navigate through the app=== | ||
[[File:Navigation Update.gif|800px]]<br> | |||
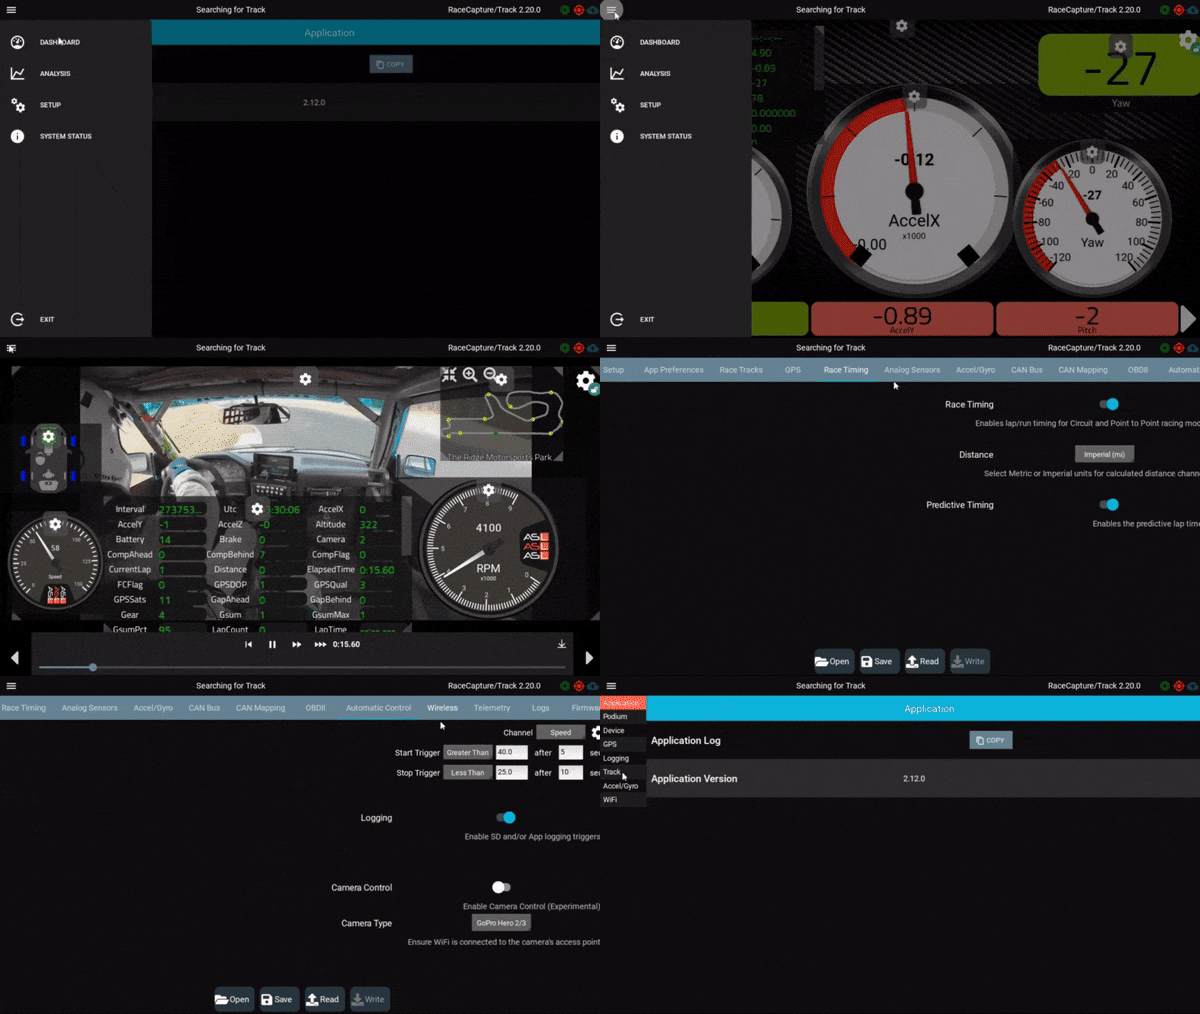
To explore additional functionalities of the app, users can access the navigation menu by tapping the hamburger button located at the top left corner. Upon clicking the hamburger button, a tab bar appears on the left, and Users can switch between different sections by tapping on the respective icons on this tab bar. | |||
==Compatible OS [[File:Good to Know.png|20px]]== | |||
Racecapture app is compatible with all the advanced operating systems. However, it is not functional on a few old versions of tablets and on Windows XP, 7, and 8 due to their outdated video drivers. | |||
* '''Not sure what tablet to use? ''' [[RaceCapture_App_recommended_tablets|See our list of recommended tablets]] | |||
==How to Install== | |||
Installing the recapture app is simple and straightforward. You simply need to download the app and install it. No complicated steps are required. The download links and installation instructions for desktop and mobile devices are given below. | |||
===On Desktop=== | |||
* '''Download :'''For desktop, download the RaceCapture app from the following link [https://podium.live/software Windows and OSX] | |||
* '''Installation in Windows 10/11:''' Windows 10/11 has built in USB drivers that support Recapture; no separate driver installation needed. | |||
* '''Installation in XP, 7, and 8:''' In Window XP,7, & 8 will require USB drivers for installation. Users can download USB driver from following link "[[RaceCapture-Track_MK2#Microsoft_Windows_7.2F8_Driver_installation|Click here.]]" | |||
=== | ===On Mobile=== | ||
For downloading Racecapture app, please click on the images below. | |||
[[File:Get_it_on_google_play.png||left||205px||link=https://play.google.com/store/apps/details?id=com.autosportlabs.racecapture&hl=en]] | |||
[[File:Apple apple store.png||Right||180px|link=https://itunes.apple.com/us/app/racecapture/id1162797255?mt=8]] | |||
[[File:Available at Amazon App store.png||Right||200px||link=https://www.amazon.com/Autosport-Labs-Race-Capture/dp/B016ZJM7GE]] | |||
=== | ===On Raspberry Pi=== | ||
[[image:Racecapture_raspberry_pi.jpg|400px]] | |||
More advanced users can run the RaceCapture App on a Raspberry pi for a more dedicated dashboard experience. | |||
* Learn more in the [[RaceCapture_on_Raspberry_Pi|Raspberry Pi Guide]] | |||
==Icons Used in Manual== | |||
Throughout this document, the pictograms below are used to underline points or important notions. | |||
The | {| class="wikitable" | ||
|+ | |||
|- | |||
! Icon !! Description | |||
|- | |||
| | |||
[[File:Important Symbol.png|20px|center]] | |||
|| Important information | |||
|- | |||
| | |||
[[File:Good to Know.png|20px|center]] | |||
|| Good to Know | |||
|- | |||
| | |||
[[File:Mandatory Action.jpg|20px|center]] | |||
|| Mandatory action | |||
|} | |||
==Intellectual Property and Usage Rights== | |||
The information contained in this document is the intellectual property of Autosport Labs, and No one can use it without the prior permission of Autosport Labs. | |||
==Help== | |||
For additional help, we encourage you to visit one of our support communities: | |||
* [https://discord.gg/JbKUyFw Discord Server] | |||
* [https://forum.autosportlabs.com Forums] | |||
* [https://www.facebook.com/groups/1288770887817789/ Facebook group] | |||
=Setup Wizard= | |||
[[File:First Time Setup Updated.gif|800px]] | |||
Upon running the RaceCapture app for the first time, you are presented with a first time setup wizard. Follow the steps given below to configure your device..[[File:Mandatory Action.jpg|20px]] <br> | |||
'''Welcome Page:''' | |||
* Click 'Next' on the welcome page to proceed to the device setup.<br> | |||
'''Device Selection:''' | |||
* Choose your RaceCapture device from the provided list. | |||
* Click 'Next' to move to the connection page.<br> | |||
'''Connection Setup:''' | |||
* Connect your system to the USB port. | |||
* Wait for the connection to establish; your device will be recognized once connected.<br> | |||
'''Preset:''' | |||
* Select the optional system preset. User can also set the streaming key later under the setup. | |||
'''Podium:''' | |||
* Enter the podium streaming key to enjoy real-time telemetry. User can also set the preset later under the setup. | |||
'''Note'''[[File:Good to Know.png|20px]]:For more details regarding real time telemetry, please [https://wiki.autosportlabs.com/RaceCapture_real_time_telemetry Click here] | |||
'''Tour:''' | |||
This section will give users a brief tour about different features of Racecapture app | |||
'''Setup, Dashboard, Analysis:''' | |||
These section will give users a short overview about Setup, Dashboard, Analysis functions. | |||
'''Note'''[[File:Good to Know.png|20px]]: You can access first time setup again by navigating to the main Setup page and selecting First time setup (as shown in the instruction below)<br><br> | |||
=System Status= | |||
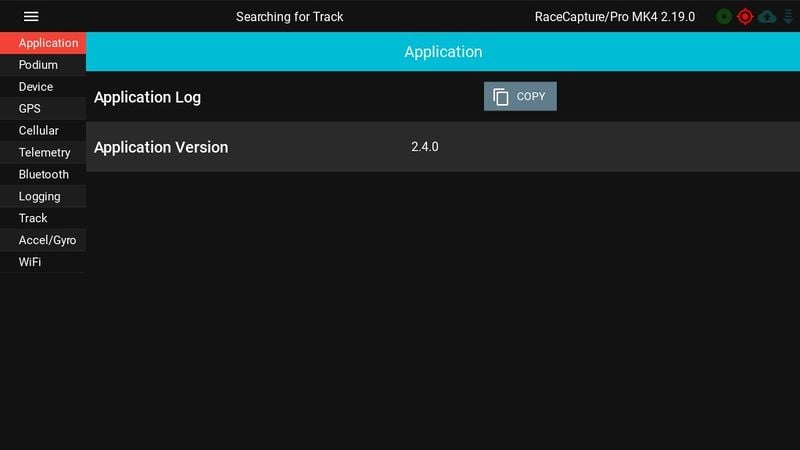
Access the system status pages through the top left menu. The system status offers information on GPS status, Track, Device, current WiFi state and Accel/Gyro. You can also get a copy of the RaceCapture application log for diagnostics. | |||
[[image:racecapture_app_status_page.jpg|800px]] | |||
== | =Dashboard Mode= | ||
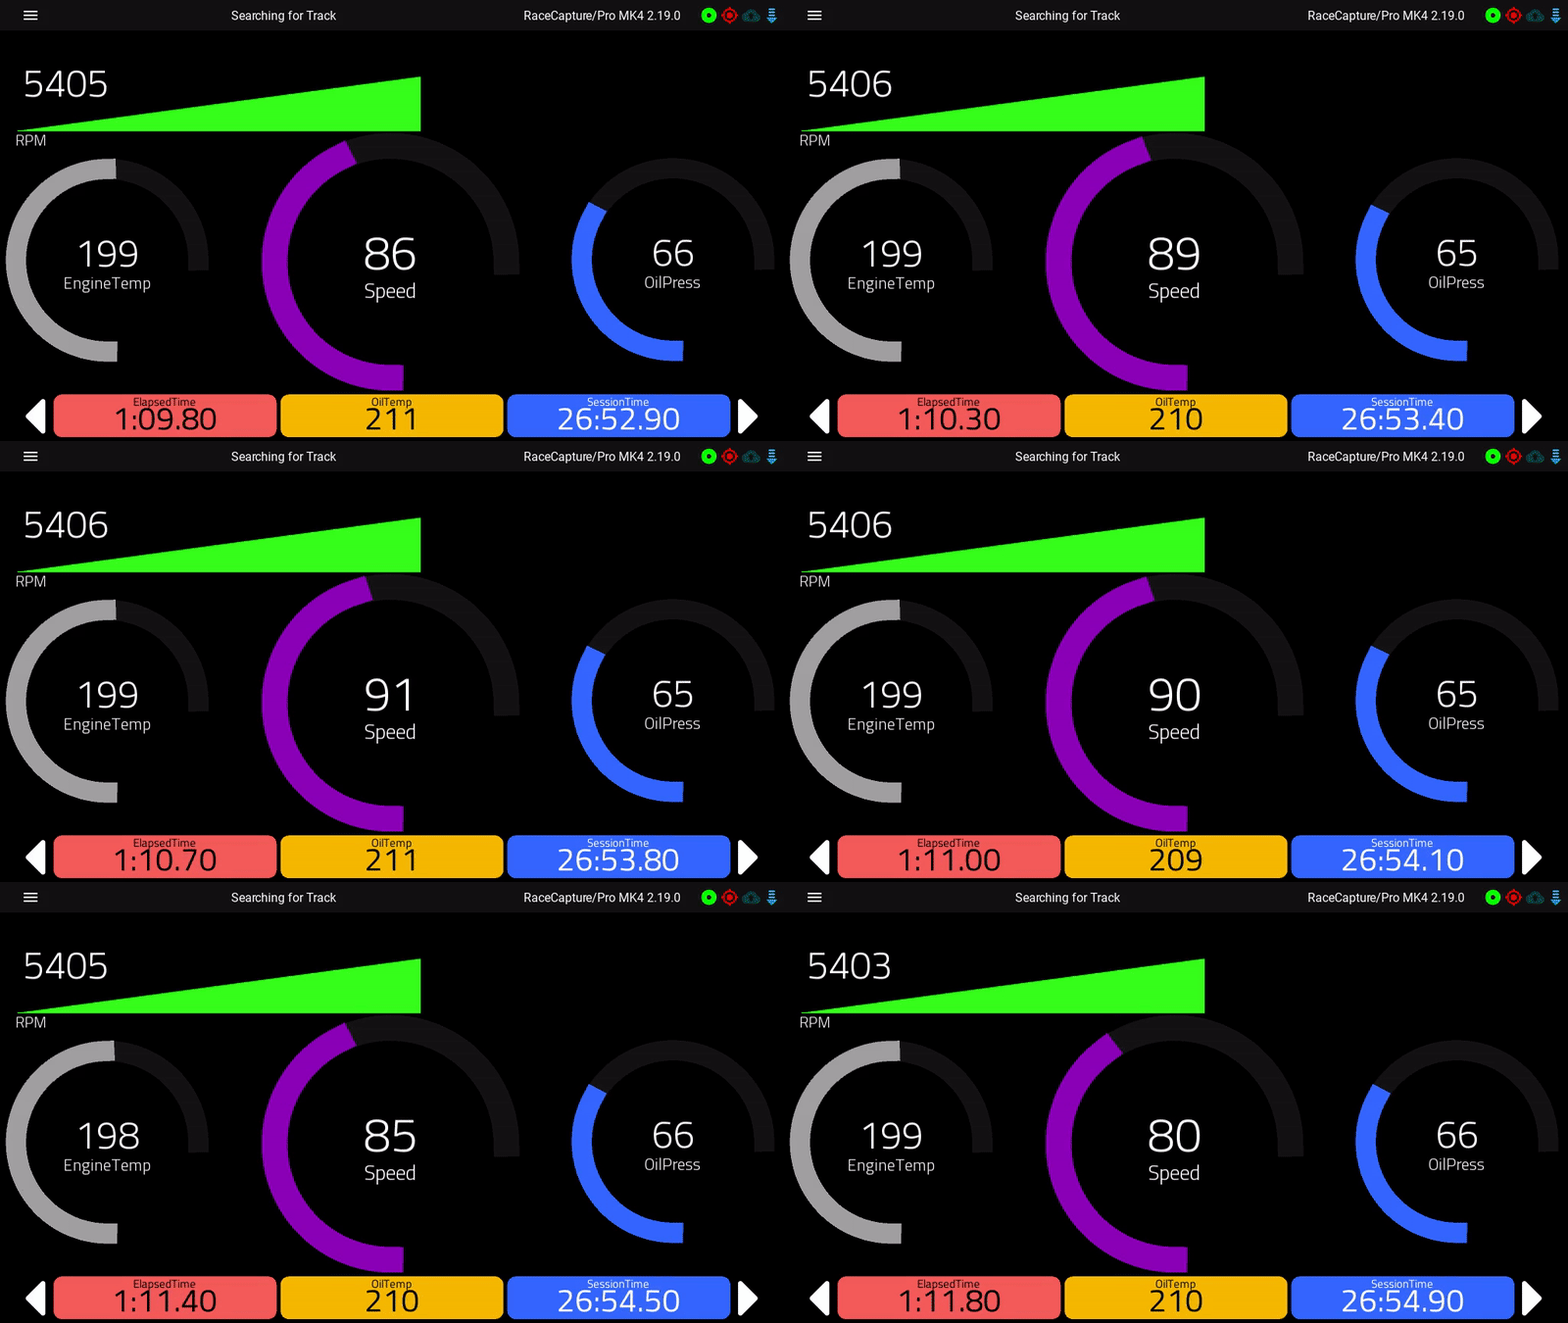
To view your dashboard, press the dashboard option on the main screen. | |||
[[image:racecapture_app_dashboard_screen.gif|800px]] | |||
== | ==Navigating Dashboard Pages== | ||
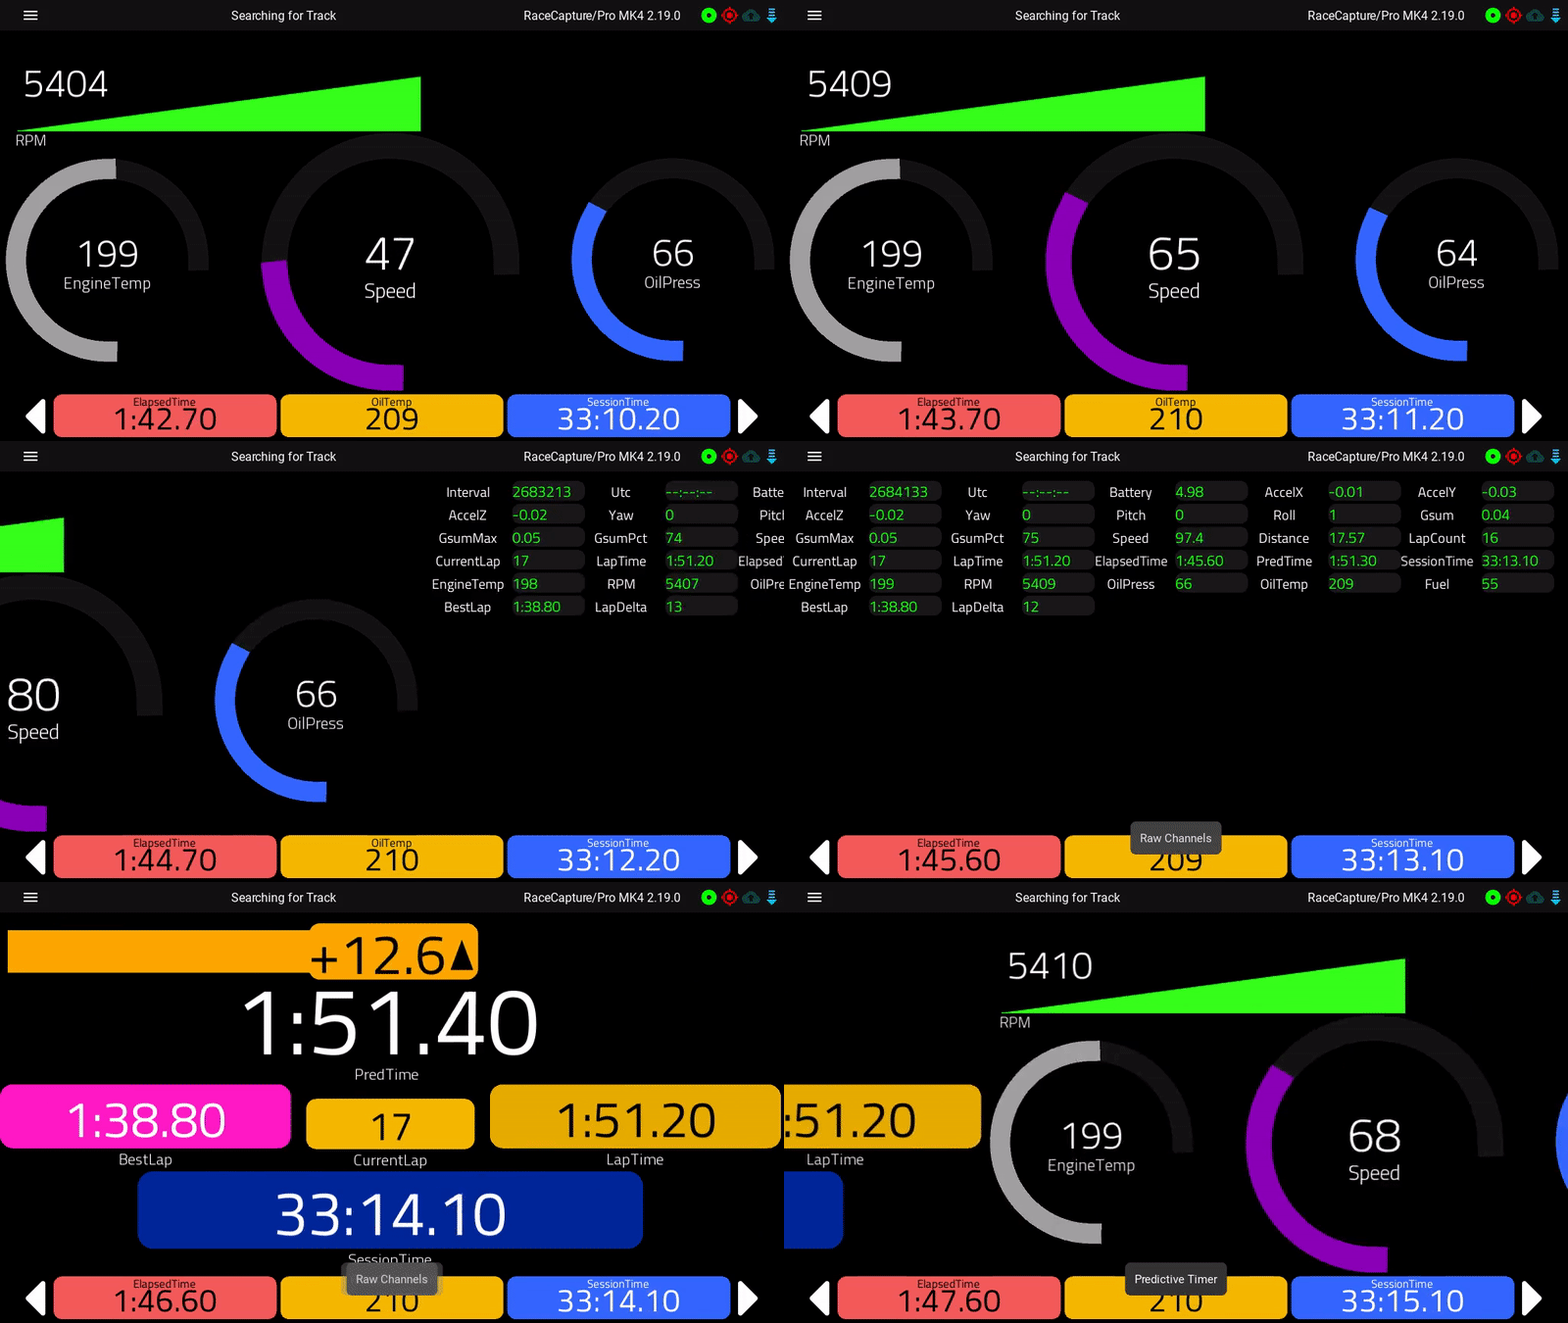
Multiple dashboard pages are supported. To move to a different page: | |||
* Swipe left or right on the screen | |||
* Press the left or right arrow buttons at the bottom of the screen | |||
* Press the left/right keyboard keys | |||
[[image:racecapture_app_dashboard_navigation.gif|800px]] | |||
== | ==Importing a new dashboard== | ||
[[image:racecapture_app_import_dashboard.gif|800px]]<br> | |||
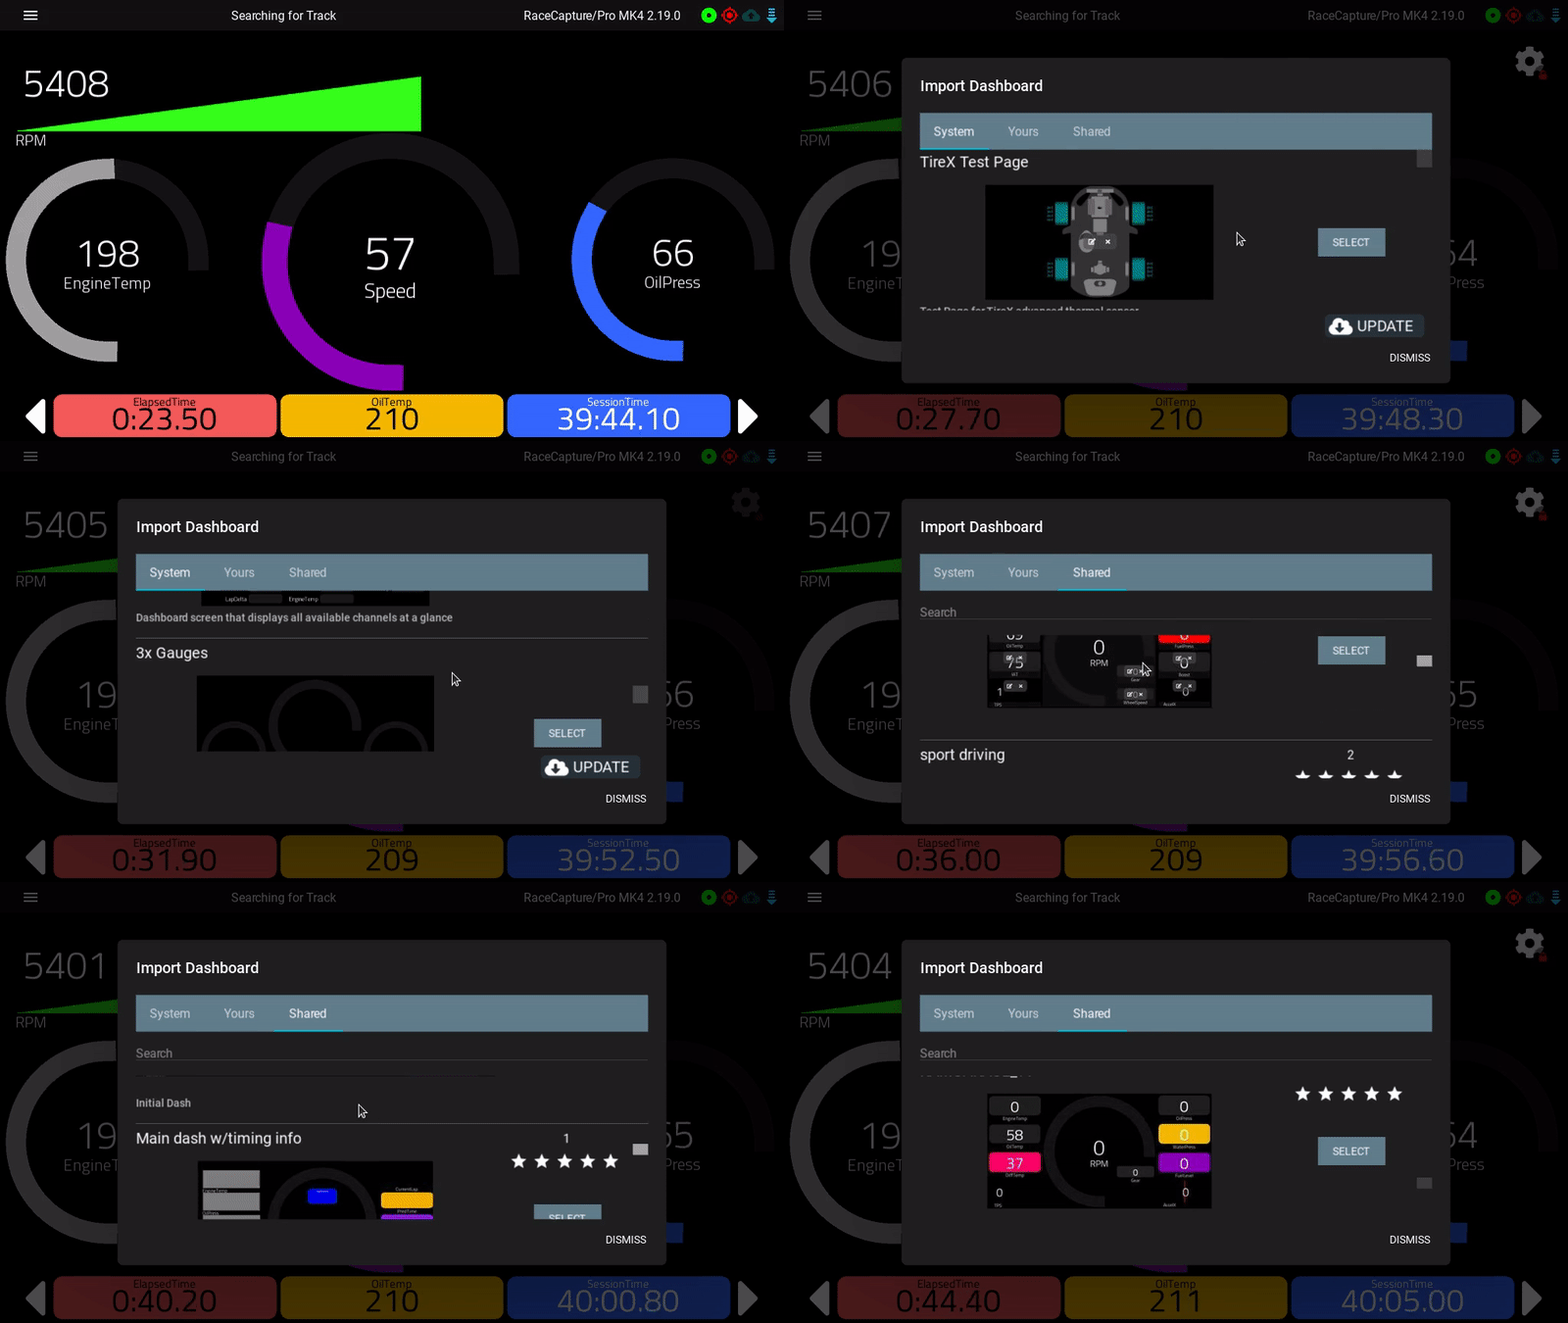
To customize your experience, you can import additional dashboard pages either from the system-provided templates or from those created by fellow racers. Follow the steps below to import a new dashboard: | |||
* Click on the gear icon located at the top right corner, and select the rectangular 'Add' icon. | |||
* In the 'Add' icon, you'll find three options: | |||
**System | |||
**Your | |||
**Shared | |||
* Choose your preferred option and scroll down to explore the available dashboard templates. | |||
* Press 'Select' next to the desired dashboard template to import it. | |||
=== | By following these steps, you can easily enhance your dashboard with a variety of templates tailored to your preferences. | ||
==Customizing a gauge== | |||
[[image:racecapture_customize_gauge.gif|800px]]<br> | |||
RaceCapture app provides, plenty of options for customizing gauges, and designing your own attractive gauges. | |||
To edit a gauge: | |||
* Unlock the dashboard | |||
* Press the gear button on the gauge to customize its settings. Depending on the gauge, you can edit: | |||
** Display channel | |||
** Color | |||
** Min/Max range | |||
** Precision (number of digits to the right of the decimal point) | |||
** Other settings depending on the gauge | |||
===Customizing Analog and Digital Gauges[[File:Good to Know.png|20px]]=== | |||
For Analog and Digital gauges, the Racepcapture app provides advanced options for customizing all the features of the Analog and Digital gauges ranging from the design of gauge, dial, color, and background, to font size, markers size, and precision using it using its super flexible analog and digital gauge editor. | |||
'''Analog Gauges'''<br> | |||
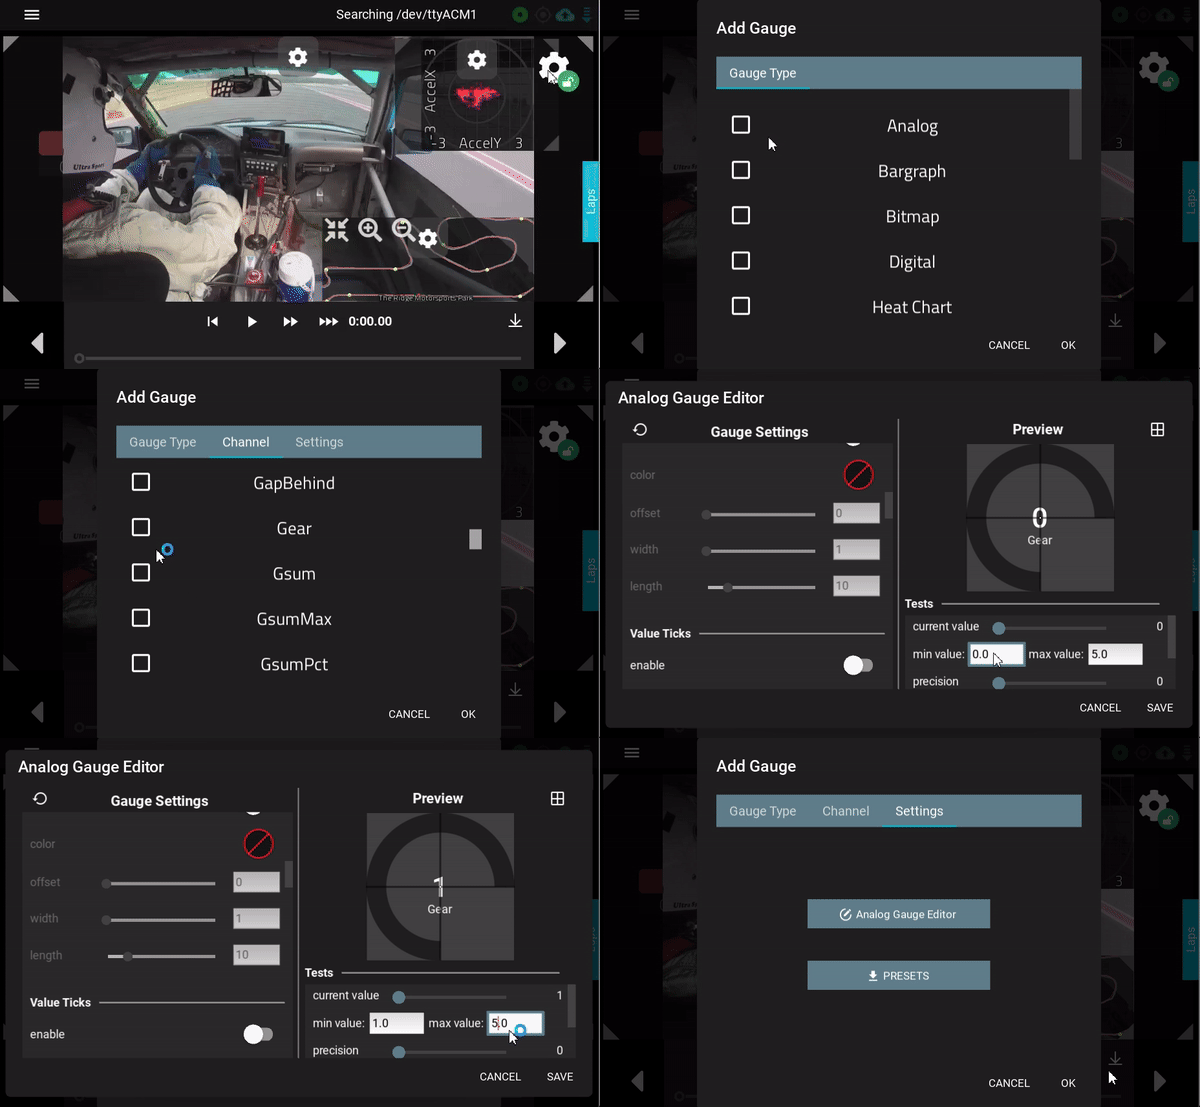
[[File:Customizing Analog Gauges (3).gif|800px]]<br> | |||
For customizing Analog gauges, follow the instructions given below | |||
* Unlock the dashboard | |||
* Press the gear button on the gauge and select the edit option | |||
* From the top bar, select the Channel and change the channel as per your requirement. | |||
* After selecting channel, select the setting option at the top bar and select Analog Gauge editor. | |||
* In Analog Gauge editor, there are tons of customizable options, with a handy preview area. | |||
'''Note :''' For more information, [https://www.autosportlabs.com/racecapture-app-2-12-0-next-generation-analog-gauges/ Click here] [[File:Good to Know.png|20px]] | |||
'''Digital Gauges'''<br> | |||
[[File:Customizing Digital Gauges.gif|800px]] | |||
For customizing Digital gauges, follow the instructions given below | |||
* Unlock the dashboard | |||
* Press the gear button on the gauge and select the edit option | |||
* From the top bar, select the Channel and change the channel as per your requirement. | |||
* After selecting channel, select the setting option at the top bar and select Digital Gauge editor. | |||
* In Digital Gauge editor, there numerous customizable options available | |||
'''Note :''' For more information, [https://www.autosportlabs.com/racecapture-app-2-13-0-next-gen-digital-gauges/ Click here] [[File:Good to Know.png|20px]] | |||
==Dashboard Alerts== | |||
You can create dashboard alerts for any channel. | |||
[[image:racecapture_app_gauge_alerts.gif|800px]] | |||
There are two ways to create a gauge alert: | |||
# Use the central alerts editor | |||
# Edit alerts from gauges | |||
===Use the central alerts editor=== | |||
[[File:Dashboard Alert .gif|800px]] | |||
* Access the dashboard settings by clicking on the gear icon. | |||
* Select More Settings and navigate to the Alerts tab | |||
* Select the channel you wish to create alerts for, or press the (+) icon to create a new alert | |||
* In the Alert rule tab, users can configure the alert active range, alert active after time, alert deactivate after time, and can also select the notification methods (Popup "Alert" or "Set Gauge color"). <br> | |||
'''Customize Notification'''<br> | |||
[[File:Popup Notification.gif|800px]] | |||
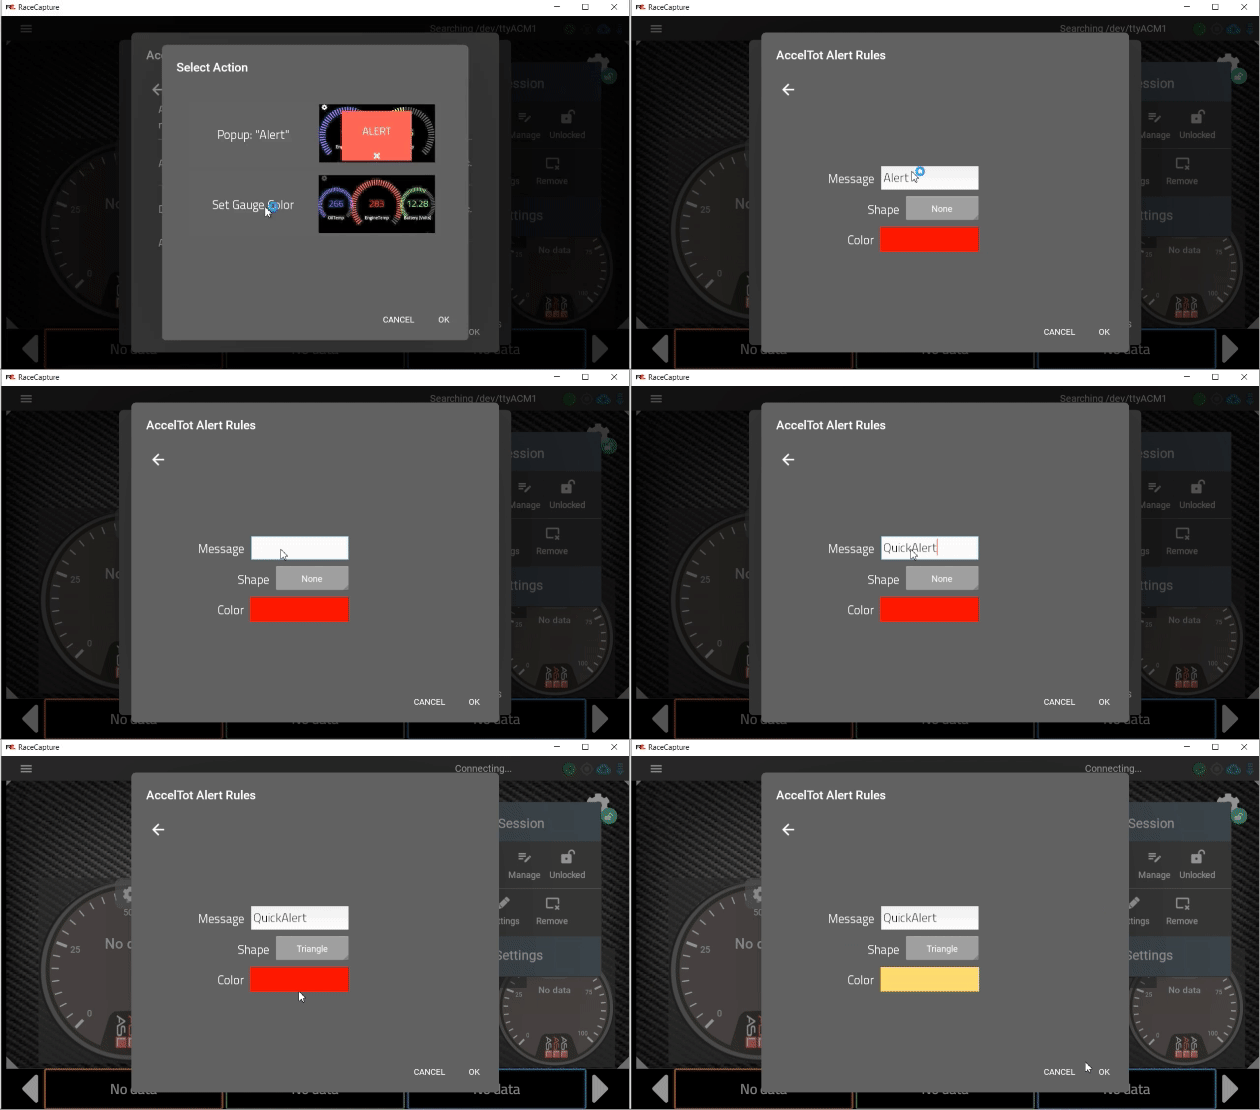
* '''Popup Alert notification:''' users can customize the message and color of alert by clicking on " add new action> selecting Popup: "Alert" > and change the message and color as per their need. | |||
* '''In Set Gauge color:''' users can customize the color of gauge by clicking on " add new action> selecting Set Gauge Color > Color | |||
===Edit alerts from gauges<br>=== | |||
[[File:Dashboard Alert using gauge edit.gif|800px]] | |||
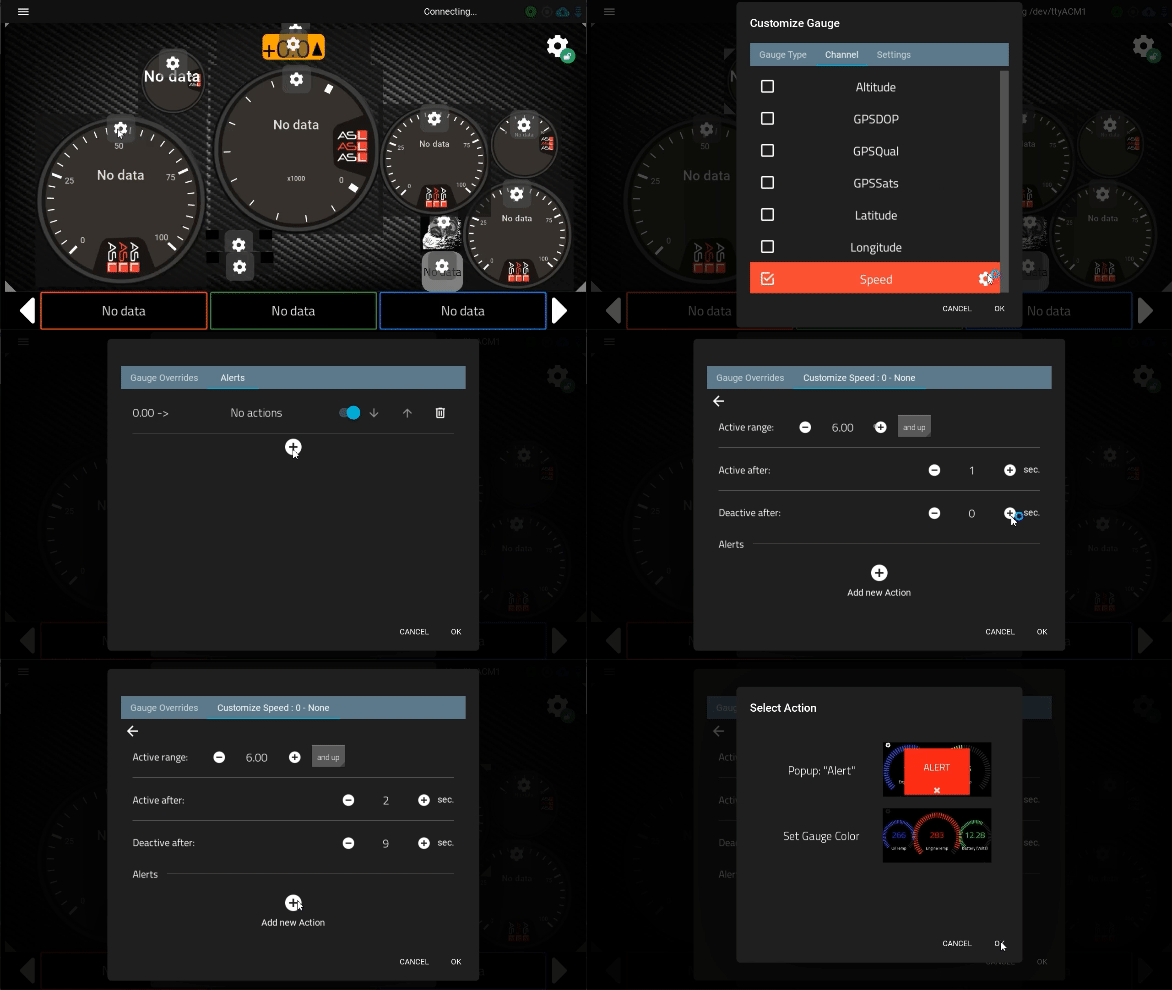
* Edit a gauge | |||
* Switch to the Channels tab and press the customization gear icon for the selected channel | |||
* Switch to the Alerts tab and customize your alerts | |||
==Customizing your dashboard== | |||
[[image:racecapture_app_dashboard_designer.gif|800px]]<br> | |||
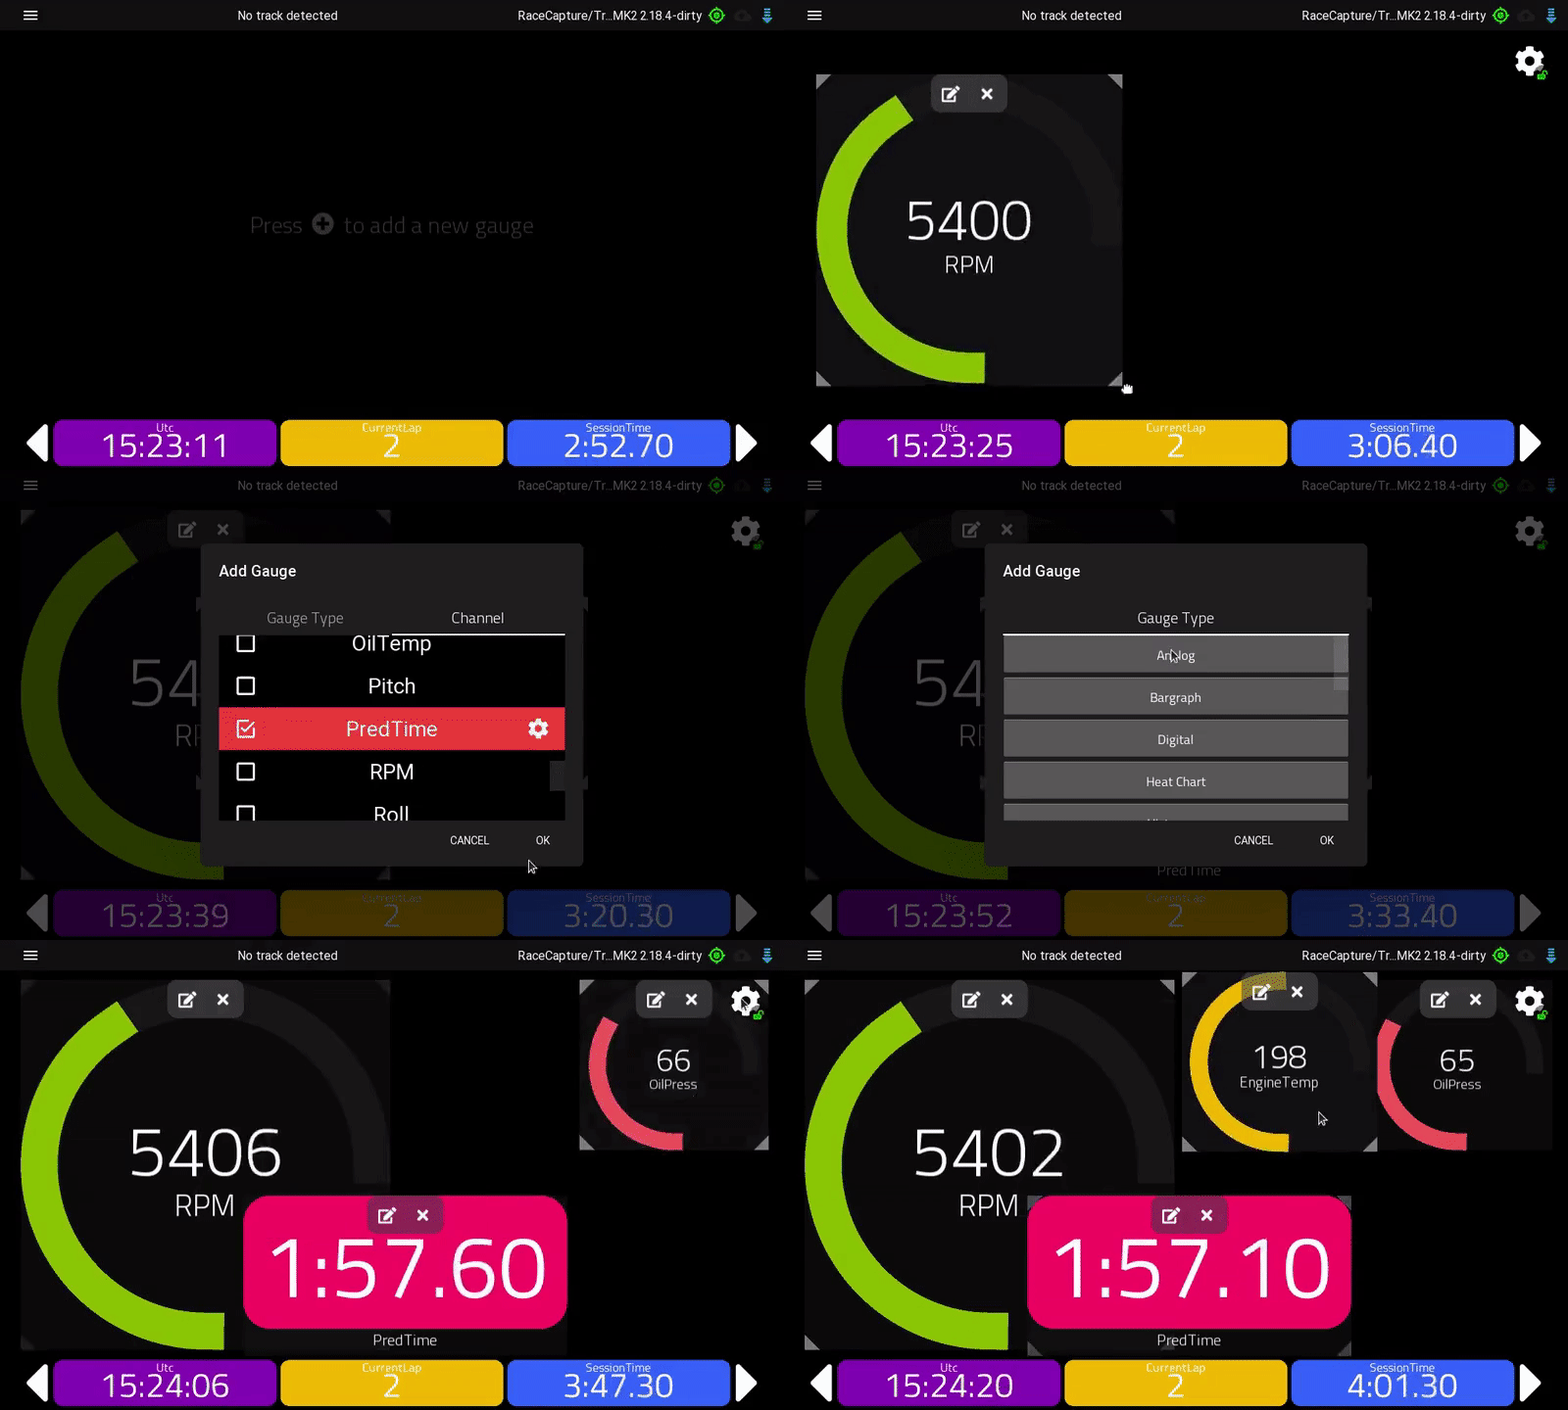
Users have the flexibility to modify an existing dashboard or create a new one from scratch by firstly unlocking the dashboard page and then adding/modifying gauges to create the design they want.<br> | |||
Users can add new gauges by following the steps given below: | |||
# Unlock the dashboard page by unlocking the gear icon present at the top right corner | |||
# After unlocking the gauge icon, open the gauge icon by clicking the gear icon. | |||
# In the add gauge option, select the gauge type, channel type, and configure the gauge setting as per your requirements. | |||
'''Note :''' For create a data-driven color-changing dashboard background [https://www.youtube.com/watch?v=vyo2WoF1iHo&t=1s Check Here] [[File:Good to Know.png|20px]] | |||
==Saving your dashboard== | |||
[[image:racecapture_app_save_dashboard.gif|800px]]<br> | |||
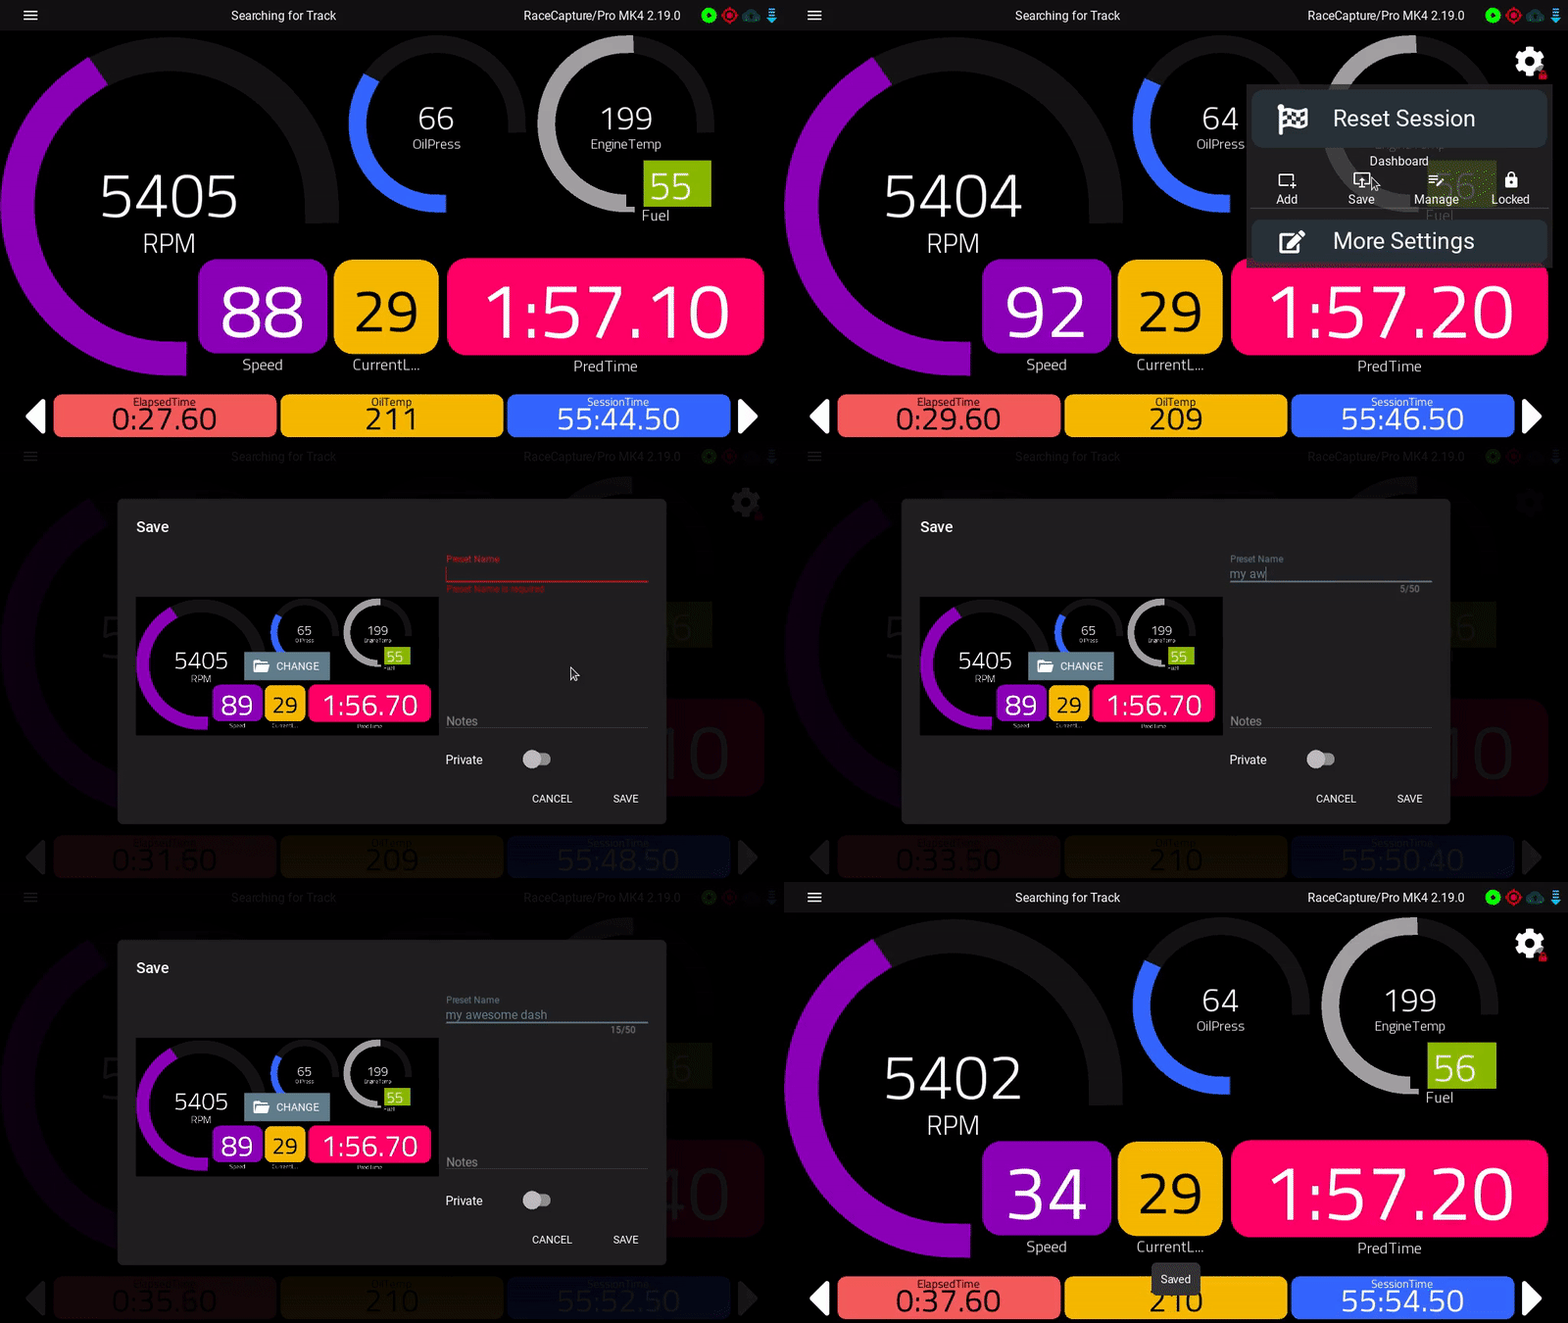
Once you have customized your dashboard to your liking, you can save it to the cloud, allowing easy sharing with other racers or access from different devices. Follow these steps to save your dashboard: | |||
* Click the gear icon at the top right corner to unlock the dashboard. | |||
* Click the save icon. | |||
* Under the "Create New" tab, press "New." | |||
* Provide a name for your dashboard and save it. | |||
<br> | |||
By following these steps, your customized dashboard will be saved to the cloud, accessible for sharing and convenient use across various devices. | |||
==Predictive Lap timing[[File:Good to Know.png|20px]]== | |||
RaceCapture/Pro offers predictive lap timing, which relies on a robust track detection system leveraging hundreds of track maps worldwide. | |||
[[image:racecapture_app_dashboard_predictive_timer.gif|800px]] | |||
===How it works=== | |||
* When GPS receives a lock, RaceCapture will search for a nearby track. | |||
* If a track is detected with one configuration, it is automatically selected. | |||
* If a track is detected with multiple configurations, the RaceCapture app will prompt you for which configuration you're using. | |||
* If no tracks are detected nearby, the RaceCapture app will offer the ability to create a track on the spot. | |||
** If you're not able to immediately create the track, you can do so later under '''Setup'''. | |||
* '''Track not found?''' [[RaceTracks|Submit the track to us]] and we'll get it into our online database. [[File:Good to Know.png|20px]] | |||
[[image:RaceCapture_create_custom_track.png|640px]] | |||
=Analysis= | |||
The RaceCapture app automatically record users session when triggered by the threshold they have configure under '''Setup / Automatic Control'''<br> | |||
'''Note [[File:Important Symbol.png|20px]]''' : The system default is to trigger on Speed | |||
To view the data, enter the '''Analysis''' mode and load an existing session. The session will be automatically named with the local track or with a timestamp. | |||
'''Loading a Session:'''<br> | |||
[[image:racecapture_app_analysis_load_session.gif|800px]]<br> | |||
Users can load sessions by: | |||
* Pressing the (+) button at the bottom of the pop-out list of laps. | |||
* Alternatively, press the gear icon on the dashboard and select 'Sessions'. | |||
<br> | |||
'''Importing a Session:'''<br><br> | |||
[[File:Importlogfile Update2.gif|800px]] | |||
For advanced analysis, users can import log files of sessions. For importing sessions, users can follow the steps given below. | |||
* On the home screen, click on the 'Analysis' option. | |||
* Press the (+) button at the bottom of the pop-out list of laps. | |||
* A new tab will open; in this new tab, select the 'Import Log' option. | |||
* Under 'Import Log,' press the 'Select' option under Datalog file and import the log file. | |||
'''Note [[File:Good to Know.png|20px]]:''' Users can also import datalog video files by clicking the 'Select' option under Datalog Video file. | |||
==Navigating data== | |||
Racepcapture app provides plenty of flexible options for navigating data. | |||
===Cursor across line chart=== | |||
Users can swipe across the line chart to correlate different points with the position on the track map. | |||
===Playback Control=== | |||
User can use the controls at the bottom to automatically play back the selected lap(s). Using the playback control option, user can also control the speed of laps.<br> | |||
Swipe across the data to compare various points correlated with the position on the track map. | |||
'''Zooming''' | |||
Users can zoom on the line charts data using a two-finger pinch gesture, or using the mouse scroll wheel or your laptop's trackpad scroll gesture. For the map, users can also zoom in, and zoom-out using the designated buttons present at the top right corner. | |||
==Reviewing Laps== | |||
Within the RaceCapture app, users have the ability to conduct a thorough analysis, and comprehensive comparison of laps for performance evaluation. This section guides you through various tools and features available for a detailed and comprehensive approach to lap analysis | |||
===Performance Metrics=== | |||
Racecapture app provides users with plenty of performance metrics options to comprehensively analyze the performance of your cars and optimize your driving strategy. The table below provides a detailed explanation of a few important available metric: | |||
{| class="wikitable" | |||
|+ Performance Metrics | |||
|- | |||
! Matric !! Description | |||
|- | |||
| AccelX, AccelY, AccelZ || Lateral, Longitudinal & Vertical acceleration in X, Y and Z axis | |||
|- | |||
| Battery || Battery voltage level | |||
|- | |||
| Brake || Brake position | |||
|- | |||
| CurrentLap || Current lap number | |||
|- | |||
| ElapsedTime || Time elapsed since the start of the session | |||
|- | |||
| EngineTemp || Temperature of Engine | |||
|- | |||
| GPSQual || GPS quality status | |||
|- | |||
| Gear || Current gear position | |||
|- | |||
| LapCount || Total laps completed | |||
|- | |||
| LapTime || Time taken for the current lap | |||
|- | |||
| MAP || Manifold absolute pressure | |||
|- | |||
| MaxRpm || Maximum RPM reached | |||
|- | |||
| OilPress || Engine oil pressure | |||
|- | |||
| Pitch || Angular orientation around the X-axis | |||
|- | |||
| PredTime || Predicted lap time based on the current performance | |||
|- | |||
| RPM || Engine revolutions per minute | |||
|- | |||
| Roll || Angular orientation around the Y-axis | |||
|- | |||
| ShiftLight || Status of the shift light | |||
|- | |||
| SessionTime || Total time elapsed in the current session | |||
|- | |||
| TPMSVoltLF, TPMSVoltLR, TPMSVoltRF, & TPMSVoltRR || Tire Pressure Monitoring System voltages of Left front, Left Rear, Right front & Right rear tires respectively | |||
|- | |||
| TPressLF, TPressLR, TPressRF, & TPressRR || Tires Pressure of Left front, Left Rear, Right front & Right rear tires respectively | |||
|- | |||
| TireITmpLF, TireITmpLR, TireITmpRF, & TireTmpRR || Internal tires temperature of Left front, Left Rear, Right front & Right rear tires respectively | |||
|- | |||
| Utc || Coordinated Universal Time | |||
|- | |||
|} | |||
In addition to the previously mentioned metrics, offers a diverse range of performance metrics for a comprehensive analysis of your vehicle's dynamics. These include:<br> | |||
'''Position and Timing Metrics:''' | |||
* CurrentLap | |||
* Distance | |||
* SessionTime | |||
* TnSlapTime | |||
'''Geospatial Metrics:''' | |||
* Latitude | |||
* Longitude | |||
* GPSQual (GPS Quality) | |||
* GPSSATS (Number of GPS Satellites)<br> | |||
'''Competition Metrics:''' | |||
* CompAhead (Comparison Ahead) | |||
* CompBehind (Comparison Behind) | |||
* CompFlag (Competition Flag) | |||
* GapAhead | |||
* LapsAhead | |||
* LapsBehind | |||
'''Dynamic Metrics:''' | |||
* GsumMax (Maximum G-force) | |||
* GsumPct (Percentage of Maximum G-force) | |||
* Interval | |||
'''Predictive Metrics:''' | |||
* PredTime (Predicted Lap Time) | |||
'''Built-in Default Sensors [[File:Important Symbol.png|20px]]'''<br> | |||
It's important to note that many of these metrics become available when related sensors are connected to the system. The RaceCapture app comes equipped with built-in default sensors, providing a foundational set of metrics: | |||
* '''Position (Latitude / Longitude):''' Derived from the GPS sensor, offering accurate location data. | |||
* '''Speed:''' Provided by the GPS sensor, delivering real-time speed information. | |||
* '''IMU (Accelerometer and Gyro):''' Three channels each, offering essential data on acceleration and rotation. | |||
* '''Battery:''' Monitors the voltage level, providing insights into the power status of the system. | |||
* '''OBDII Channels:''' When plugged into a vehicle with OBDII support, additional channels become available. These channels may vary based on the vehicle, but by default, TPS (Throttle Position Sensor), EngineTemp (Engine Temperature), and RPM (Revolutions Per Minute) are consistently accessible. | |||
<br> | |||
Each metric provides a unique perspective on your vehicle's performance, allowing for a nuanced analysis to refine your racing strategy. | |||
====Selecting Performance Metrics==== | |||
[[File:Metrice.gif|800px]] | |||
To choose and display specific performance metrics on your dashboard, follow these steps: | |||
''' | |||
* Unlock the gear icon present at the top right corner | |||
* Click on the gear icon and select the add gauge option | |||
* Pick the gauge type that suits your analysis needs (e.g., digital, analog, linear chart). | |||
* Within the chosen gauge type, select the "Channel" representing the performance metric you want to analyze. | |||
* Fine-tune the settings to align with your requirements. Adjust parameters such as scale, range, or units based on your preferences. | |||
* Save your gauge configuration to apply the selected performance metrics to your dashboard. | |||
<br> | |||
By following these steps, you can tailor your dashboard to showcase the specific performance metrics that matter most to your racing analysis. | |||
===Data Visualization=== | |||
Racecapture app provides innovative data visualization features, empowering users with advanced features for in-depth analysis. The table below provides a detailed explanation of available gauges: | |||
{| class="wikitable" | |||
|+ Data Visualization Options | |||
|- | |||
! Gauge Type !! Description | |||
|- | |||
| Analog || Visualize data with analog-style gauges for a real-time, dynamic display. | |||
|- | |||
| Bargraph || Use bar graphs to represent data discretely, providing a clear insight of data. | |||
|- | |||
| Bitmap || Display custom images or icons to enhance the visual representation of your data. | |||
|- | |||
| Digital || Showcase numerical data in a clear and precise digital format for quick reference. | |||
|- | |||
| Heat Chart || Gain insights into data patterns using color gradients to represent varying intensities. | |||
|- | |||
| Histogram || Understand data distribution through histogram charts, ideal for analyzing frequency. | |||
|- | |||
| LapTime || Focus on lap-specific metrics with dedicated gauges for lap time analysis. | |||
|- | |||
| Line Chart || Track trends and variations over time using line charts for comprehensive data analysis | |||
|- | |||
| Overview || Get a holistic view of your racing data with overview gauges summarizing key metrics. | |||
|- | |||
| Raw Channel || Provides an unfiltered analysis of individual parameters. | |||
|- | |||
| Scatter Plot || Identify correlations and relationships between two variables using scatter plots. | |||
|- | |||
| Thermal Image || Visualize temperature variations with thermal image gauges for heat-sensitive data. | |||
|- | |||
| Time Delta || Analyze time differentials between specific data points using time delta gauges. | |||
|- | |||
| Time Gap || Evaluate time gaps for strategic decision-making. | |||
|- | |||
| Track Map || Navigate your racing data on a track map, providing a spatial context to your analysis. | |||
|- | |||
| Video || Integrate video data seamlessly with dedicated video gauges for synchronized analysis. | |||
|} | |||
Users can explore the above mentioned gauge types to enhance their data visualization experience and get valuable insights. | |||
====Selecting Gauge Type==== | |||
[[File:Data Visualization.gif|800px]]<br> | |||
Users can select the desired gauge type by following the steps given below: | |||
* Unlock the gear icon present at the top right corner | |||
* Click on the gear icon and select the add gauge option | |||
* Pick the gauge type that suits your analysis needs (e.g., digital, analog, heart chart). | |||
===Customizing Views=== | |||
The RaceCapture app provides numerous customization options, allowing users to configure the app interface as per their preferences. Explore the key customization features below: | |||
'''Gauge Customization''' | |||
* Size, Shape, Type: Modify the size, shape, and type of available gauges to suit your visual preferences. | |||
* Color and Appearance: Personalize the color scheme and appearance of each gauge for a customized display. | |||
'''Gauge Placement''' | |||
* Location Customization: Users can move gauges to their preferred locations on the display | |||
* Position Setting: Set gauges precisely where you need them for an intuitive and efficient layout. | |||
'''Layer Management''' | |||
* Bring to Front or Send to Back: Adjust the layering of gauges with options to raise or lower their appearance. | |||
* Raise to Top or Lower to Bottom: Adjust the visibility of gauges by bringing them to the forefront or placing them at the back. | |||
'''Zoom Functionality''' | |||
* Zoom In & Zoom Out: For enhancing focus, users can Zoom-in and Zoom out gauge as per requirement. | |||
'''Alert Customization''' | |||
* Set Custom Alerts: Define alerts based on specific conditions or events during your race. | |||
* Threshold Adjustments: Configured alert thresholds to match your required value. | |||
'''Advanced Features Exploration''' | |||
* Video Integration: Seamlessly integrate video data for synchronized analysis with racing telemetry. | |||
* Thermal Imaging: Users can use the advance feature of thermal imaging for a more comprehensive understanding of your racing data. | |||
'''Regular Upgradation''' | |||
* Continuous Refinement: Users can regularly assess and fine-tune their dashboard layout and configurations based on changing preferences and real-time racing needs. | |||
User can experiment with different configurations to find the setup that enhances their racing strategy and overall performance. | |||
===Comparative Analysis=== | |||
[[File:Comparative Analysis.gif|800px]] | |||
RaceCapture app also provides advance comparative analysis options which help users to gain deeper insights into their performance over multiple laps. If your data includes lap times, this feature becomes a valuable tool in refining your racing strategy. Here's how users can take the advantage of the Comparative Analysis option: | |||
'''Navigate to Comparative Analysis:''' | |||
* Access the Comparative Analysis feature by selecting the laps dropdown list on the right side of the interface. | |||
'''Select Laps for Comparison:''' | |||
* Choose the laps you wish to compare from the available dropdown list. | |||
* Users can compare up to 4 laps simultaneously, whether they are from the same session or different sessions. | |||
'''Comprehensive Lap Comparison:''' | |||
* Use the Comparative Analysis option to comprehensively assess different laps. | |||
* Identify trends, analyze variations, and pinpoint areas for improvement in your driving performance. | |||
'''Performance Shortcomings Analysis''' | |||
* Uncover performance shortcomings by comparing key metrics across selected laps. | |||
'''Session-to-Session Comparison:''' | |||
* Compare laps from different sessions to track your progress over time. | |||
'''Advance Analysis Tools:''' | |||
* Users can use advance gauges and video playback, for a holistic understanding of their racing performance. | |||
==Reviewing raw data== | |||
If your data contains no laps, such as data from a static test or dyno pull, the data will be present in one entry under the loaded session. Select this entry to view the data. The RaceCapture app will auto-select the '''Time''' dimension if it detects no significant distance traveled within the data. | |||
==Exporting Data== | |||
You can export your sessions from your list of saved sessions. | |||
===Android=== | |||
* Press the gear icon to access your session list | |||
* Select the session you wish to export - Android will let you save it to a file, share to email, or any other app that accepts files. | |||
* '''Note:''' - if you save it to your local device, you can download it to your computer using a USB cable when your Android device is set up in File Transfer mode | |||
===iOS=== | |||
* Press the gear icon to access your session list | |||
* Export this to your local iOS device storage. | |||
* Connect your iOS device to your computer using a USB cable. | |||
* Access the iOS device using the iTunes file sharing capability. We recommend [http://www.i-funbox.com/en/index.html iFunBox] as an easy to use tool. | |||
* Copy the exported log file from your iOS device to your computer. | |||
===Importing to 3rd party software=== | |||
The RaceCapture log file format is plain CSV, which can be imported into 3rd party software. | |||
* '''RaceRender''' provides native support for the RaceCapture log file format. See the [[RaceCapture_RaceRender_Guide|exporting to RaceRender guide]]. | |||
* '''DashWare''' has been used by RaceCapture customers - Rowan Hick has a write-up on [https://www.rowanhick.com/2016/01/07/racecapture-pro-dashware-win Dashware integration]. | |||
=System Setup= | |||
You can configure all of RaceCapture's options under Setup. | |||
When the RaceCapture app detects the connected hardware, it will read the current setup from the device. | |||
* The setup information is presented as a series of pages, by topic. | |||
* When you change something on a setup page, you'll need to '''Write''' the changes back to the RaceCapture device before they take effect. | |||
[[Image:racecapture_setup_buttons.png]] | |||
==Explanation of buttons== | |||
* '''Save''': Save the current RaceCapture setup to a file, for backup. | |||
* '''Open''': Load a previously saved setup file. | |||
* '''Read''': Read the current setup from the RaceCapture device. | |||
* '''Write''': Writes any updated changes back to the RaceCapture device. '''Note: when you see the write button glowing / pulsing, it means there are pending changes to write back to the RaceCapture device''' | |||
==App Preferences== | |||
[[File:App Prederences 1.png|800px]]<br> | |||
On the App preferences section, users can customize various settings as per their requirements. The setting options are as follows: | |||
* '''Startup Screen:''' From the startup screen option, users can select any of the following as the startup screen " Homepage, dashboard, Setup & Analysis. | |||
* '''Record Session:''' Users can toggle the recording of sessions on or off based on their preference. | |||
* '''Send Telemetry:''' Control the transmission of telemetry to the Podium app (App will not send the telemetry if the device built-in telemetry module in on) | |||
* '''Connection Type:''' Switch between USB and Wifi as the RaceCapture device connection type. | |||
* '''Full Screen''' Users can enable the full screen mode of the app by turning on the full screen option present at the bottom | |||
==Race Tracks== | |||
[[File:Racetrack..gif|800px]] | |||
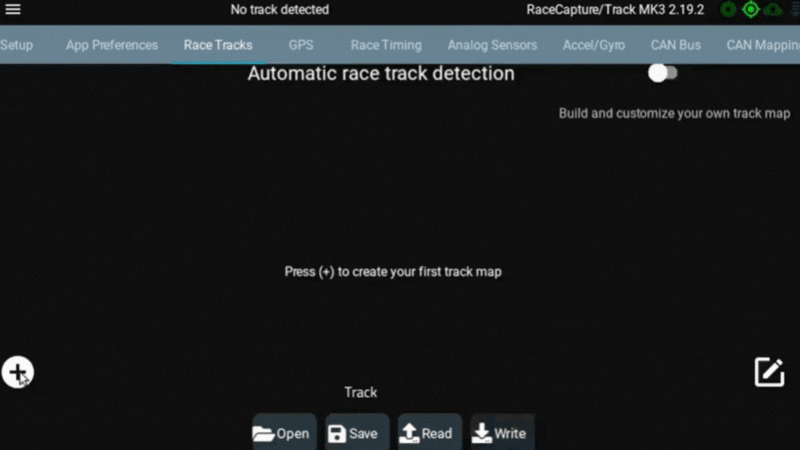
On the Race Tracks page you can create a custom track, which will be included in the library of track maps for automatic detection. Follow these steps to set up your custom track: | |||
'''Disable Automatic Race Track Detection:''' | |||
* To create a custom track, turn off 'Automatic race track detection' option present at the top right corner<br> | |||
'''Add a New Track''' | |||
* Press the add (+) button, present at the bottom left corner, to begin the process of adding a new track to the library.<br> | |||
'''Choose Track Style''' | |||
* Upon selecting to add a new track, opt for either a circuit or Autocross (point-to-point) style course.<br> | |||
'''Select Start and Finish points''' | |||
* Follow the prompts to choose the start and finish points of your track. Drive to the desired start line and press start. You can either finish immediately to create a simple track map with a single start/finish point or proceed to create more complex configurations.<br> | |||
'''Drive Through the Track''' | |||
* Drive through the track as you've configured, ensuring to drive a sufficient distance away from the start/finish point before returning.<br> | |||
'''Confirm Track Creation''' | |||
* Confirm your track creation by following on-screen instructions. You may choose to create a minimal track with just a start/finish point<br> | |||
'''Name Your Track''' | |||
* Give your track a name and finish the setup process | |||
By following the above mentioned simple steps, you can easily set up a custom track and can optimize your racing performance. | |||
'''Note[[File:Good to Know.png|20px]]:''' For further details, [https://www.youtube.com/watch?v=-q3YzFa6LQM Click Here] | |||
==GPS== | |||
[[File:GPS.png| 800px ]] | |||
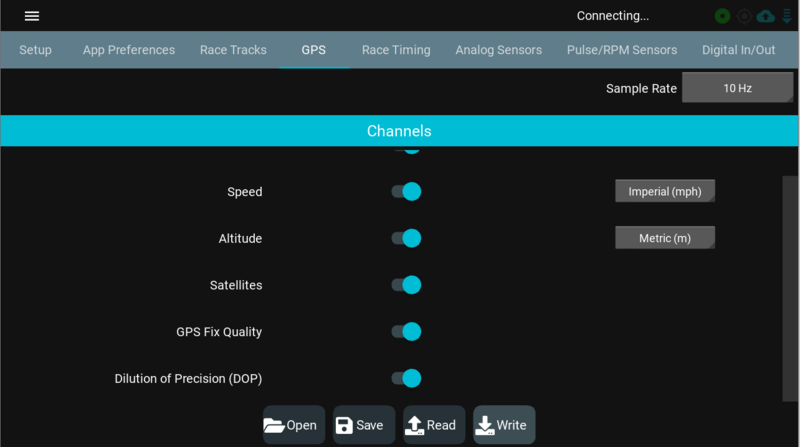
The GPS page allows user to configure different parameters according to their preferences. Here's a guide on adjusting GPS settings:<br> | |||
'''GPS Sample Rate''' | |||
* Adjust the GPS sample rate according to your preference. Options include 1Hz, 5Hz, 10Hz (default), 25Hz, and Disable. [[File:Important Symbol.png|20px]] A 10Hz sample rate is recommended for the best balance of performance and accuracy. | |||
<br> | |||
'''Units Selection''' | |||
* Choose between imperial and metric units based on user's measurement preferences. | |||
<br> | |||
'''Channel Configuration''' | |||
* Enable or disable specific GPS channels as per user's requirements. Channels include Position, Speed, Altitude, Satellite, GPS Fix Quality, and Dilution of Precision (DOP). | |||
<br> | |||
'''Important Note [[File:Mandatory Action.jpg|20px]]''' | |||
* We strongly recommend keeping the default channels enabled for proper operation of analysis and lap timing [[RaceCapturePro2_GPS|Getting the best GPS performance]]. | |||
<br> | |||
By customizing these GPS settings, users can ensure accurate data capture and enhance the overall precision of their RaceCapture system. | |||
==Race Timing== | |||
[[File:Race Timing.png|800px]]<br> | |||
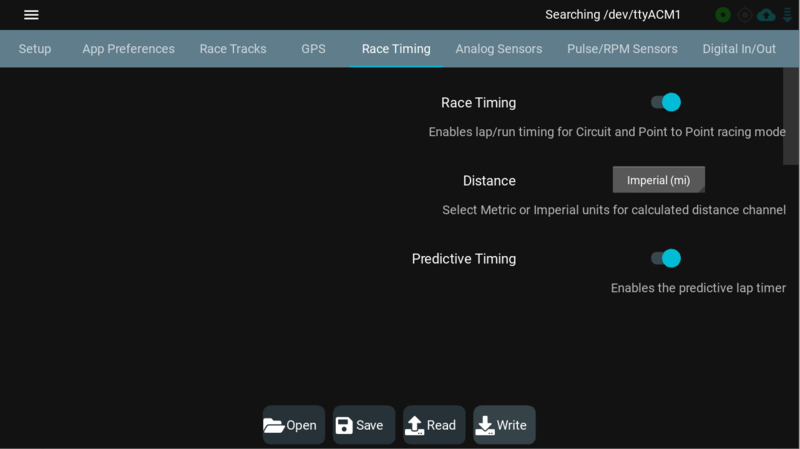
In this section, users can customize the behavior of the lap timer and predictive lap timer. Also, there's an option to choose between metric and imperial units for calculating distance. Follow these instructions to set your race timing preferences: | |||
'''Enable/Disable Lap Timer''' | |||
* Toggle the lap timer on or off based on your preference. | |||
<br> | |||
'''Enable/Disable Predictive Lap Timer''' | |||
* Choose to activate or deactivate the predictive lap timer as desired. | |||
<br> | |||
'''Distance Unit Selection''' | |||
* Opt for metric or imperial units for calculating the distance channel. | |||
<br> | |||
'''Note [[File:Important Symbol.png|20px]]:''' It is recommended to leave these features 'on' to fully utilize the capabilities of the lap timer and predictive lap timer. | |||
By configuring these settings, users can customize the race timing features according to their specific needs and preferences. | |||
==Analog Sensors== | |||
[[file:racecapture_app_setup_analog_sensors.jpg|800px]] | |||
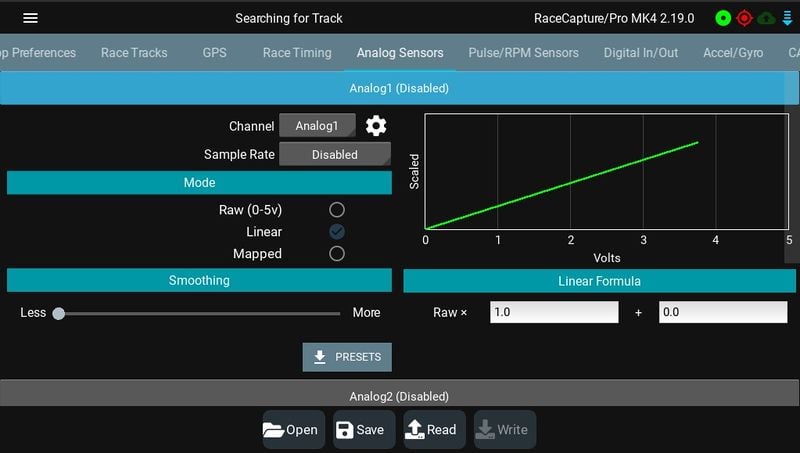
This section empowers users to configure and calibrate their analog sensors as per their specific requirements. To set up analog sensors, follow these straightforward steps: | |||
<br> | |||
* '''Channel Selection:''' Begin by selecting the desired channel type (sensor) for configuration | |||
* '''Sample Rate Configuration:''' Configure the sample rate to suit your preferences and data acquisition needs. | |||
* '''Mode Selection:''' Choose from three available modes: Raw, Linear, or Mapped, based on your intended use. | |||
* '''Linear Formula or Interpolated Mode:''' In the selected mode, input values in either linear formula or interpolated mode, depending on your Mode Selection.<br> | |||
By following these steps, users can configure and calibrate analog sensors to optimize their performance within the RaceCapture system | |||
<br> | |||
'''Note [[File:Good to Know.png|20px]]:''' For more details regarding the calibration of analog sensors, please visit [https://wiki.autosportlabs.com/RaceCapturePro_Sensors#Calibrating_Analog_Sensors Calibrating Analog Sensors] | |||
==Pulse/RPM sensors== | |||
[[file:racecapture_app_setup_pulse_rpm_sensors.jpg|800px]] | |||
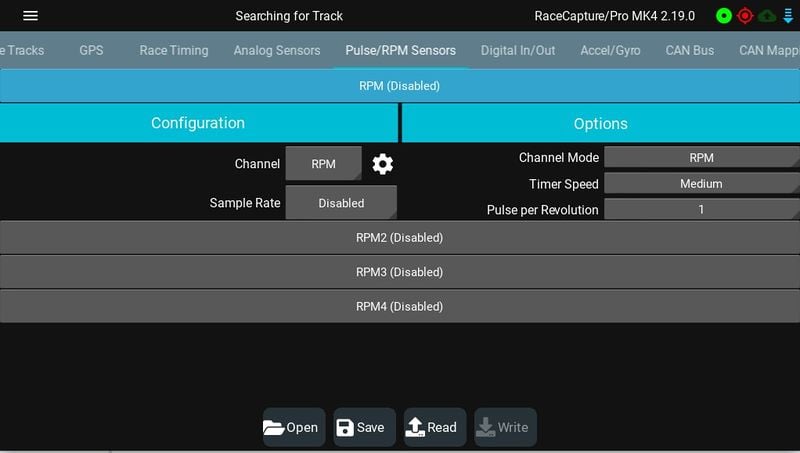
This section provide user the option to configure and calibrate RPM and pulse-type sensors, including those for wheel speed. Similar to the analog sensor configuration, this section allows users to: | |||
'''Channel Selection''' | |||
* Choose the appropriate channel for the RPM or pulse-type sensor configuration. | |||
<br> | |||
'''Sample Rate Configuration''' | |||
* Configure the sample rate according to your specific requirements for accurate data capture. | |||
<br> | |||
'''Channel Mode Options''' | |||
* Select the desired channel mode from RPM, Frequency, and Period (in milliseconds and microseconds). | |||
<br> | |||
'''Timer Speed Adjustment''' | |||
* Adjust timer speed with options such as slow, medium, and fast to match your sensor's characteristics. | |||
<br> | |||
'''Pulses Per Revolution''' | |||
* Specify the number of pulses per revolution for precise sensor calibration. | |||
<br> | |||
By utilizing these configuration options, users can effectively calibrate RPM and pulse-type sensors as per their specific needa. | |||
==Digital In/Out== | |||
[[file:racecapture_app_setup_gpio_sensors.jpg|800px]] | |||
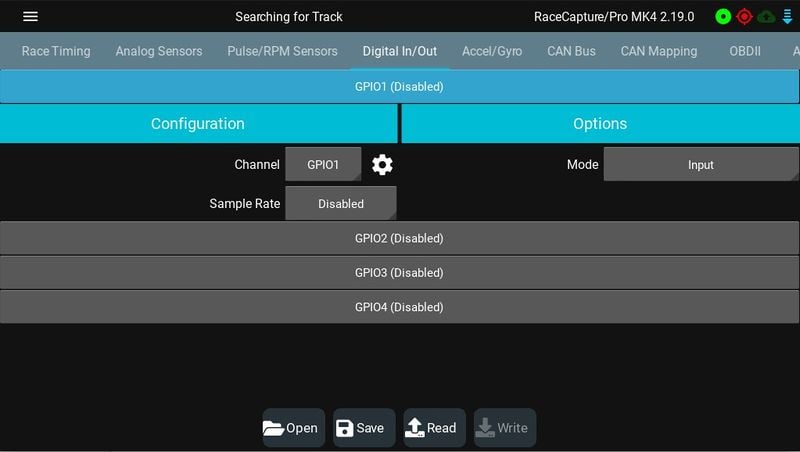
This section provide user the option to configure the General Purpose Input/Outputs (GPIOs) for their RaceCapture system. In this section users can adjust the sample rate and specify whether the mode should be set to input or output. | |||
By following these straightforward steps, users can configure the digital input/output settings to meet their specific requirements within the RaceCapture system. | |||
==Accel / Gyro== | |||
[[image:racecapture_app_setup_accel_gyro_sensors.jpg|800px]] | |||
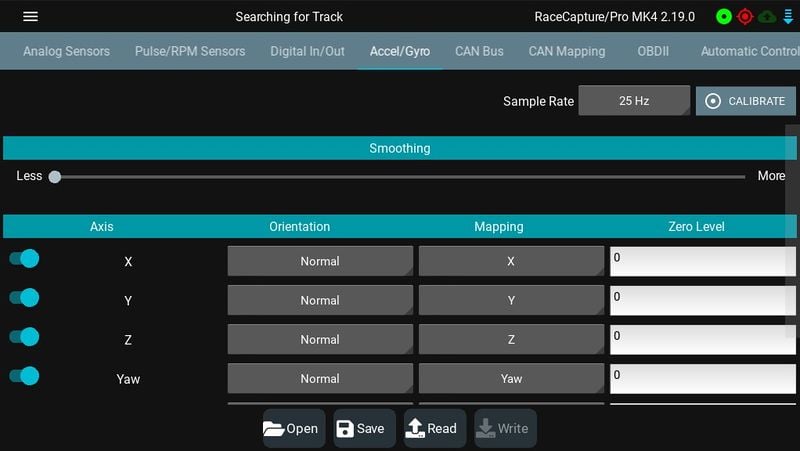
For optimal performance, it is recommended to mount RaceCapture square with the chassis, ensuring that the harness connectors face the front of the vehicle. | |||
'''Channel Remapping''' | |||
* Users have the flexibility to re-map channels by reassigning the physical axis to the mapped channel, offering customization based on specific needs. | |||
'''Calibration Process''' | |||
* Define the desired channel mappings | |||
* Calibrate the accelerometer and gyro by pressing the dedicated calibrate button. | |||
* Confirm the calibration by pressing the write button to save the settings back to RaceCapture. | |||
==CAN bus== | |||
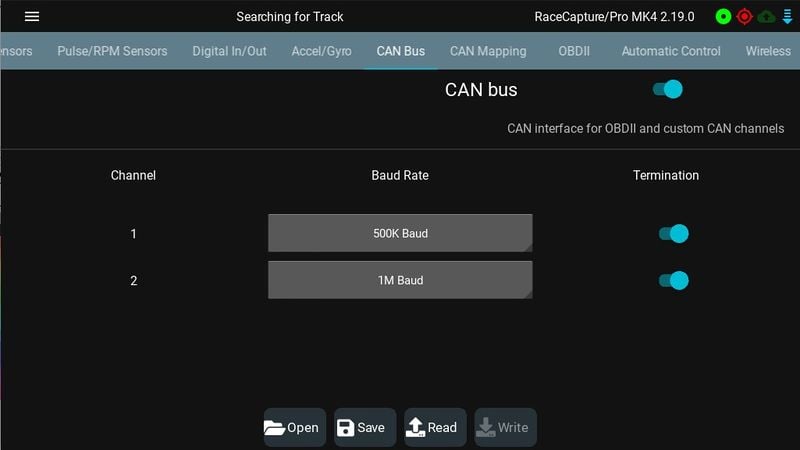
To enable CAN bus communications, set the CAN bus setting to '''ON'''. | |||
CAN bus baud rates are configurable; common rates are 250K, 500K and 1MB. RaceCapture defaults to: | |||
* 500K for CAN1, which is common for OEM and aftermarket ECUs | |||
* 1MB for CAN2, which matches the standard for our CAN bus accessories. | |||
[[image:racecapture_setup_can_bus_network.jpg|800px]] | |||
==CAN bus mapping== | |||
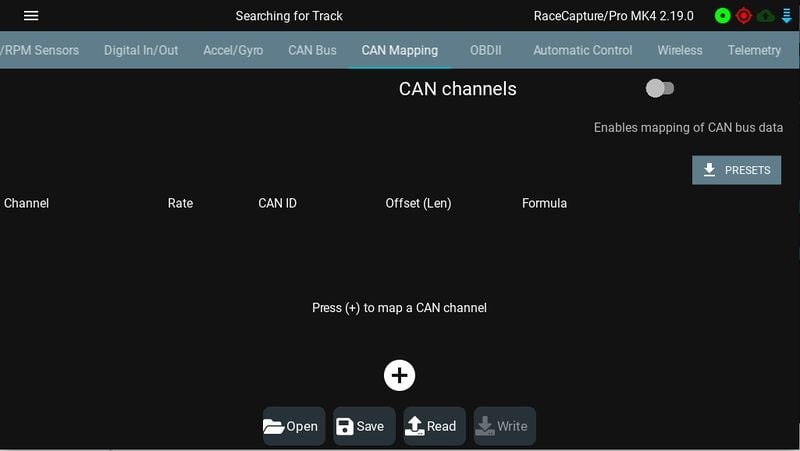
RaceCapture offers a powerful CAN bus mapping capability, allowing you to map CAN bus data frames to real-world sensor values. | |||
See our comprehensive guide on [[CAN_Bus_Integration|Using and mapping CAN bus sensor data]] [[File:Good to Know.png|20px]] | |||
[[image:racecapture_app_can_bus_mapping.jpg|800px]] | |||
==OBDII== | |||
[[File:OBDII.gif|800px]] | |||
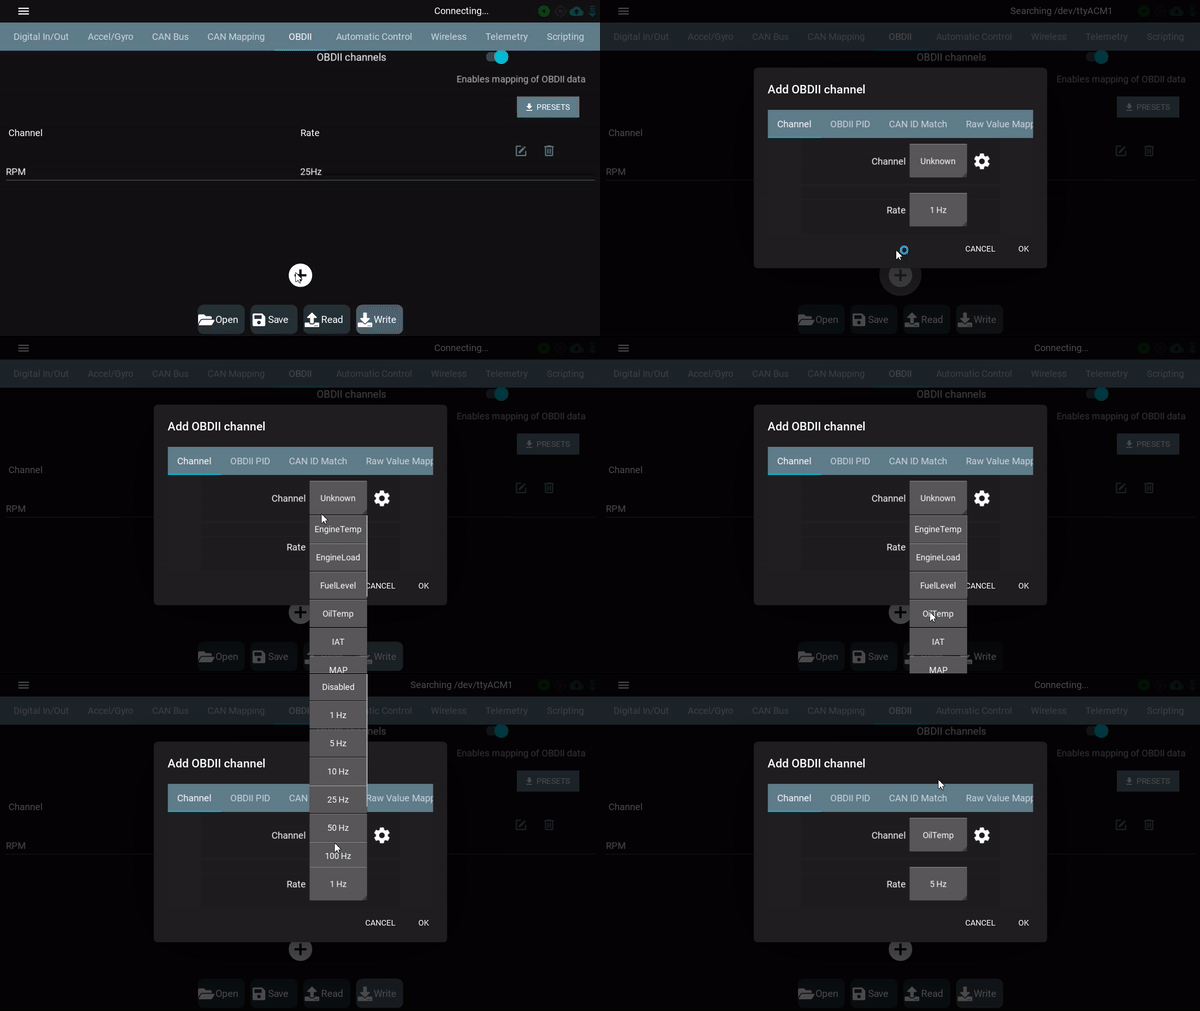
User can configure the OBDII channels setting and add a new OBDII channel within this section. To add a new OBDII channel To add a new OBDII channel, follow the instructions below: | |||
===Adding OBDII Channel=== | |||
* To add a new OBDII channel, click on the + button present at the bottom | |||
<br> | |||
'''Selecting OBDII channels''' | |||
* Access the channel menu and choose the desired OBDII channel from the standard list available on the OBDII configuration screen. | |||
<br> | |||
'''Selecting sample rates''' | |||
* Select the sample rates from the Rate icon present in the Channel menu. | |||
* '''Note [[File:Good to Know.png|20px]]:''' For channels that require a faster response rate, like RPM and TPS, we recommend 10, 25 or 50Hz. More slowly changing channels like EngineTemperature should be set to 1 or 5Hz. | |||
<br> | |||
'''Note about unsupported channels [[File:Mandatory Action.jpg|20px]]''' | |||
If your ECU does not support a channel, the value will remain at 0. RaceCapture will time-out waiting for a response from the ECU, which will affect the performance of other channels. We recommend removing all unsupported channels to ensure optimal OBDII performance. | |||
The OBDII section offers extensive customization options, including unit conversions, mode, and PID customization. For additional information, visit [https://wiki.autosportlabs.com/RC_OBDII Here] [[File:Good to Know.png|20px]] | |||
==Automatic Control== | |||
[[image:racecapture_setup_automatic_control.jpg|800px]] | |||
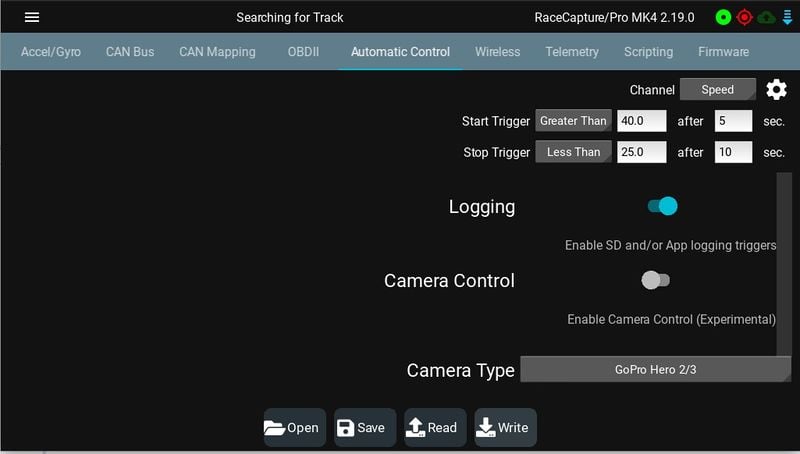
The automatic control section provides user with various options to customize their RaceCapture system's behavior. Within this section, users can: | |||
'''Start/Stop Trigger Time''' | |||
* Set the trigger time for starting and stopping | |||
<br> | |||
'''Logging Triggers''' | |||
* Enable or disable SD card and app logging triggers. | |||
<br> | |||
'''Camera Control''' | |||
* Toggle camera on/off as per the requirements | |||
<br> | |||
Camera Type Selection | |||
* Choose the desired camera type directly from this section | |||
By utilizing these options, users can configure the automatic control settings to suit their specific requirements within the RaceCapture system. | |||
==Wireless== | |||
[[image:racecapture_app_setup_wireless.jpg|800px]] | |||
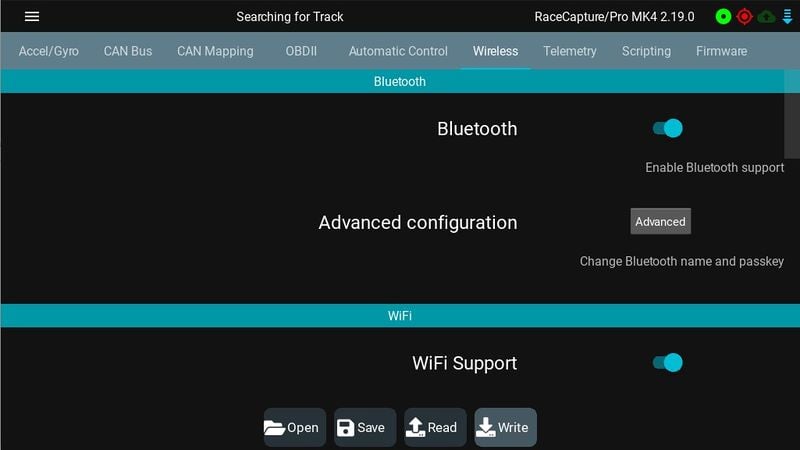
The Wireless section offers a range of configuration options for Bluetooth, WiFi, and cellular settings. | |||
===Bluetooth=== | |||
In the Bluetooth section, users can toggle Bluetooth on/off, and customize the Bluetooth name and passcode. | |||
===WiFi=== | |||
In wireless section, users can enable / disable wireless support and can configure RaceCapture's WiFi for both '''Access Point''' and '''Client''' mode. | |||
'''Client Mode:''' | |||
To enable client mode, specify the SSID and password for the network you wish to connect to and turn the client mode switch to on | |||
'''Access Point Mode:''' | |||
To enable the RaceCapture access point, specify the SSID and a password. | |||
'''Note [[File:Mandatory Action.jpg|20px]] :''' If specified, passwords must be minimum of 8 characters. Leave the field blank to create an open network. | |||
===Cellular Configuration=== | |||
This section enables users to enable/disable the on-board cellular option, select the designated regional profile, and configure the Access Point Name (APN). | |||
By utilizing these wireless configuration options, users can configure their RaceCapture system to integrate with various networks. | |||
==Real-time Telemetry== | |||
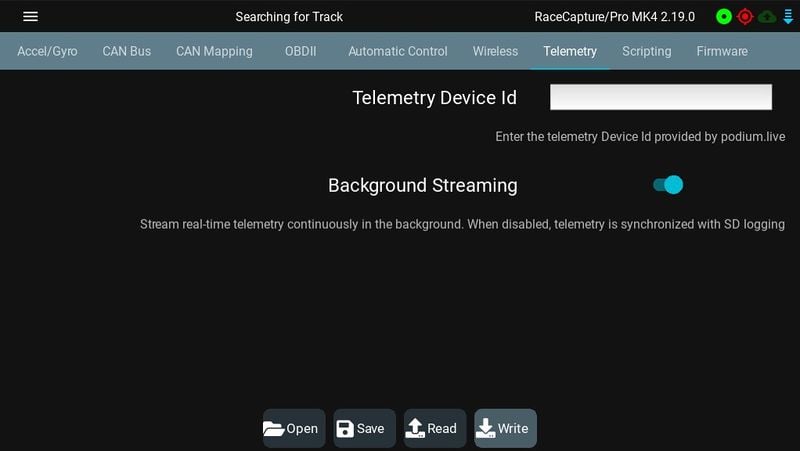
With the real-time telemetry feature you can live-stream your data to [http://podium.live Podium] so you can compare and share laps and runs with your friends. Enable by setting your Podium Device ID provided by your [http://podium.live Podium Account] [[File:Good to Know.png|20px]] | |||
See the [[RaceCapture_real_time_telemetry|RaceCapture real time telemetry setup guide]] [[File:Good to Know.png|20px]]for details on setting up this feature. | |||
[[image:racecapture_app_setup_telemetry.jpg|800px]] | |||
[[image:podium.png|thumb|200px]] | |||
http://i.imgur.com/WzHsdU1.gif | |||
===Batch Upload to Podium=== | |||
[[File:Batch Upload Updated.gif|800px]] | |||
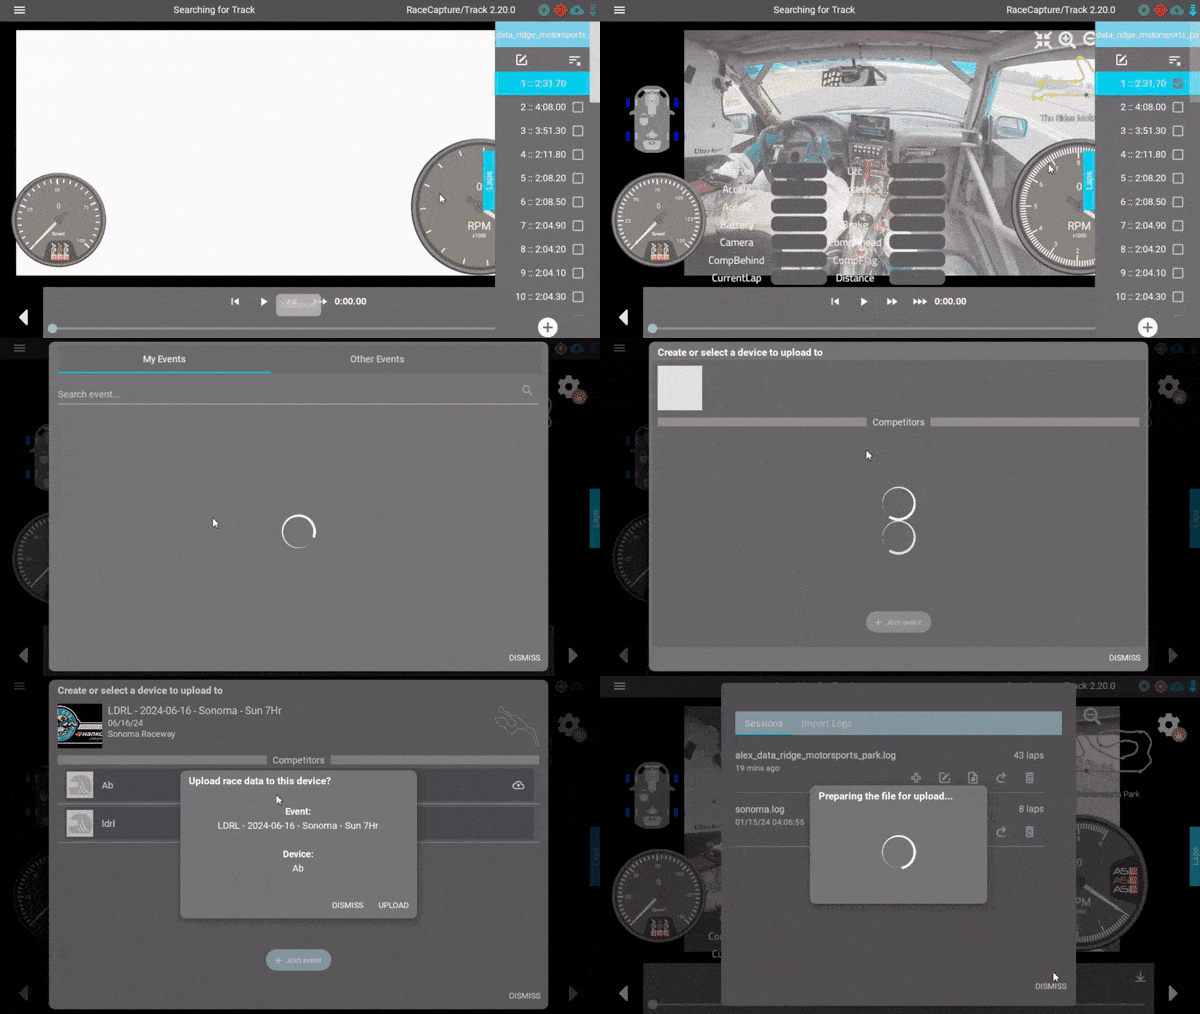
Users can upload sessions directly from the RaceCapture app to Podium after completing their session. Here's how to batch upload to Podium: | |||
* Drive some great laps at your favorite race track and then return to the pits | |||
* Navigate to Analysis and bring up the session list | |||
* Press the Export button next to the session you want to export | |||
* Select Podium | |||
* Create a new Podium event or select an existing one (either yours or a public event shared with you) | |||
* Add a device to the selected event. If one of your devices is already in the event, you can just select it instead | |||
* Confirm the upload, and it will upload automatically | |||
Podium will queue the file for processing, and the laps will soon appear in the selected event. | |||
==Scripting== | |||
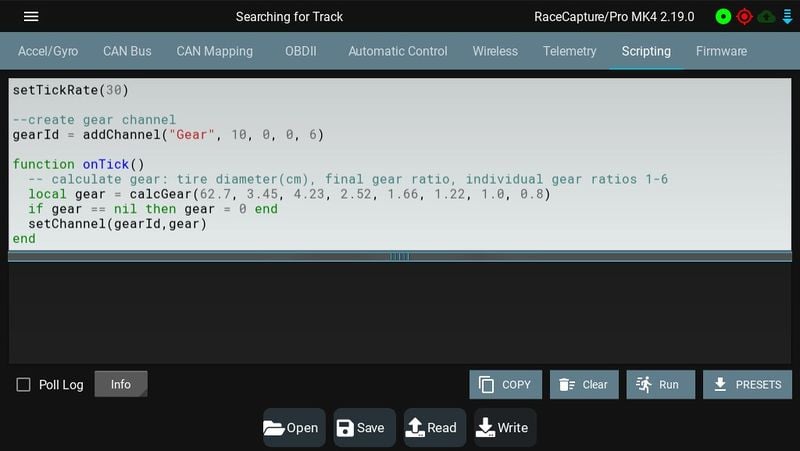
You can customize the behavior of your system by writing small Lua scripts; you can do things like: | |||
* Create live math (virtual) channels that are calculated on the fly | |||
* Broadcast Custom CAN bus messages | |||
* Control a fan based on the temperature of an analog channel (e.g. EngineTemp) | |||
<br> | |||
See the [[RaceCapturePro_Lua_Scripting|Lua scripting guide]] [[File:Good to Know.png|20px]] for a complete how-to, including helpful examples. | |||
[[image:racecapture_app_setup_lua_scripting.jpg|800px]] | |||
===Diagnostic Logs=== | |||
To view the log messages provided by the RaceCapture unit, you can enable the '''Poll log''' check box. You can copy the current log to the clipboard by pressing the '''Copy''' button. | |||
'''Note [[File:Good to Know.png|20px]]:''' These logs are useful for diagnosing issues with your RaceCapture unit, as well as seeing messages printed by your Lua script. | |||
==Firmware== | |||
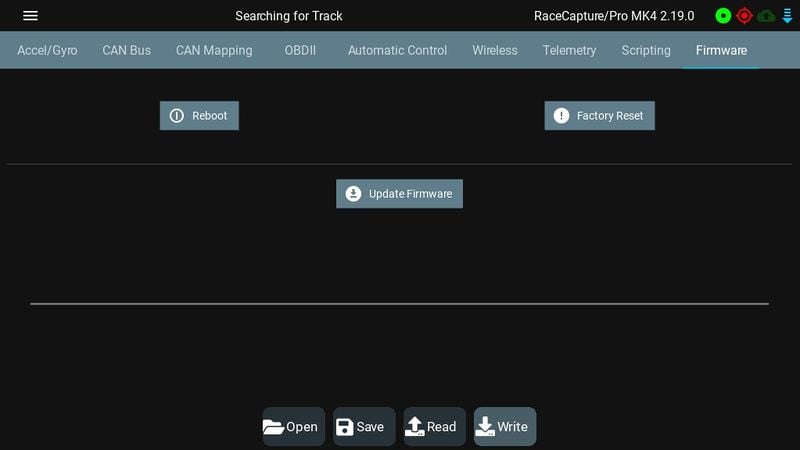
Here you can update your system's firmware, perform a factory reset, which restores the system to its original settings, or perform a reboot of the unit without needing to do a power-cycle. | |||
* '''Note [[File:Mandatory Action.jpg|20px]] :''' Before updating your firmware, be sure to save your current configuration to a file. | |||
[[file:racecapture_app_setup_firmware.jpg|800px]] | |||
=Keyboard shortcuts= | |||
The following keyboard sequences can be used to control the app: | |||
==Most anywhere in app== | |||
* ESC - exit / go up a level | |||
==Only active from home page== | |||
* "a" - Enter Analysis view | |||
* "d" - Enter Dashboard view | |||
* "s" - Enter Setup View | |||
* "t" - Enter Status view | |||
* "ctrl-q" - quit application | |||
==Dashboard view or Analysis view== | |||
* left arrow - Navigate left | |||
* right arrow - Navigate right | |||
==On Dashboard view== | |||
* "k" - Send "OK" response to pit-to-car alert | |||
* "y" - Send "Yes" response to pit-to-car alert | |||
* "n" - Send "No" response to pit-to-car alert | |||
=Troubleshooting= | |||
==Recovering from mis-configured WiFi or Bluetooth [[File:Good to Know.png|20px]]== | |||
If you're unable to connect via mobile due to a Wireless configuration issue - for example: | |||
* You forgot the password you set for RaceCapture's Access Point or Bluetooth link | |||
* If RaceCapture's WiFi client needs to be re-configured for a new WiFi network | |||
You can recover by re-configuring RaceCatpure's WiFi settings via the USB connection and the Windows or OSX app. | |||
Steps to recover: | |||
* Launch the RaceCapture app on Windows or OSX | |||
* Connect RaceCapture via USB | |||
* Allow the software to connect and read the configuration | |||
* Under Setup, adjust the WiFi or Bluetooth settings as needed | |||
* Write the configuration back to RaceCapture | |||
Once you update the settings, it's recommended you test the WiFi connection using your mobile device while still connected over USB so you can further adjust settings as needed. | |||
=Extra Information= | |||
==Microsoft Windows 7/8 Driver installation [[File:Good to Know.png|20px]]== | |||
* Download and unzip drivers: [https://autosportlabs-software.s3-us-west-2.amazonaws.com/RaceCapturePro_drivers_winXPVista7_V2.zip Windows XP/Vista/7/8 Drivers V2] | |||
** '''Note for Windows 8 users''' - These drivers are unsigned. You will need to disable the driver signing requirement for Windows 8, or upgrade to Windows 10. [https://learn.sparkfun.com/tutorials/disabling-driver-signature-on-windows-8/disabling-signed-driver-enforcement-on-windows-8 Instructions] | |||
*** [http://www.howtogeek.com/167723/how-to-disable-driver-signature-verification-on-64-bit-windows-8.1-so-that-you-can-install-unsigned-drivers/ Win8 64bit unsigned driver instructions] | |||
* Plug RaceCapture/Pro in to the computer. | |||
* If prompted to install a driver, direct Windows to the folder where you unzipped the RaceCapture/Pro drivers. | |||
* If not prompted, manually update driver: | |||
** Open Windows Device Manager and find the '''Ports (COM and LPT)''' section. RaceCapture/Pro should be listed there, possibly with a yellow (!) over the icon. | |||
** Right click and select 'Update Driver'. | |||
** Follow the instructions and direct Windows to the folder where you unzipped the RaceCapture/Pro drivers. | |||
Latest revision as of 22:38, 29 July 2024
Overview
About the guide
This is a comprehensive user guide that contains complete instructions about the services and functions of the RaceCapture app. The app is designed to be easy to use across multiple devices. The RaceCapture app allows you to integrate your devices with the RaceCapture modules and get instant access to the endless functionalities of RaceCapture modules. Using this app, customers can access all the features of the RaceCapture modules, monitor, store, and analyze the real-time data, and users can also provide customized commands to the RaceCapture modules using Lua scripts. Further details about the app are given in the respective sections.
Note: It is recommended that this guide be read thoroughly to familiarize with the RaceCapture app, and perform tasks efficiently and effectively.
Home View
Upon launching the Racecapture app, the Home View serves as the starting point, presenting users with three primary icon options:
- Analysis
- Dashboard
- Setup
- System Status
To explore additional functionalities of the app, users can access the navigation menu by tapping the hamburger button located at the top left corner. Upon clicking the hamburger button, a tab bar appears on the left, and Users can switch between different sections by tapping on the respective icons on this tab bar.
Compatible OS 
Racecapture app is compatible with all the advanced operating systems. However, it is not functional on a few old versions of tablets and on Windows XP, 7, and 8 due to their outdated video drivers.
- Not sure what tablet to use? See our list of recommended tablets
How to Install
Installing the recapture app is simple and straightforward. You simply need to download the app and install it. No complicated steps are required. The download links and installation instructions for desktop and mobile devices are given below.
On Desktop
- Download :For desktop, download the RaceCapture app from the following link Windows and OSX
- Installation in Windows 10/11: Windows 10/11 has built in USB drivers that support Recapture; no separate driver installation needed.
- Installation in XP, 7, and 8: In Window XP,7, & 8 will require USB drivers for installation. Users can download USB driver from following link "Click here."
On Mobile
For downloading Racecapture app, please click on the images below.
On Raspberry Pi
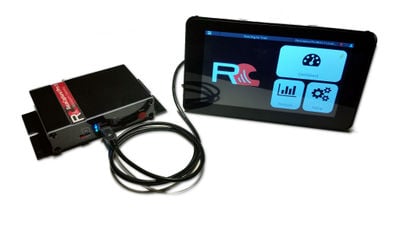
More advanced users can run the RaceCapture App on a Raspberry pi for a more dedicated dashboard experience.
- Learn more in the Raspberry Pi Guide
Icons Used in Manual
Throughout this document, the pictograms below are used to underline points or important notions.
| Icon | Description |
|---|---|
| Important information | |
| Good to Know | |
| Mandatory action |
Intellectual Property and Usage Rights
The information contained in this document is the intellectual property of Autosport Labs, and No one can use it without the prior permission of Autosport Labs.
Help
For additional help, we encourage you to visit one of our support communities:
Setup Wizard
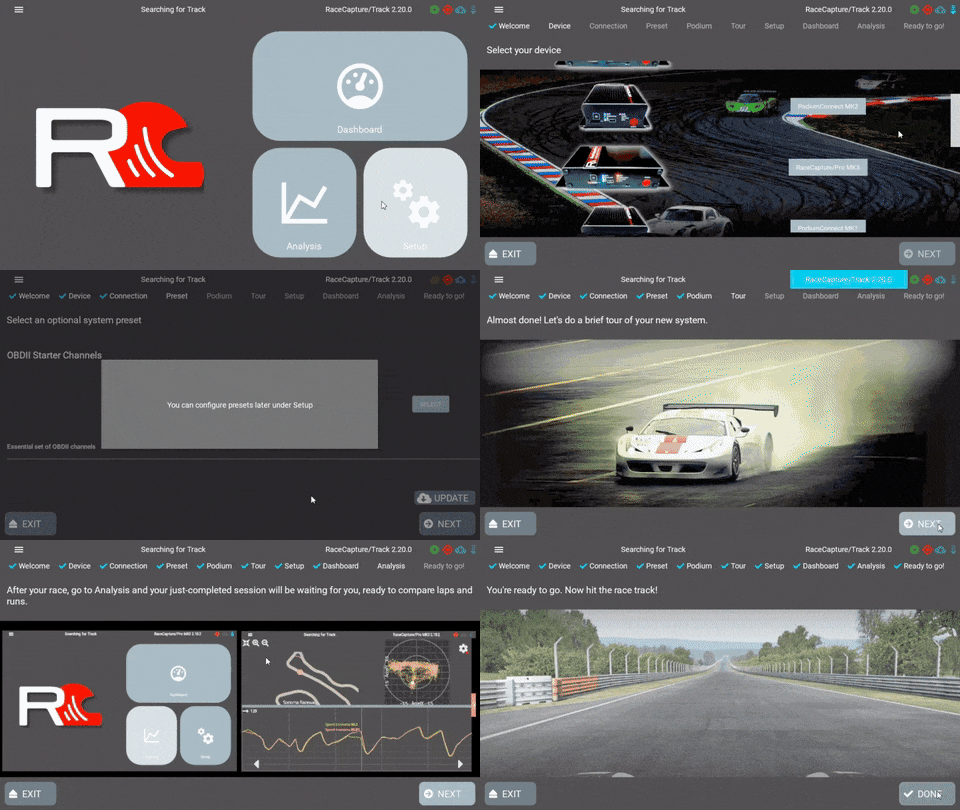
Upon running the RaceCapture app for the first time, you are presented with a first time setup wizard. Follow the steps given below to configure your device..![]()
Welcome Page:
- Click 'Next' on the welcome page to proceed to the device setup.
Device Selection:
- Choose your RaceCapture device from the provided list.
- Click 'Next' to move to the connection page.
Connection Setup:
- Connect your system to the USB port.
- Wait for the connection to establish; your device will be recognized once connected.
Preset:
- Select the optional system preset. User can also set the streaming key later under the setup.
Podium:
- Enter the podium streaming key to enjoy real-time telemetry. User can also set the preset later under the setup.
Note![]() :For more details regarding real time telemetry, please Click here
:For more details regarding real time telemetry, please Click here
Tour: This section will give users a brief tour about different features of Racecapture app
Setup, Dashboard, Analysis: These section will give users a short overview about Setup, Dashboard, Analysis functions.
Note![]() : You can access first time setup again by navigating to the main Setup page and selecting First time setup (as shown in the instruction below)
: You can access first time setup again by navigating to the main Setup page and selecting First time setup (as shown in the instruction below)
System Status
Access the system status pages through the top left menu. The system status offers information on GPS status, Track, Device, current WiFi state and Accel/Gyro. You can also get a copy of the RaceCapture application log for diagnostics.
Dashboard Mode
To view your dashboard, press the dashboard option on the main screen.
Multiple dashboard pages are supported. To move to a different page:
- Swipe left or right on the screen
- Press the left or right arrow buttons at the bottom of the screen
- Press the left/right keyboard keys
Importing a new dashboard
To customize your experience, you can import additional dashboard pages either from the system-provided templates or from those created by fellow racers. Follow the steps below to import a new dashboard:
- Click on the gear icon located at the top right corner, and select the rectangular 'Add' icon.
- In the 'Add' icon, you'll find three options:
- System
- Your
- Shared
- Choose your preferred option and scroll down to explore the available dashboard templates.
- Press 'Select' next to the desired dashboard template to import it.
By following these steps, you can easily enhance your dashboard with a variety of templates tailored to your preferences.
Customizing a gauge
RaceCapture app provides, plenty of options for customizing gauges, and designing your own attractive gauges.
To edit a gauge:
- Unlock the dashboard
- Press the gear button on the gauge to customize its settings. Depending on the gauge, you can edit:
- Display channel
- Color
- Min/Max range
- Precision (number of digits to the right of the decimal point)
- Other settings depending on the gauge
Customizing Analog and Digital Gauges
For Analog and Digital gauges, the Racepcapture app provides advanced options for customizing all the features of the Analog and Digital gauges ranging from the design of gauge, dial, color, and background, to font size, markers size, and precision using it using its super flexible analog and digital gauge editor.
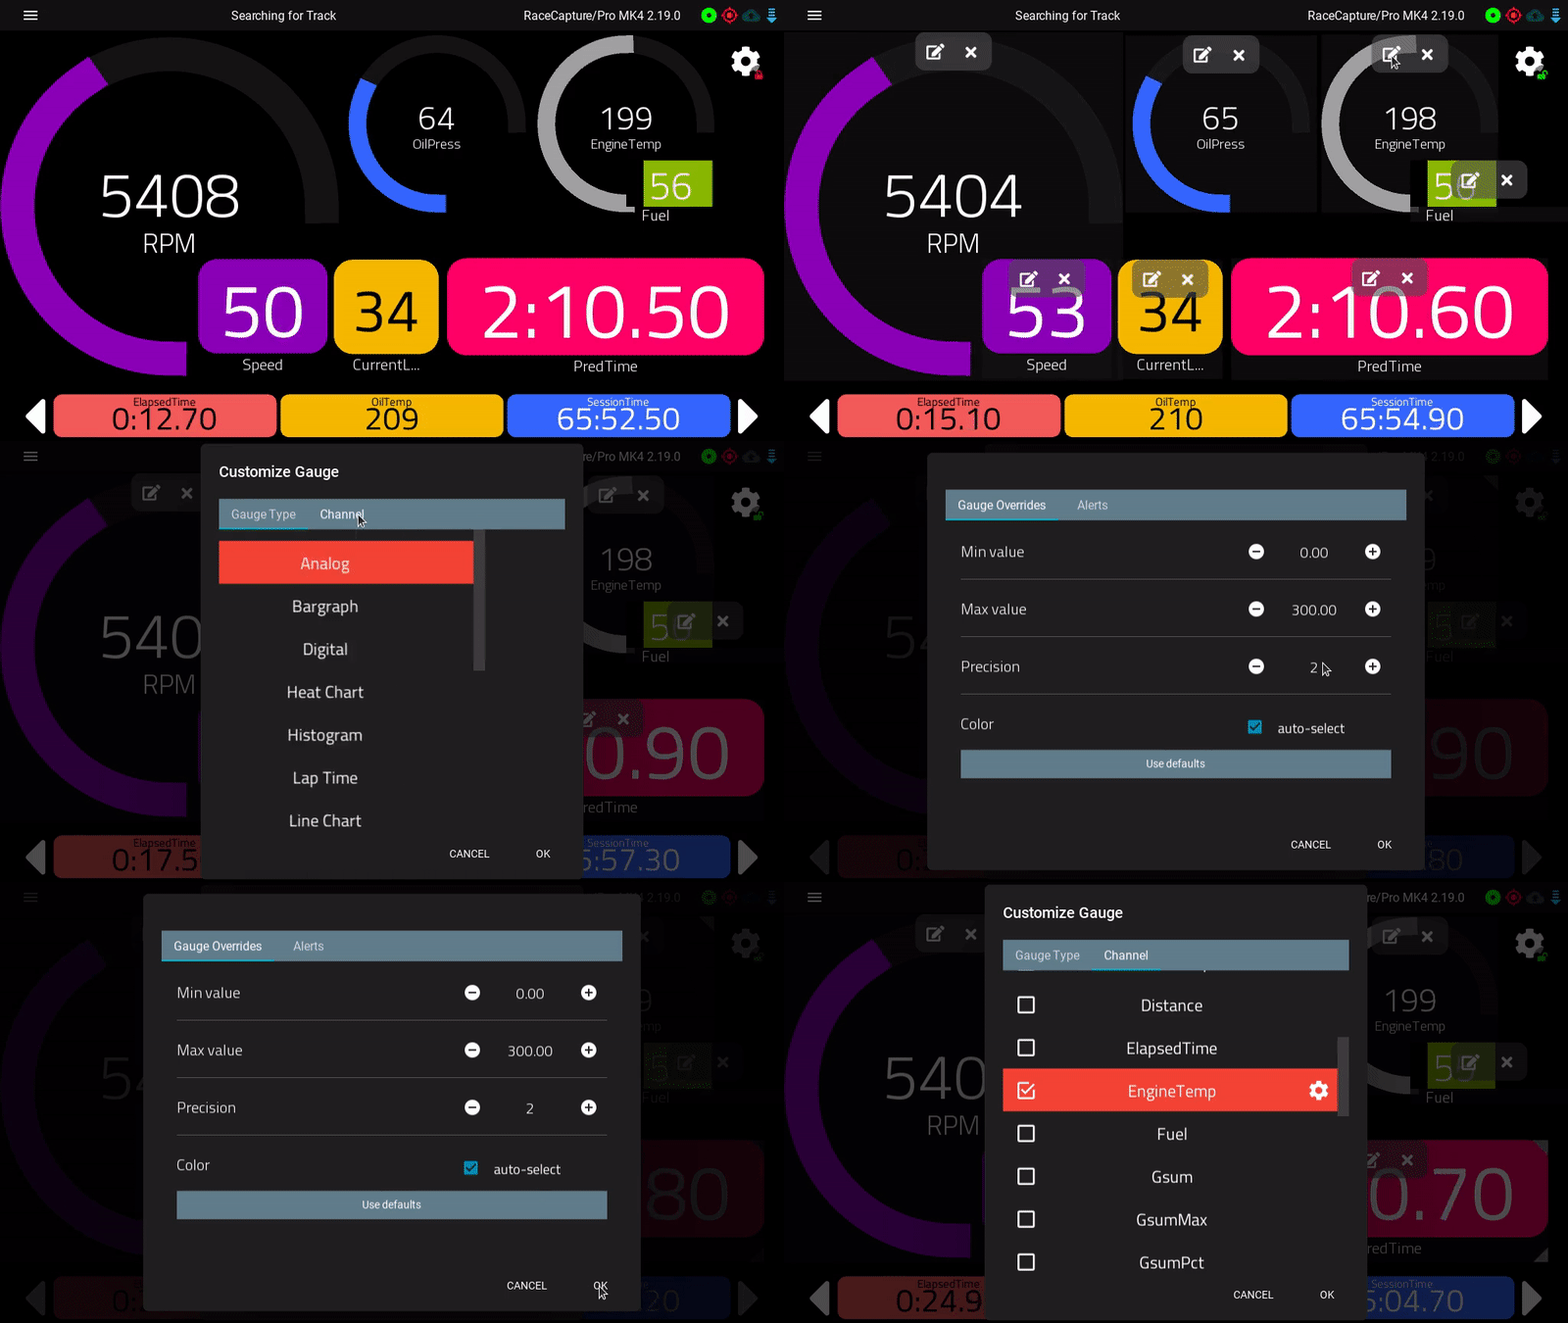
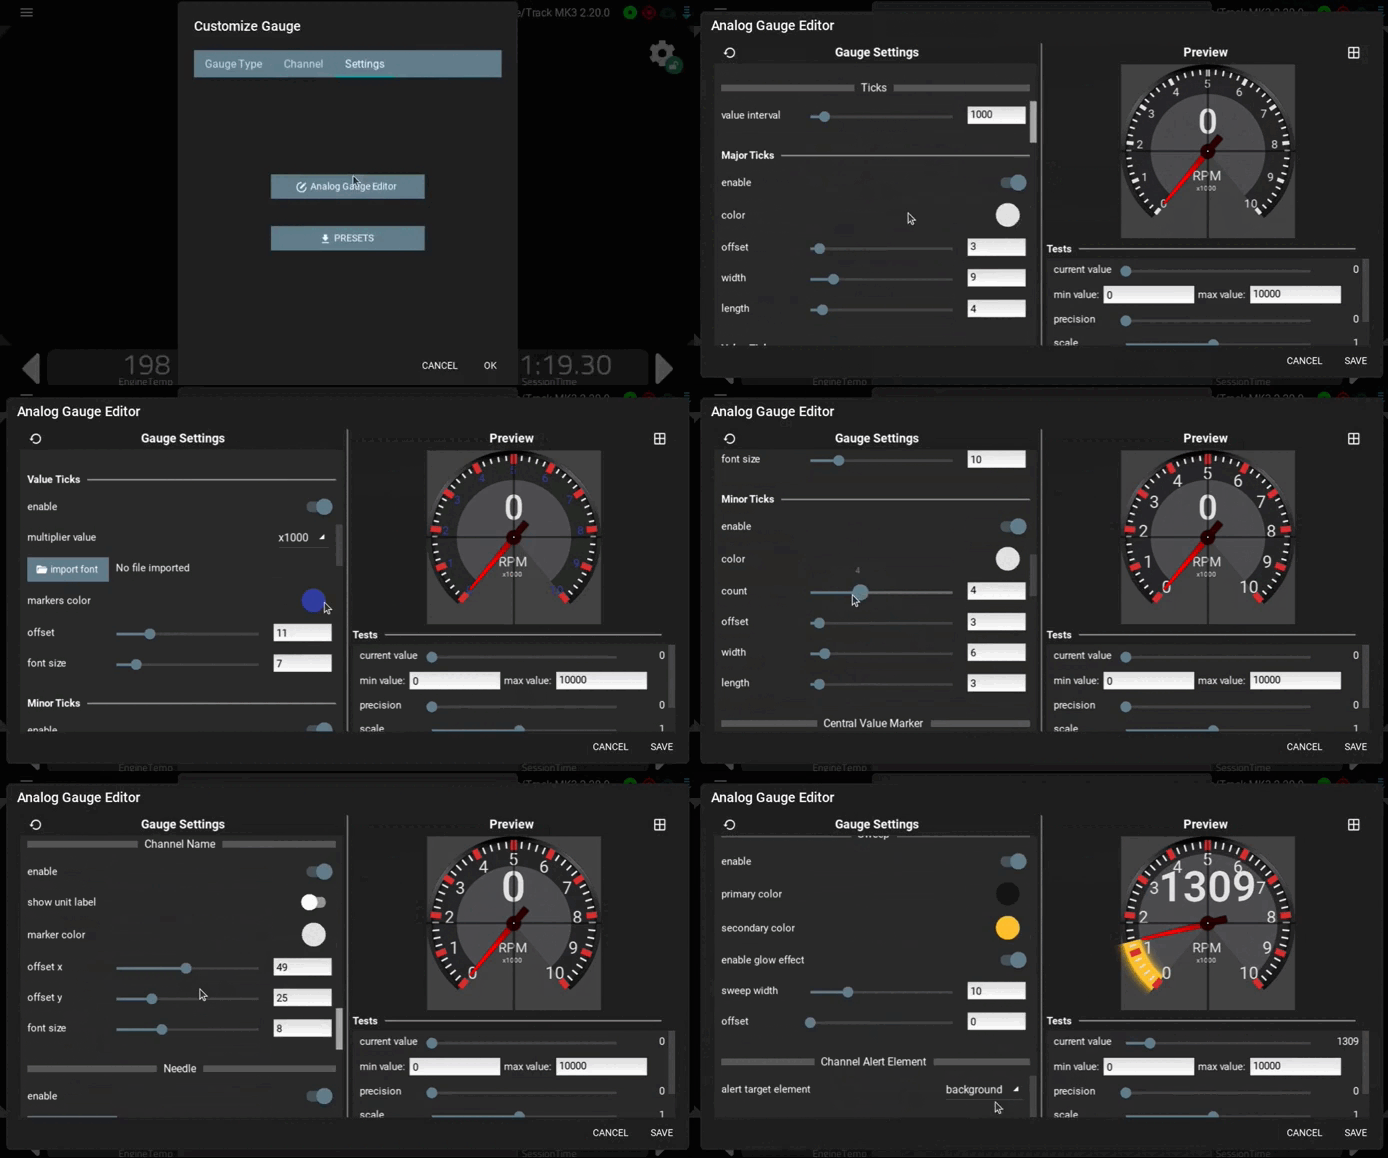
Analog Gauges
For customizing Analog gauges, follow the instructions given below
- Unlock the dashboard
- Press the gear button on the gauge and select the edit option
- From the top bar, select the Channel and change the channel as per your requirement.
- After selecting channel, select the setting option at the top bar and select Analog Gauge editor.
- In Analog Gauge editor, there are tons of customizable options, with a handy preview area.
Note : For more information, Click here ![]()
Digital Gauges
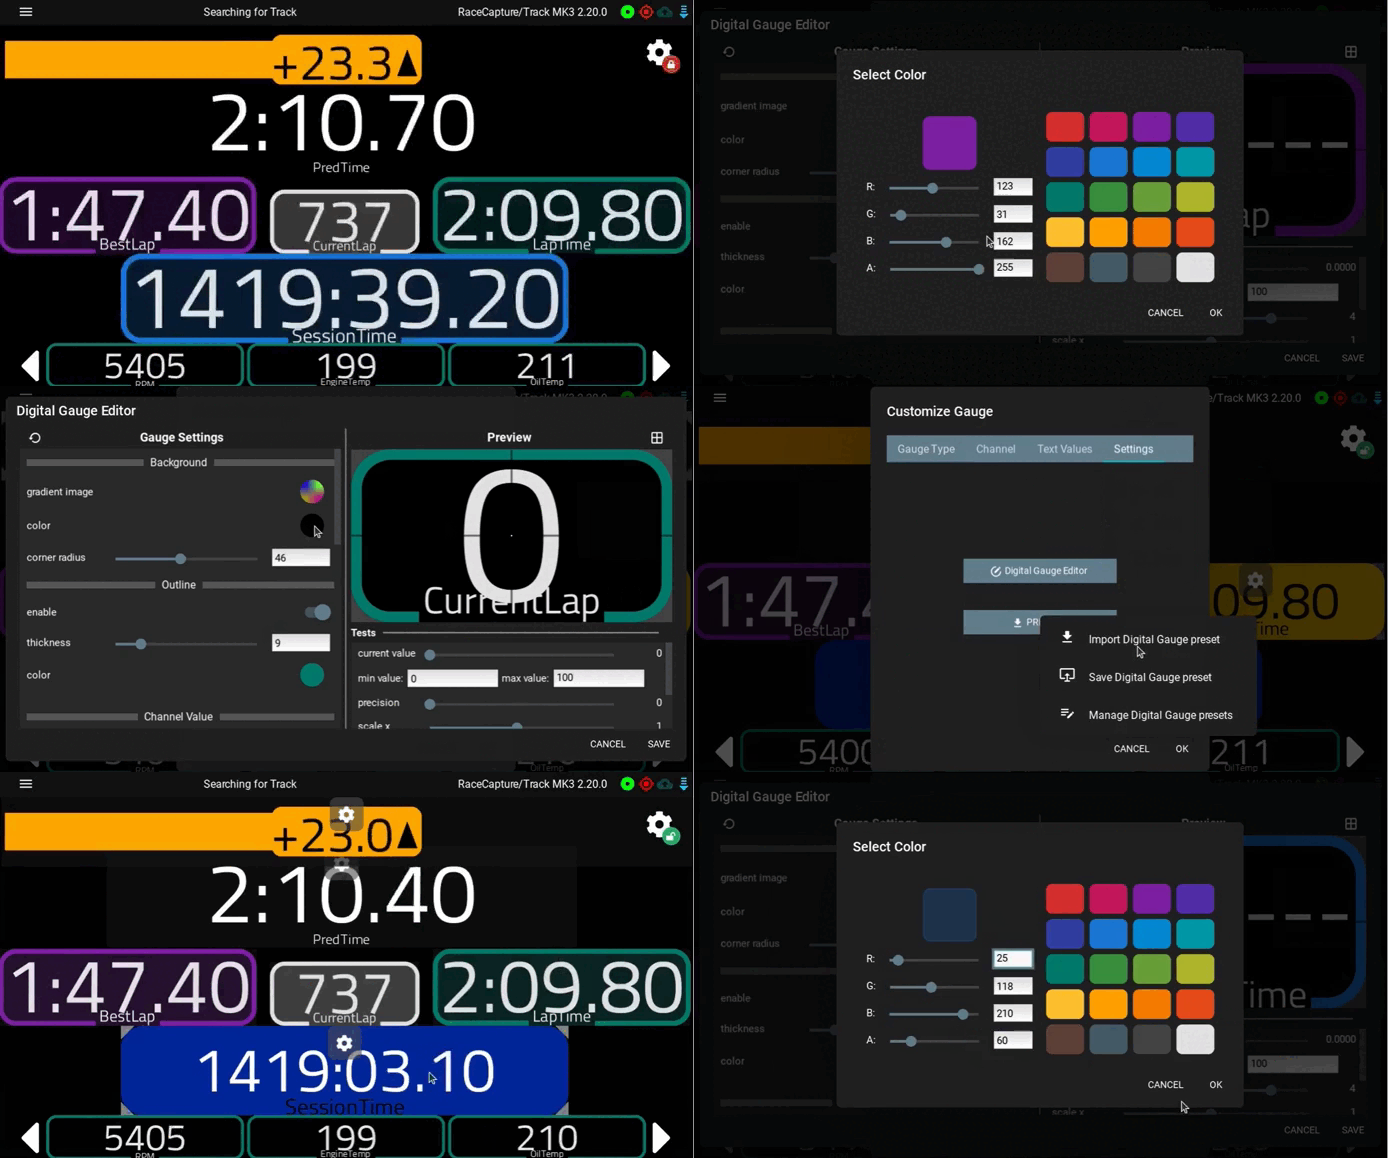 For customizing Digital gauges, follow the instructions given below
- Unlock the dashboard
- Press the gear button on the gauge and select the edit option
- From the top bar, select the Channel and change the channel as per your requirement.
- After selecting channel, select the setting option at the top bar and select Digital Gauge editor.
- In Digital Gauge editor, there numerous customizable options available
Note : For more information, Click here ![]()
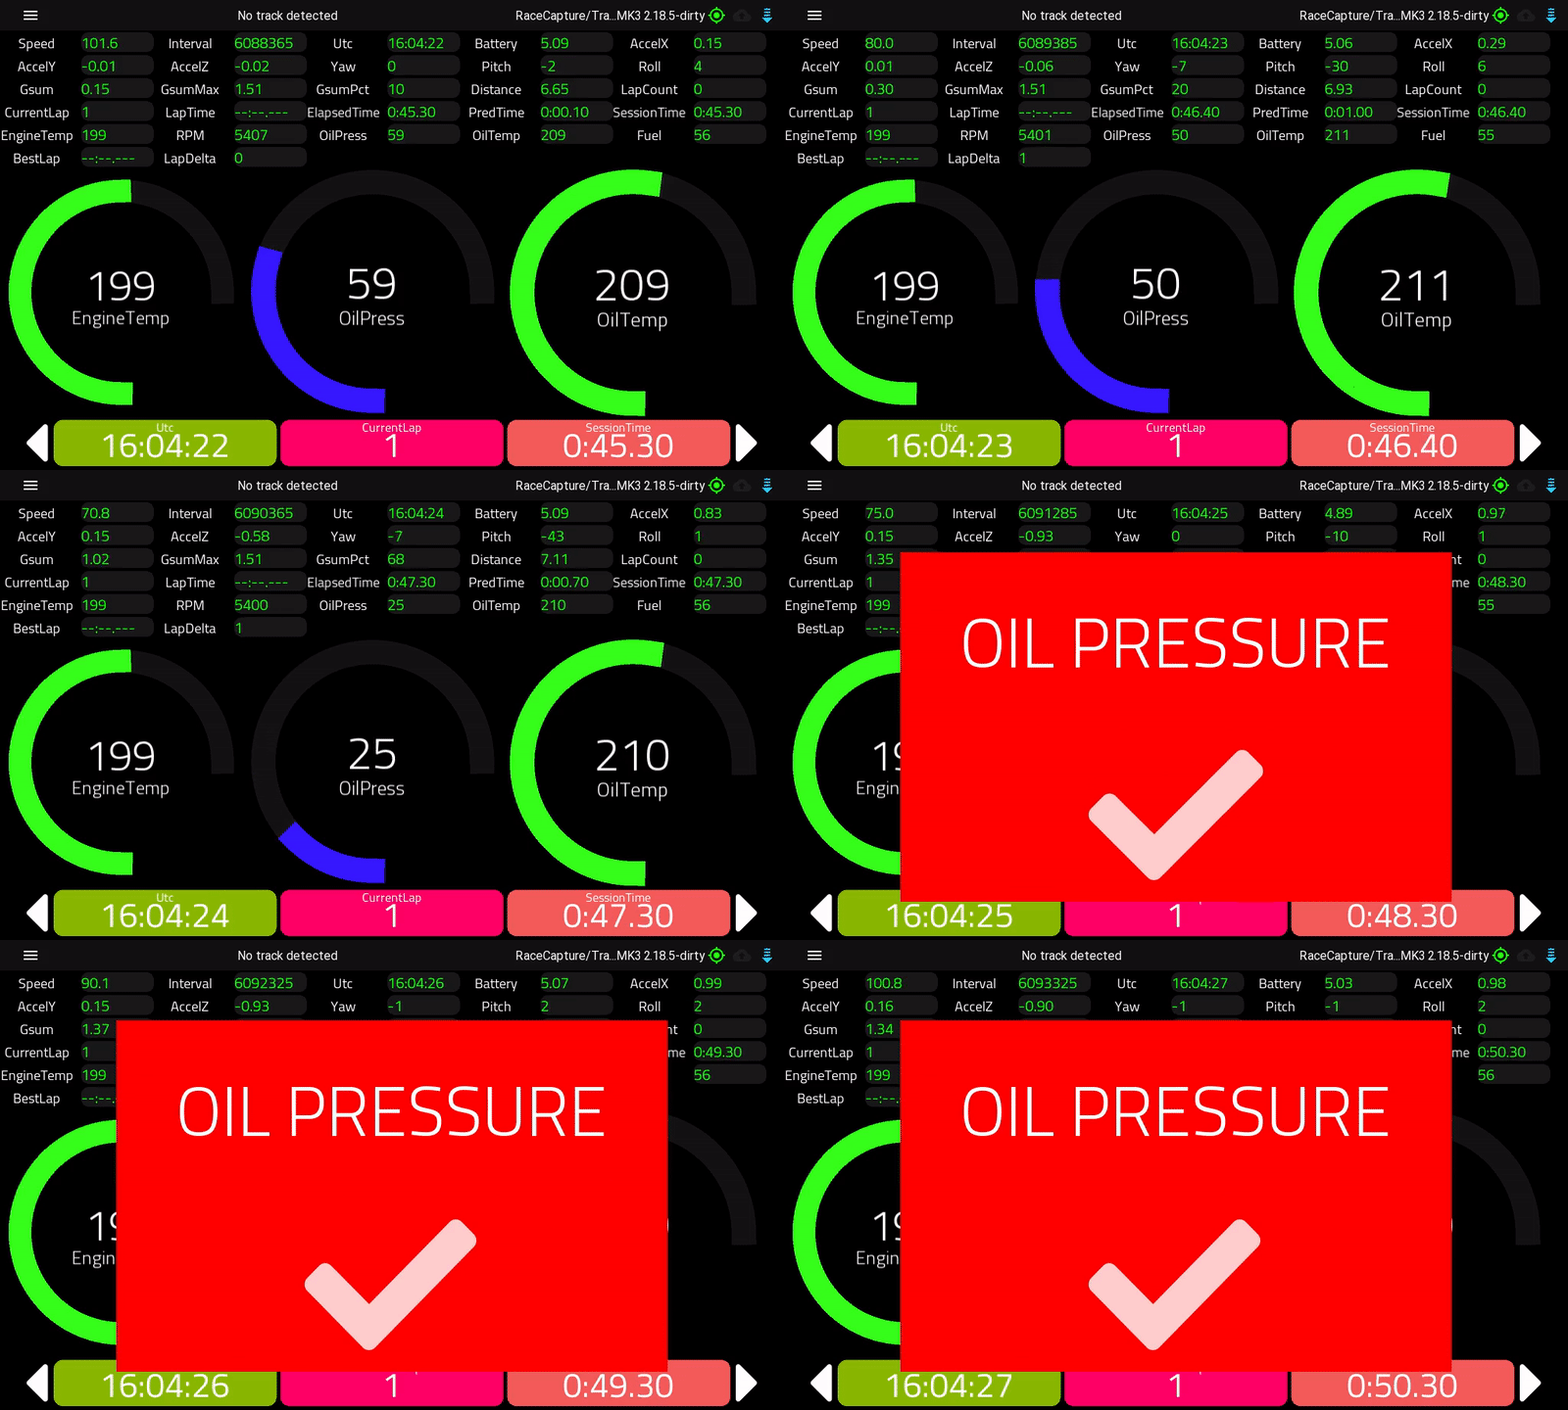
Dashboard Alerts
You can create dashboard alerts for any channel.
There are two ways to create a gauge alert:
- Use the central alerts editor
- Edit alerts from gauges
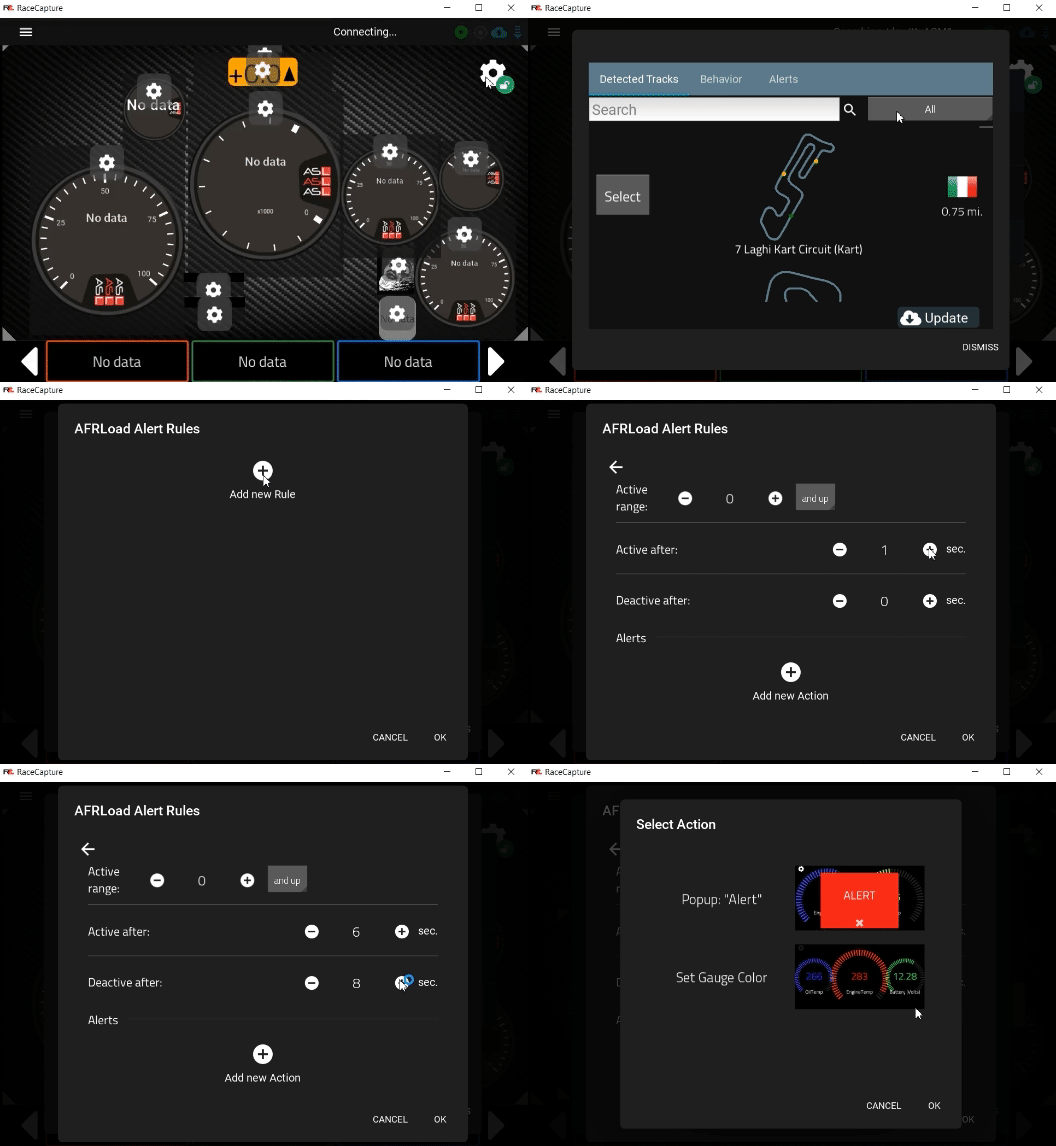
Use the central alerts editor
- Access the dashboard settings by clicking on the gear icon.
- Select More Settings and navigate to the Alerts tab
- Select the channel you wish to create alerts for, or press the (+) icon to create a new alert
- In the Alert rule tab, users can configure the alert active range, alert active after time, alert deactivate after time, and can also select the notification methods (Popup "Alert" or "Set Gauge color").
Customize Notification
- Popup Alert notification: users can customize the message and color of alert by clicking on " add new action> selecting Popup: "Alert" > and change the message and color as per their need.
- In Set Gauge color: users can customize the color of gauge by clicking on " add new action> selecting Set Gauge Color > Color
Edit alerts from gauges
- Edit a gauge
- Switch to the Channels tab and press the customization gear icon for the selected channel
- Switch to the Alerts tab and customize your alerts
Customizing your dashboard
Users have the flexibility to modify an existing dashboard or create a new one from scratch by firstly unlocking the dashboard page and then adding/modifying gauges to create the design they want.
Users can add new gauges by following the steps given below:
- Unlock the dashboard page by unlocking the gear icon present at the top right corner
- After unlocking the gauge icon, open the gauge icon by clicking the gear icon.
- In the add gauge option, select the gauge type, channel type, and configure the gauge setting as per your requirements.
Note : For create a data-driven color-changing dashboard background Check Here ![]()
Saving your dashboard
Once you have customized your dashboard to your liking, you can save it to the cloud, allowing easy sharing with other racers or access from different devices. Follow these steps to save your dashboard:
- Click the gear icon at the top right corner to unlock the dashboard.
- Click the save icon.
- Under the "Create New" tab, press "New."
- Provide a name for your dashboard and save it.
By following these steps, your customized dashboard will be saved to the cloud, accessible for sharing and convenient use across various devices.
Predictive Lap timing
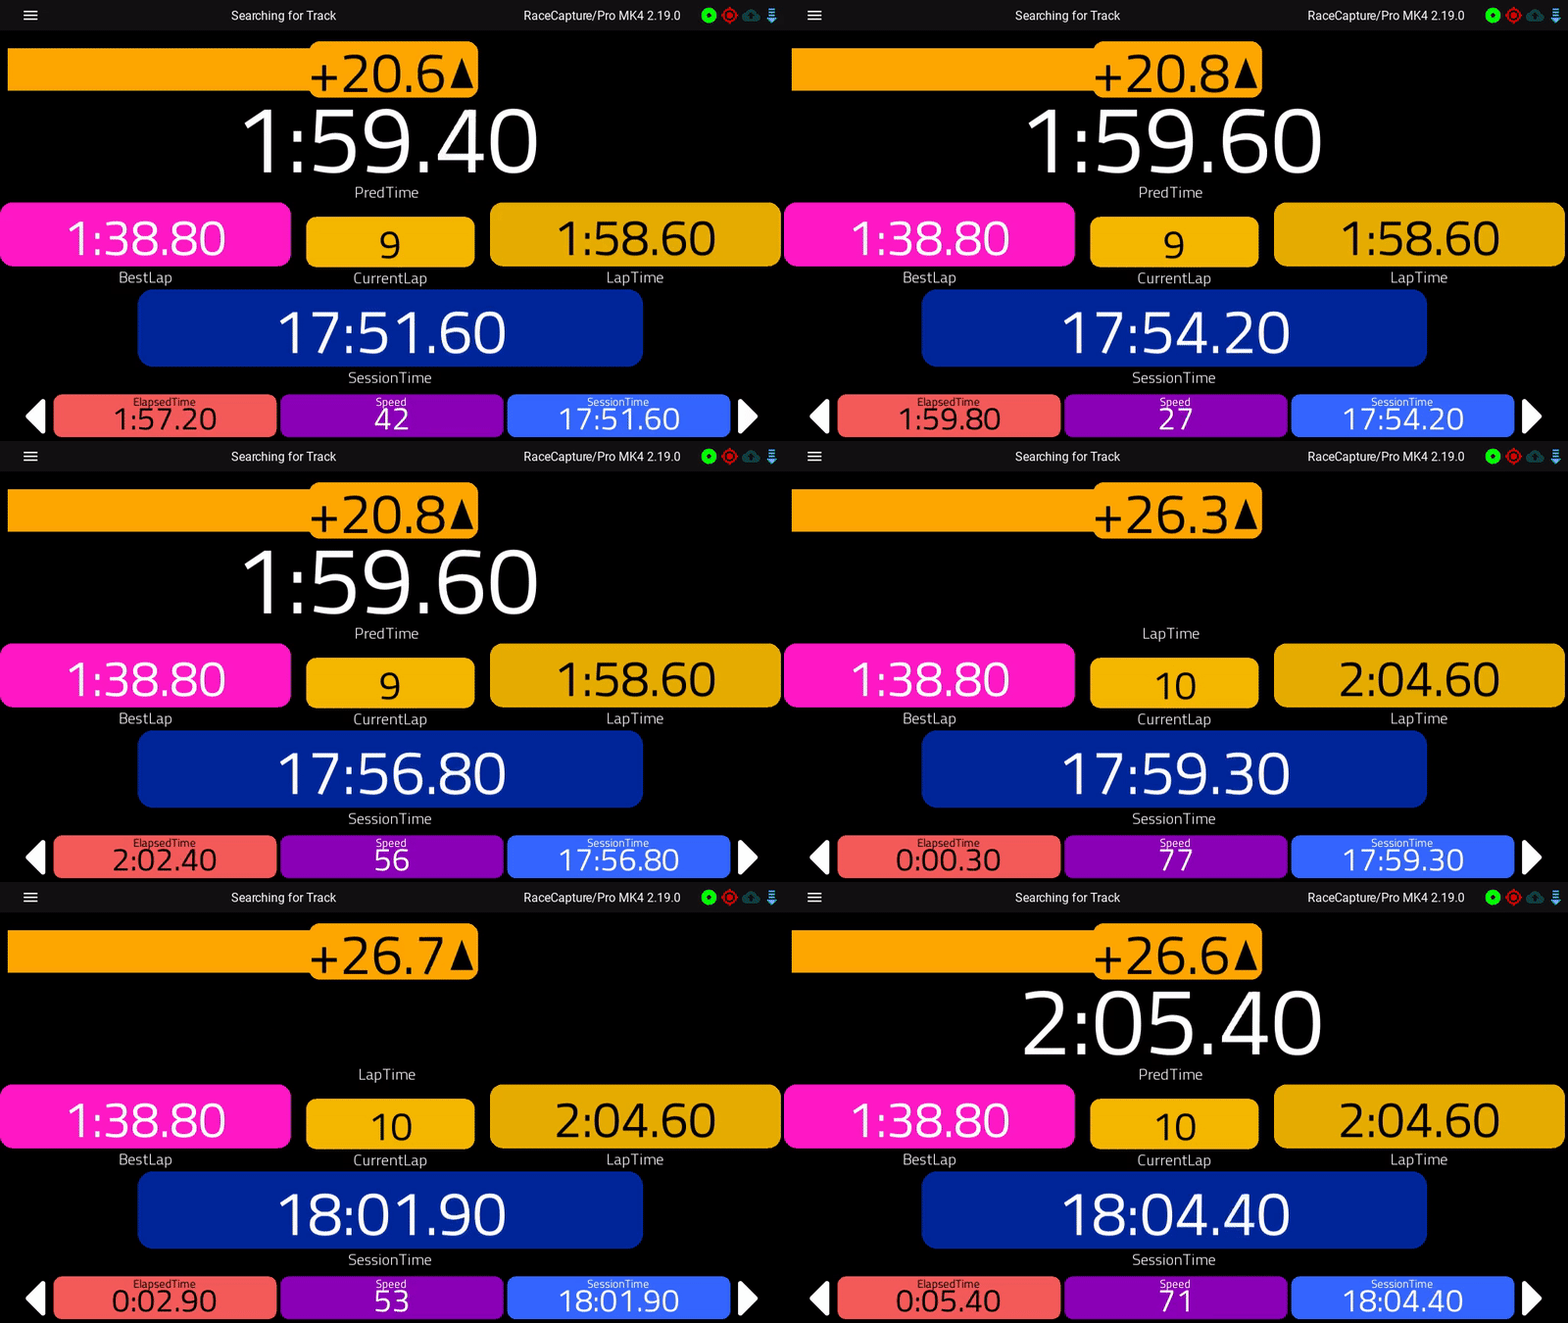
RaceCapture/Pro offers predictive lap timing, which relies on a robust track detection system leveraging hundreds of track maps worldwide.
How it works
- When GPS receives a lock, RaceCapture will search for a nearby track.
- If a track is detected with one configuration, it is automatically selected.
- If a track is detected with multiple configurations, the RaceCapture app will prompt you for which configuration you're using.
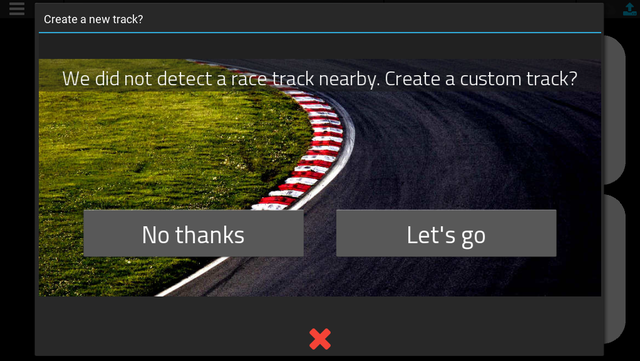
- If no tracks are detected nearby, the RaceCapture app will offer the ability to create a track on the spot.
- If you're not able to immediately create the track, you can do so later under Setup.
- Track not found? Submit the track to us and we'll get it into our online database.

Analysis
The RaceCapture app automatically record users session when triggered by the threshold they have configure under Setup / Automatic Control
Note ![]() : The system default is to trigger on Speed
: The system default is to trigger on Speed
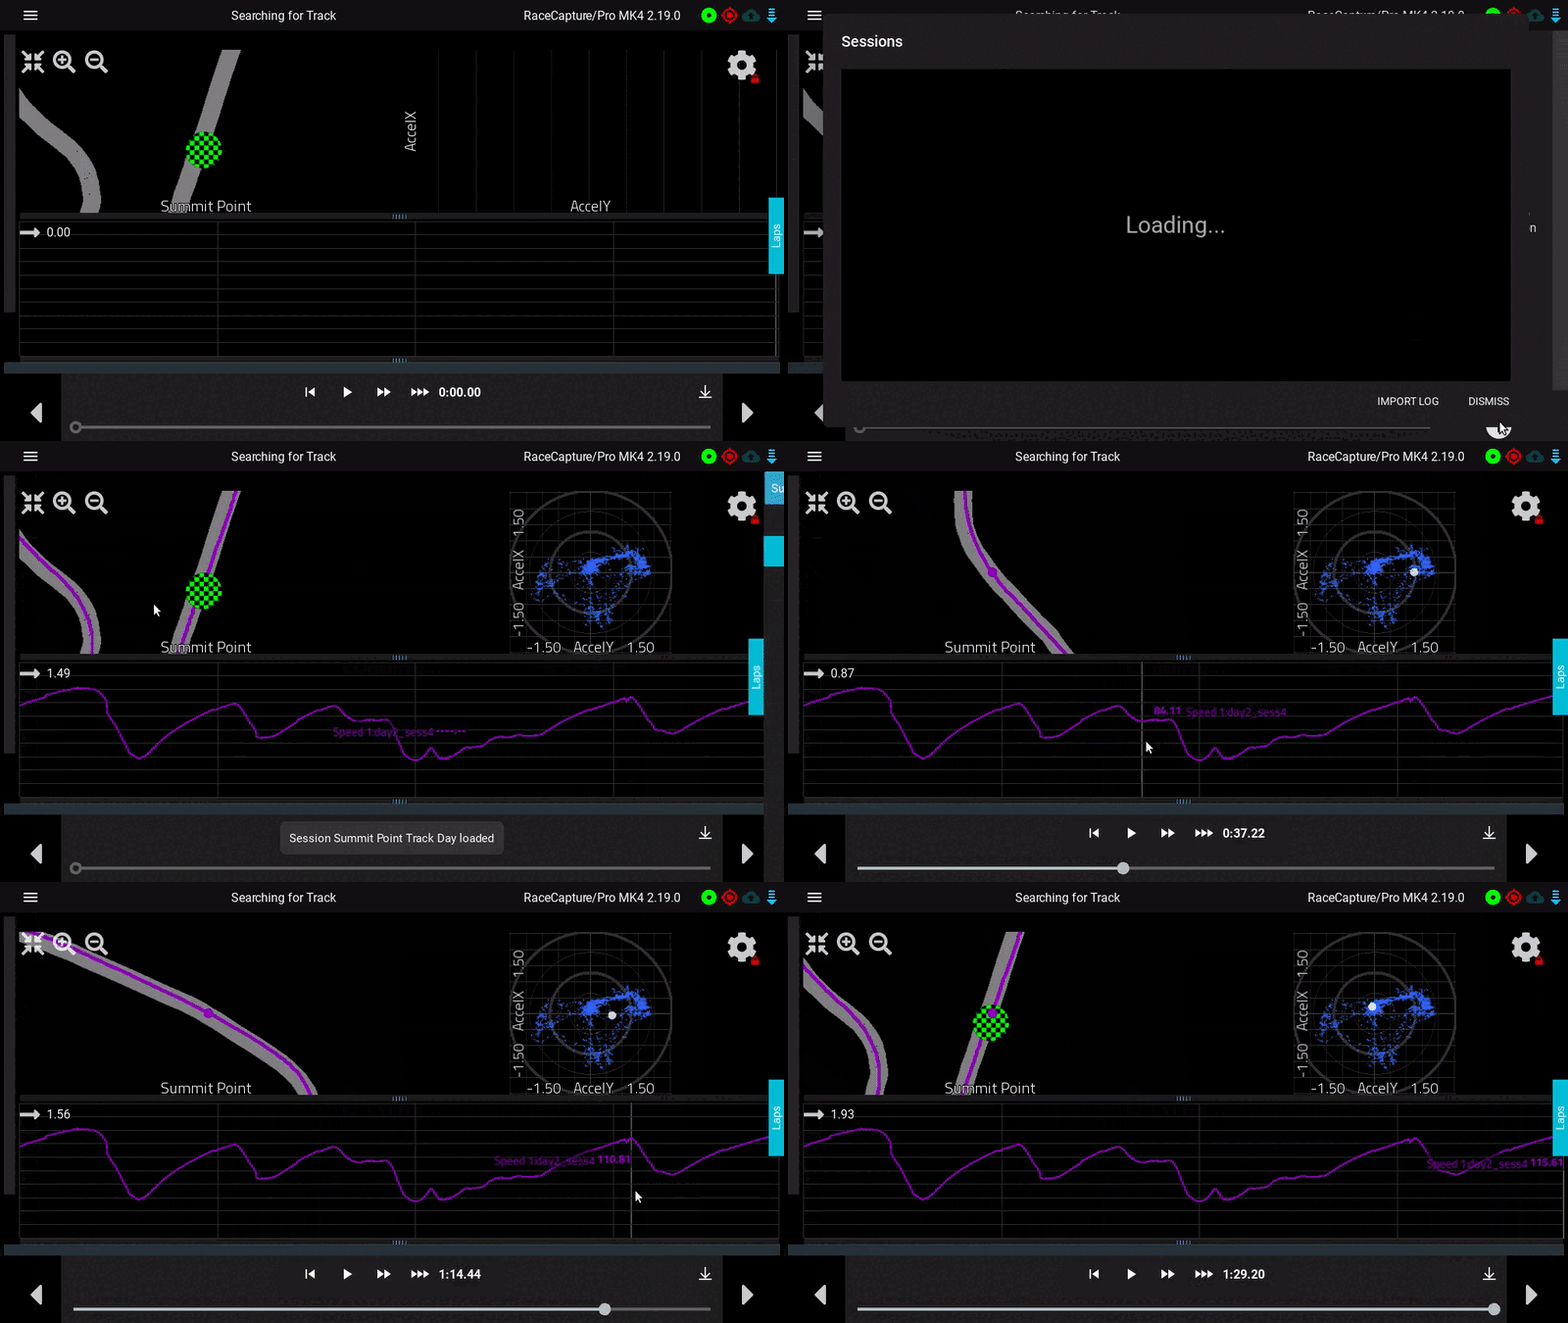
To view the data, enter the Analysis mode and load an existing session. The session will be automatically named with the local track or with a timestamp.
Loading a Session:
Users can load sessions by:
- Pressing the (+) button at the bottom of the pop-out list of laps.
- Alternatively, press the gear icon on the dashboard and select 'Sessions'.
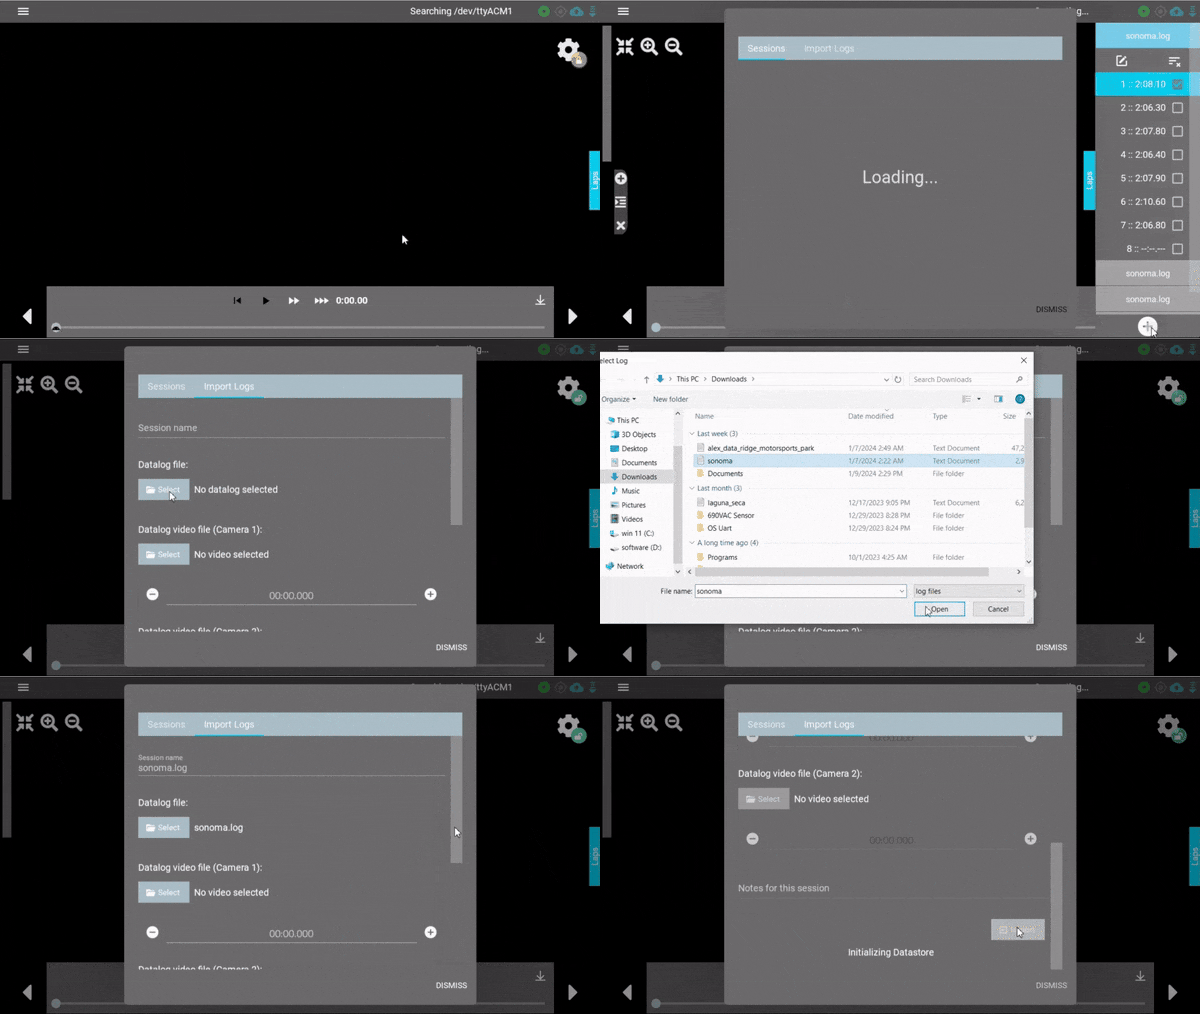
For advanced analysis, users can import log files of sessions. For importing sessions, users can follow the steps given below.
- On the home screen, click on the 'Analysis' option.
- Press the (+) button at the bottom of the pop-out list of laps.
- A new tab will open; in this new tab, select the 'Import Log' option.
- Under 'Import Log,' press the 'Select' option under Datalog file and import the log file.
Note ![]() : Users can also import datalog video files by clicking the 'Select' option under Datalog Video file.
: Users can also import datalog video files by clicking the 'Select' option under Datalog Video file.
Racepcapture app provides plenty of flexible options for navigating data.
Cursor across line chart
Users can swipe across the line chart to correlate different points with the position on the track map.
Playback Control
User can use the controls at the bottom to automatically play back the selected lap(s). Using the playback control option, user can also control the speed of laps.
Swipe across the data to compare various points correlated with the position on the track map.
Zooming
Users can zoom on the line charts data using a two-finger pinch gesture, or using the mouse scroll wheel or your laptop's trackpad scroll gesture. For the map, users can also zoom in, and zoom-out using the designated buttons present at the top right corner.
Reviewing Laps
Within the RaceCapture app, users have the ability to conduct a thorough analysis, and comprehensive comparison of laps for performance evaluation. This section guides you through various tools and features available for a detailed and comprehensive approach to lap analysis
Performance Metrics
Racecapture app provides users with plenty of performance metrics options to comprehensively analyze the performance of your cars and optimize your driving strategy. The table below provides a detailed explanation of a few important available metric:
| Matric | Description |
|---|---|
| AccelX, AccelY, AccelZ | Lateral, Longitudinal & Vertical acceleration in X, Y and Z axis |
| Battery | Battery voltage level |
| Brake | Brake position |
| CurrentLap | Current lap number |
| ElapsedTime | Time elapsed since the start of the session |
| EngineTemp | Temperature of Engine |
| GPSQual | GPS quality status |
| Gear | Current gear position |
| LapCount | Total laps completed |
| LapTime | Time taken for the current lap |
| MAP | Manifold absolute pressure |
| MaxRpm | Maximum RPM reached |
| OilPress | Engine oil pressure |
| Pitch | Angular orientation around the X-axis |
| PredTime | Predicted lap time based on the current performance |
| RPM | Engine revolutions per minute |
| Roll | Angular orientation around the Y-axis |
| ShiftLight | Status of the shift light |
| SessionTime | Total time elapsed in the current session |
| TPMSVoltLF, TPMSVoltLR, TPMSVoltRF, & TPMSVoltRR | Tire Pressure Monitoring System voltages of Left front, Left Rear, Right front & Right rear tires respectively |
| TPressLF, TPressLR, TPressRF, & TPressRR | Tires Pressure of Left front, Left Rear, Right front & Right rear tires respectively |
| TireITmpLF, TireITmpLR, TireITmpRF, & TireTmpRR | Internal tires temperature of Left front, Left Rear, Right front & Right rear tires respectively |
| Utc | Coordinated Universal Time |
In addition to the previously mentioned metrics, offers a diverse range of performance metrics for a comprehensive analysis of your vehicle's dynamics. These include:
Position and Timing Metrics:
- CurrentLap
- Distance
- SessionTime
- TnSlapTime
Geospatial Metrics:
- Latitude
- Longitude
- GPSQual (GPS Quality)
- GPSSATS (Number of GPS Satellites)
Competition Metrics:
- CompAhead (Comparison Ahead)
- CompBehind (Comparison Behind)
- CompFlag (Competition Flag)
- GapAhead
- LapsAhead
- LapsBehind
Dynamic Metrics:
- GsumMax (Maximum G-force)
- GsumPct (Percentage of Maximum G-force)
- Interval
Predictive Metrics:
- PredTime (Predicted Lap Time)
It's important to note that many of these metrics become available when related sensors are connected to the system. The RaceCapture app comes equipped with built-in default sensors, providing a foundational set of metrics:
- Position (Latitude / Longitude): Derived from the GPS sensor, offering accurate location data.
- Speed: Provided by the GPS sensor, delivering real-time speed information.
- IMU (Accelerometer and Gyro): Three channels each, offering essential data on acceleration and rotation.
- Battery: Monitors the voltage level, providing insights into the power status of the system.
- OBDII Channels: When plugged into a vehicle with OBDII support, additional channels become available. These channels may vary based on the vehicle, but by default, TPS (Throttle Position Sensor), EngineTemp (Engine Temperature), and RPM (Revolutions Per Minute) are consistently accessible.
Each metric provides a unique perspective on your vehicle's performance, allowing for a nuanced analysis to refine your racing strategy.
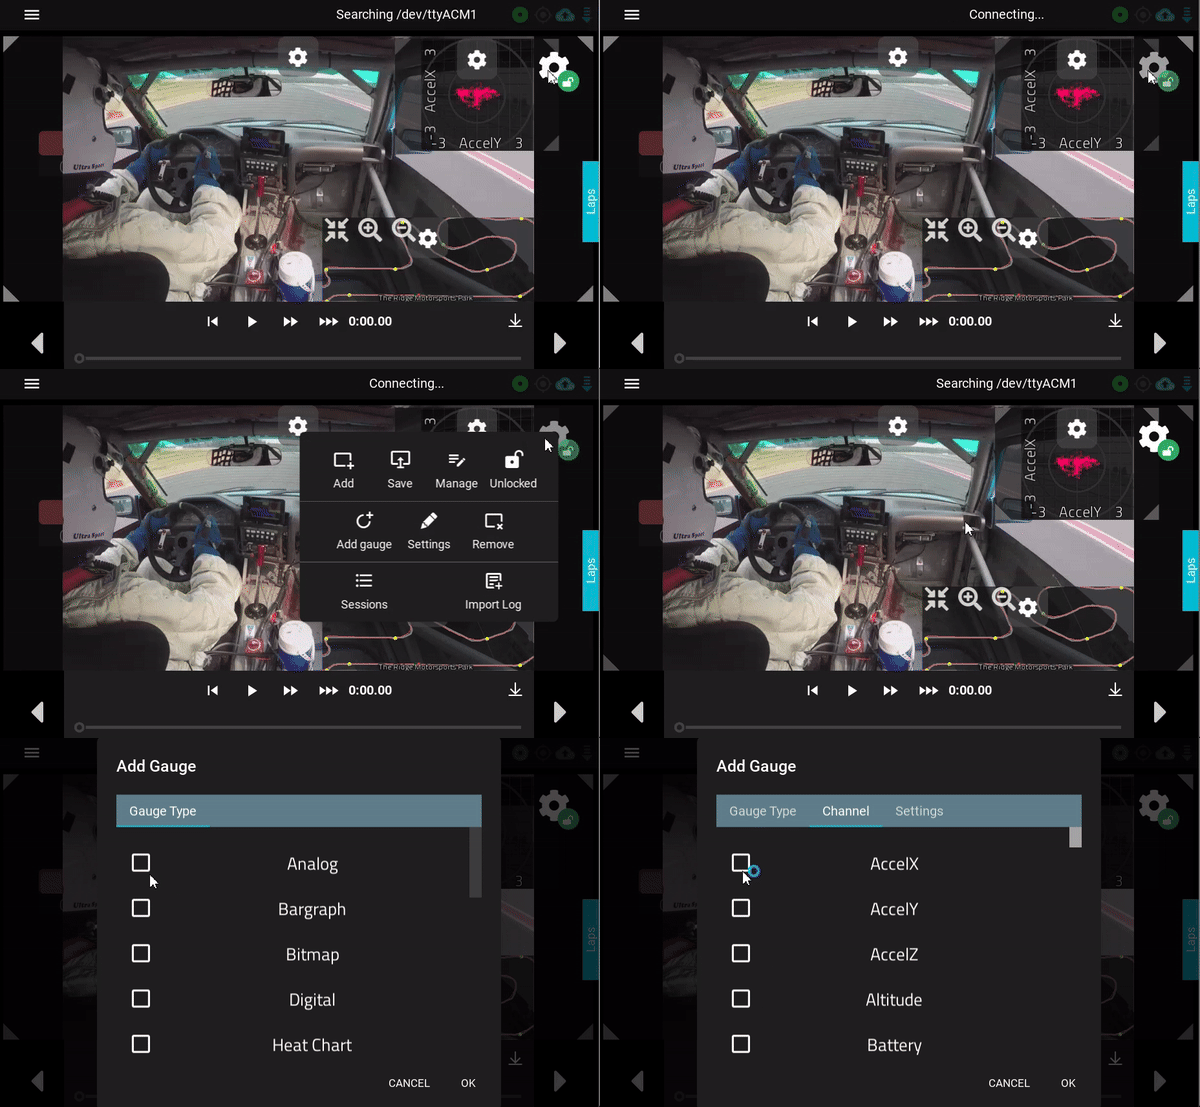
Selecting Performance Metrics
To choose and display specific performance metrics on your dashboard, follow these steps:
- Unlock the gear icon present at the top right corner
- Click on the gear icon and select the add gauge option
- Pick the gauge type that suits your analysis needs (e.g., digital, analog, linear chart).
- Within the chosen gauge type, select the "Channel" representing the performance metric you want to analyze.
- Fine-tune the settings to align with your requirements. Adjust parameters such as scale, range, or units based on your preferences.
- Save your gauge configuration to apply the selected performance metrics to your dashboard.
By following these steps, you can tailor your dashboard to showcase the specific performance metrics that matter most to your racing analysis.
Data Visualization
Racecapture app provides innovative data visualization features, empowering users with advanced features for in-depth analysis. The table below provides a detailed explanation of available gauges:
| Gauge Type | Description |
|---|---|
| Analog | Visualize data with analog-style gauges for a real-time, dynamic display. |
| Bargraph | Use bar graphs to represent data discretely, providing a clear insight of data. |
| Bitmap | Display custom images or icons to enhance the visual representation of your data. |
| Digital | Showcase numerical data in a clear and precise digital format for quick reference. |
| Heat Chart | Gain insights into data patterns using color gradients to represent varying intensities. |
| Histogram | Understand data distribution through histogram charts, ideal for analyzing frequency. |
| LapTime | Focus on lap-specific metrics with dedicated gauges for lap time analysis. |
| Line Chart | Track trends and variations over time using line charts for comprehensive data analysis |
| Overview | Get a holistic view of your racing data with overview gauges summarizing key metrics. |
| Raw Channel | Provides an unfiltered analysis of individual parameters. |
| Scatter Plot | Identify correlations and relationships between two variables using scatter plots. |
| Thermal Image | Visualize temperature variations with thermal image gauges for heat-sensitive data. |
| Time Delta | Analyze time differentials between specific data points using time delta gauges. |
| Time Gap | Evaluate time gaps for strategic decision-making. |
| Track Map | Navigate your racing data on a track map, providing a spatial context to your analysis. |
| Video | Integrate video data seamlessly with dedicated video gauges for synchronized analysis. |
Users can explore the above mentioned gauge types to enhance their data visualization experience and get valuable insights.
Selecting Gauge Type
Users can select the desired gauge type by following the steps given below:
- Unlock the gear icon present at the top right corner
- Click on the gear icon and select the add gauge option
- Pick the gauge type that suits your analysis needs (e.g., digital, analog, heart chart).
Customizing Views
The RaceCapture app provides numerous customization options, allowing users to configure the app interface as per their preferences. Explore the key customization features below:
Gauge Customization
- Size, Shape, Type: Modify the size, shape, and type of available gauges to suit your visual preferences.
- Color and Appearance: Personalize the color scheme and appearance of each gauge for a customized display.
Gauge Placement
- Location Customization: Users can move gauges to their preferred locations on the display
- Position Setting: Set gauges precisely where you need them for an intuitive and efficient layout.
Layer Management
- Bring to Front or Send to Back: Adjust the layering of gauges with options to raise or lower their appearance.
- Raise to Top or Lower to Bottom: Adjust the visibility of gauges by bringing them to the forefront or placing them at the back.
Zoom Functionality
- Zoom In & Zoom Out: For enhancing focus, users can Zoom-in and Zoom out gauge as per requirement.
Alert Customization
- Set Custom Alerts: Define alerts based on specific conditions or events during your race.
- Threshold Adjustments: Configured alert thresholds to match your required value.
Advanced Features Exploration
- Video Integration: Seamlessly integrate video data for synchronized analysis with racing telemetry.
- Thermal Imaging: Users can use the advance feature of thermal imaging for a more comprehensive understanding of your racing data.
Regular Upgradation
- Continuous Refinement: Users can regularly assess and fine-tune their dashboard layout and configurations based on changing preferences and real-time racing needs.
User can experiment with different configurations to find the setup that enhances their racing strategy and overall performance.
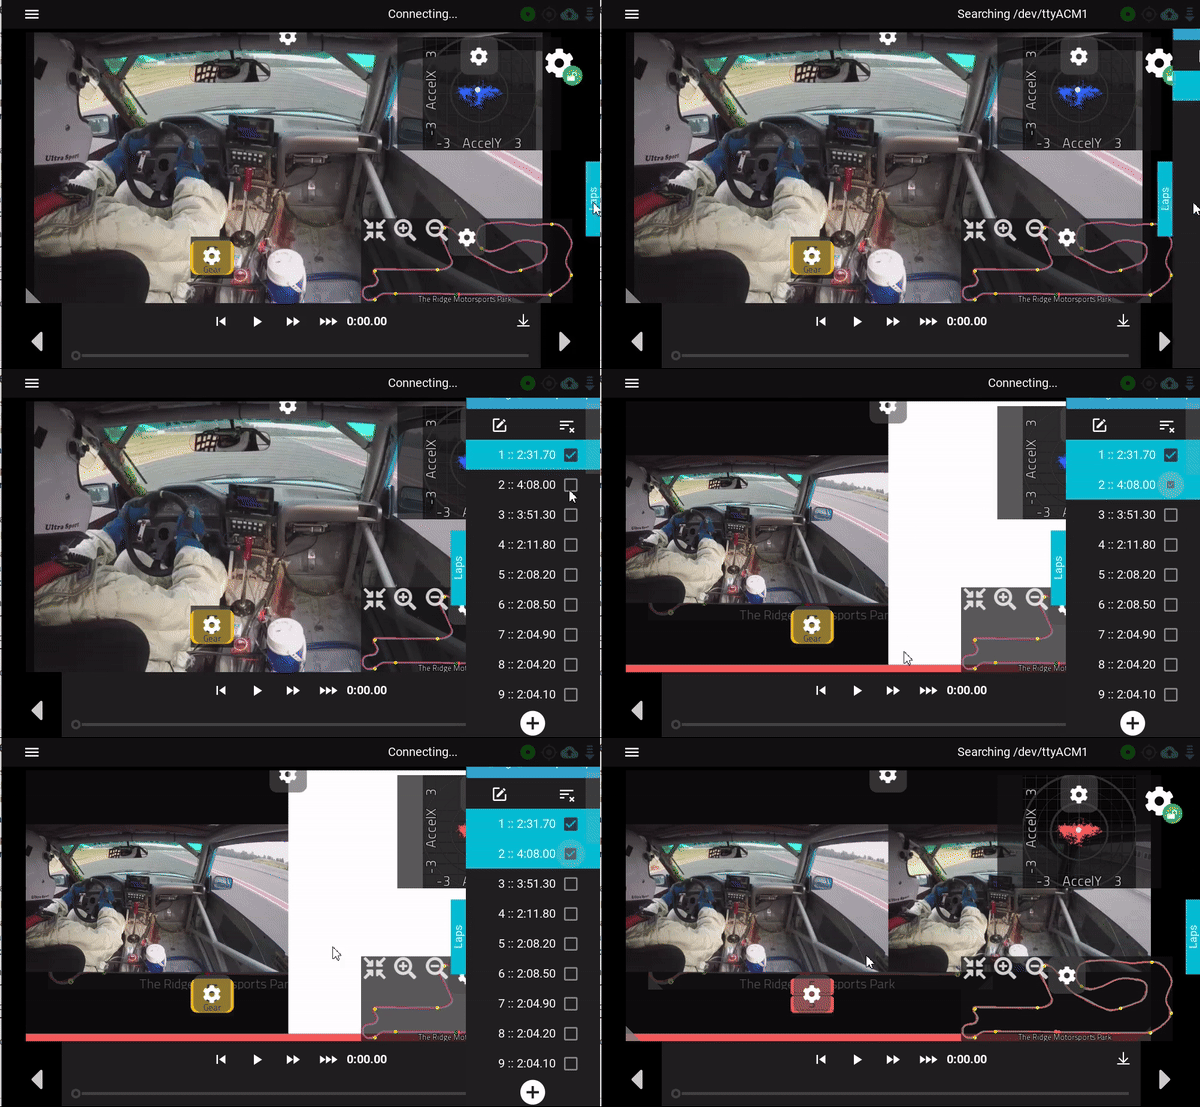
Comparative Analysis
RaceCapture app also provides advance comparative analysis options which help users to gain deeper insights into their performance over multiple laps. If your data includes lap times, this feature becomes a valuable tool in refining your racing strategy. Here's how users can take the advantage of the Comparative Analysis option:
Navigate to Comparative Analysis:
- Access the Comparative Analysis feature by selecting the laps dropdown list on the right side of the interface.
Select Laps for Comparison:
- Choose the laps you wish to compare from the available dropdown list.
- Users can compare up to 4 laps simultaneously, whether they are from the same session or different sessions.
Comprehensive Lap Comparison:
- Use the Comparative Analysis option to comprehensively assess different laps.
- Identify trends, analyze variations, and pinpoint areas for improvement in your driving performance.
Performance Shortcomings Analysis
- Uncover performance shortcomings by comparing key metrics across selected laps.
Session-to-Session Comparison:
- Compare laps from different sessions to track your progress over time.
Advance Analysis Tools:
- Users can use advance gauges and video playback, for a holistic understanding of their racing performance.
Reviewing raw data
If your data contains no laps, such as data from a static test or dyno pull, the data will be present in one entry under the loaded session. Select this entry to view the data. The RaceCapture app will auto-select the Time dimension if it detects no significant distance traveled within the data.
Exporting Data
You can export your sessions from your list of saved sessions.
Android
- Press the gear icon to access your session list
- Select the session you wish to export - Android will let you save it to a file, share to email, or any other app that accepts files.
- Note: - if you save it to your local device, you can download it to your computer using a USB cable when your Android device is set up in File Transfer mode
iOS
- Press the gear icon to access your session list
- Export this to your local iOS device storage.
- Connect your iOS device to your computer using a USB cable.
- Access the iOS device using the iTunes file sharing capability. We recommend iFunBox as an easy to use tool.
- Copy the exported log file from your iOS device to your computer.
Importing to 3rd party software
The RaceCapture log file format is plain CSV, which can be imported into 3rd party software.
- RaceRender provides native support for the RaceCapture log file format. See the exporting to RaceRender guide.
- DashWare has been used by RaceCapture customers - Rowan Hick has a write-up on Dashware integration.
System Setup
You can configure all of RaceCapture's options under Setup.
When the RaceCapture app detects the connected hardware, it will read the current setup from the device.
- The setup information is presented as a series of pages, by topic.
- When you change something on a setup page, you'll need to Write the changes back to the RaceCapture device before they take effect.
Explanation of buttons
- Save: Save the current RaceCapture setup to a file, for backup.
- Open: Load a previously saved setup file.
- Read: Read the current setup from the RaceCapture device.
- Write: Writes any updated changes back to the RaceCapture device. Note: when you see the write button glowing / pulsing, it means there are pending changes to write back to the RaceCapture device
App Preferences
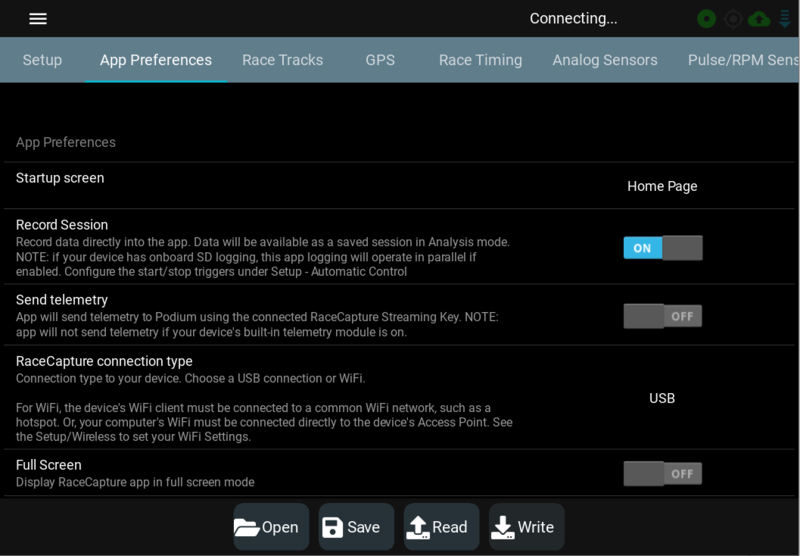
On the App preferences section, users can customize various settings as per their requirements. The setting options are as follows:
- Startup Screen: From the startup screen option, users can select any of the following as the startup screen " Homepage, dashboard, Setup & Analysis.
- Record Session: Users can toggle the recording of sessions on or off based on their preference.
- Send Telemetry: Control the transmission of telemetry to the Podium app (App will not send the telemetry if the device built-in telemetry module in on)
- Connection Type: Switch between USB and Wifi as the RaceCapture device connection type.
- Full Screen Users can enable the full screen mode of the app by turning on the full screen option present at the bottom
Race Tracks
On the Race Tracks page you can create a custom track, which will be included in the library of track maps for automatic detection. Follow these steps to set up your custom track:
Disable Automatic Race Track Detection:
- To create a custom track, turn off 'Automatic race track detection' option present at the top right corner
Add a New Track
- Press the add (+) button, present at the bottom left corner, to begin the process of adding a new track to the library.
Choose Track Style
- Upon selecting to add a new track, opt for either a circuit or Autocross (point-to-point) style course.
Select Start and Finish points
- Follow the prompts to choose the start and finish points of your track. Drive to the desired start line and press start. You can either finish immediately to create a simple track map with a single start/finish point or proceed to create more complex configurations.
Drive Through the Track
- Drive through the track as you've configured, ensuring to drive a sufficient distance away from the start/finish point before returning.
Confirm Track Creation
- Confirm your track creation by following on-screen instructions. You may choose to create a minimal track with just a start/finish point
Name Your Track
- Give your track a name and finish the setup process
By following the above mentioned simple steps, you can easily set up a custom track and can optimize your racing performance.
Note![]() : For further details, Click Here
: For further details, Click Here
GPS
The GPS page allows user to configure different parameters according to their preferences. Here's a guide on adjusting GPS settings:
GPS Sample Rate
- Adjust the GPS sample rate according to your preference. Options include 1Hz, 5Hz, 10Hz (default), 25Hz, and Disable.
 A 10Hz sample rate is recommended for the best balance of performance and accuracy.
Units Selection
- Choose between imperial and metric units based on user's measurement preferences.
Channel Configuration
- Enable or disable specific GPS channels as per user's requirements. Channels include Position, Speed, Altitude, Satellite, GPS Fix Quality, and Dilution of Precision (DOP).
- We strongly recommend keeping the default channels enabled for proper operation of analysis and lap timing Getting the best GPS performance.
By customizing these GPS settings, users can ensure accurate data capture and enhance the overall precision of their RaceCapture system.
Race Timing
In this section, users can customize the behavior of the lap timer and predictive lap timer. Also, there's an option to choose between metric and imperial units for calculating distance. Follow these instructions to set your race timing preferences:
Enable/Disable Lap Timer
- Toggle the lap timer on or off based on your preference.
Enable/Disable Predictive Lap Timer
- Choose to activate or deactivate the predictive lap timer as desired.
Distance Unit Selection
- Opt for metric or imperial units for calculating the distance channel.
Note ![]() : It is recommended to leave these features 'on' to fully utilize the capabilities of the lap timer and predictive lap timer.
: It is recommended to leave these features 'on' to fully utilize the capabilities of the lap timer and predictive lap timer.
By configuring these settings, users can customize the race timing features according to their specific needs and preferences.
Analog Sensors
This section empowers users to configure and calibrate their analog sensors as per their specific requirements. To set up analog sensors, follow these straightforward steps:
- Channel Selection: Begin by selecting the desired channel type (sensor) for configuration
- Sample Rate Configuration: Configure the sample rate to suit your preferences and data acquisition needs.
- Mode Selection: Choose from three available modes: Raw, Linear, or Mapped, based on your intended use.
- Linear Formula or Interpolated Mode: In the selected mode, input values in either linear formula or interpolated mode, depending on your Mode Selection.
By following these steps, users can configure and calibrate analog sensors to optimize their performance within the RaceCapture system
Note ![]() : For more details regarding the calibration of analog sensors, please visit Calibrating Analog Sensors
: For more details regarding the calibration of analog sensors, please visit Calibrating Analog Sensors
Pulse/RPM sensors
This section provide user the option to configure and calibrate RPM and pulse-type sensors, including those for wheel speed. Similar to the analog sensor configuration, this section allows users to:
Channel Selection
- Choose the appropriate channel for the RPM or pulse-type sensor configuration.
Sample Rate Configuration
- Configure the sample rate according to your specific requirements for accurate data capture.
Channel Mode Options
- Select the desired channel mode from RPM, Frequency, and Period (in milliseconds and microseconds).
Timer Speed Adjustment
- Adjust timer speed with options such as slow, medium, and fast to match your sensor's characteristics.
Pulses Per Revolution
- Specify the number of pulses per revolution for precise sensor calibration.
By utilizing these configuration options, users can effectively calibrate RPM and pulse-type sensors as per their specific needa.
Digital In/Out
This section provide user the option to configure the General Purpose Input/Outputs (GPIOs) for their RaceCapture system. In this section users can adjust the sample rate and specify whether the mode should be set to input or output.
By following these straightforward steps, users can configure the digital input/output settings to meet their specific requirements within the RaceCapture system.
Accel / Gyro
For optimal performance, it is recommended to mount RaceCapture square with the chassis, ensuring that the harness connectors face the front of the vehicle.
Channel Remapping
- Users have the flexibility to re-map channels by reassigning the physical axis to the mapped channel, offering customization based on specific needs.
Calibration Process
- Define the desired channel mappings
- Calibrate the accelerometer and gyro by pressing the dedicated calibrate button.
- Confirm the calibration by pressing the write button to save the settings back to RaceCapture.
CAN bus
To enable CAN bus communications, set the CAN bus setting to ON. CAN bus baud rates are configurable; common rates are 250K, 500K and 1MB. RaceCapture defaults to:
- 500K for CAN1, which is common for OEM and aftermarket ECUs
- 1MB for CAN2, which matches the standard for our CAN bus accessories.
CAN bus mapping
RaceCapture offers a powerful CAN bus mapping capability, allowing you to map CAN bus data frames to real-world sensor values.
See our comprehensive guide on Using and mapping CAN bus sensor data ![]()
OBDII
User can configure the OBDII channels setting and add a new OBDII channel within this section. To add a new OBDII channel To add a new OBDII channel, follow the instructions below:
Adding OBDII Channel
- To add a new OBDII channel, click on the + button present at the bottom
Selecting OBDII channels
- Access the channel menu and choose the desired OBDII channel from the standard list available on the OBDII configuration screen.
Selecting sample rates
- Select the sample rates from the Rate icon present in the Channel menu.
- Note
 : For channels that require a faster response rate, like RPM and TPS, we recommend 10, 25 or 50Hz. More slowly changing channels like EngineTemperature should be set to 1 or 5Hz.
Note about unsupported channels ![]()
If your ECU does not support a channel, the value will remain at 0. RaceCapture will time-out waiting for a response from the ECU, which will affect the performance of other channels. We recommend removing all unsupported channels to ensure optimal OBDII performance.
The OBDII section offers extensive customization options, including unit conversions, mode, and PID customization. For additional information, visit Here ![]()
Automatic Control
The automatic control section provides user with various options to customize their RaceCapture system's behavior. Within this section, users can:
Start/Stop Trigger Time
- Set the trigger time for starting and stopping
Logging Triggers
- Enable or disable SD card and app logging triggers.
Camera Control
- Toggle camera on/off as per the requirements
Camera Type Selection
- Choose the desired camera type directly from this section
By utilizing these options, users can configure the automatic control settings to suit their specific requirements within the RaceCapture system.
Wireless
The Wireless section offers a range of configuration options for Bluetooth, WiFi, and cellular settings.
Bluetooth
In the Bluetooth section, users can toggle Bluetooth on/off, and customize the Bluetooth name and passcode.
WiFi
In wireless section, users can enable / disable wireless support and can configure RaceCapture's WiFi for both Access Point and Client mode.
Client Mode: To enable client mode, specify the SSID and password for the network you wish to connect to and turn the client mode switch to on
Access Point Mode: To enable the RaceCapture access point, specify the SSID and a password.
Note ![]() : If specified, passwords must be minimum of 8 characters. Leave the field blank to create an open network.
: If specified, passwords must be minimum of 8 characters. Leave the field blank to create an open network.
Cellular Configuration
This section enables users to enable/disable the on-board cellular option, select the designated regional profile, and configure the Access Point Name (APN).
By utilizing these wireless configuration options, users can configure their RaceCapture system to integrate with various networks.
Real-time Telemetry
With the real-time telemetry feature you can live-stream your data to Podium so you can compare and share laps and runs with your friends. Enable by setting your Podium Device ID provided by your Podium Account ![]()
See the RaceCapture real time telemetry setup guide ![]() for details on setting up this feature.
for details on setting up this feature.
Batch Upload to Podium
Users can upload sessions directly from the RaceCapture app to Podium after completing their session. Here's how to batch upload to Podium:
- Drive some great laps at your favorite race track and then return to the pits
- Navigate to Analysis and bring up the session list
- Press the Export button next to the session you want to export
- Select Podium
- Create a new Podium event or select an existing one (either yours or a public event shared with you)
- Add a device to the selected event. If one of your devices is already in the event, you can just select it instead
- Confirm the upload, and it will upload automatically
Podium will queue the file for processing, and the laps will soon appear in the selected event.
Scripting
You can customize the behavior of your system by writing small Lua scripts; you can do things like:
- Create live math (virtual) channels that are calculated on the fly
- Broadcast Custom CAN bus messages
- Control a fan based on the temperature of an analog channel (e.g. EngineTemp)
See the Lua scripting guide ![]() for a complete how-to, including helpful examples.
for a complete how-to, including helpful examples.
Diagnostic Logs
To view the log messages provided by the RaceCapture unit, you can enable the Poll log check box. You can copy the current log to the clipboard by pressing the Copy button.
Note ![]() : These logs are useful for diagnosing issues with your RaceCapture unit, as well as seeing messages printed by your Lua script.
: These logs are useful for diagnosing issues with your RaceCapture unit, as well as seeing messages printed by your Lua script.
Firmware
Here you can update your system's firmware, perform a factory reset, which restores the system to its original settings, or perform a reboot of the unit without needing to do a power-cycle.
Keyboard shortcuts
The following keyboard sequences can be used to control the app:
Most anywhere in app
- ESC - exit / go up a level
Only active from home page
- "a" - Enter Analysis view
- "d" - Enter Dashboard view
- "s" - Enter Setup View
- "t" - Enter Status view
- "ctrl-q" - quit application
Dashboard view or Analysis view
- left arrow - Navigate left
- right arrow - Navigate right
On Dashboard view
- "k" - Send "OK" response to pit-to-car alert
- "y" - Send "Yes" response to pit-to-car alert
- "n" - Send "No" response to pit-to-car alert
Troubleshooting
Recovering from mis-configured WiFi or Bluetooth 
If you're unable to connect via mobile due to a Wireless configuration issue - for example:
- You forgot the password you set for RaceCapture's Access Point or Bluetooth link
- If RaceCapture's WiFi client needs to be re-configured for a new WiFi network
You can recover by re-configuring RaceCatpure's WiFi settings via the USB connection and the Windows or OSX app.
Steps to recover:
- Launch the RaceCapture app on Windows or OSX
- Connect RaceCapture via USB
- Allow the software to connect and read the configuration
- Under Setup, adjust the WiFi or Bluetooth settings as needed
- Write the configuration back to RaceCapture
Once you update the settings, it's recommended you test the WiFi connection using your mobile device while still connected over USB so you can further adjust settings as needed.
Extra Information
Microsoft Windows 7/8 Driver installation 
- Download and unzip drivers: Windows XP/Vista/7/8 Drivers V2
- Note for Windows 8 users - These drivers are unsigned. You will need to disable the driver signing requirement for Windows 8, or upgrade to Windows 10. Instructions
- Plug RaceCapture/Pro in to the computer.
- If prompted to install a driver, direct Windows to the folder where you unzipped the RaceCapture/Pro drivers.
- If not prompted, manually update driver:
- Open Windows Device Manager and find the Ports (COM and LPT) section. RaceCapture/Pro should be listed there, possibly with a yellow (!) over the icon.
- Right click and select 'Update Driver'.
- Follow the instructions and direct Windows to the folder where you unzipped the RaceCapture/Pro drivers.

